16,257 total views, 2 views today
In the past couple of tutorials we learned how to pass in custom data streams to a particle shader and then use that data to create a noise field. Here we’re going to continue the series with spherical GPU force fields for Unity’s particle system. Below is preview of what we’ll be making.
[IMAGE REMOVED]
I strongly recommend you read the previous tutorials (Intro to Custom Particle Vertex Streams and GPU Particle Animation with Simplex Noise) since I’ll be skipping a few minor details that I’m assuming you’re familiar with by this point.
Part 1 – Particle System
To be able to preview our effect, we of course need a particle system to test with. Nothing fancy, just a flat bed of white particles.

Create a new particle system and make sure to reset its transform. In the main module, enable Prewarm, set Start Speed to 0, randomize the Start Size to between 0.25 and 0.3, and set the Max Particles to 10,000.
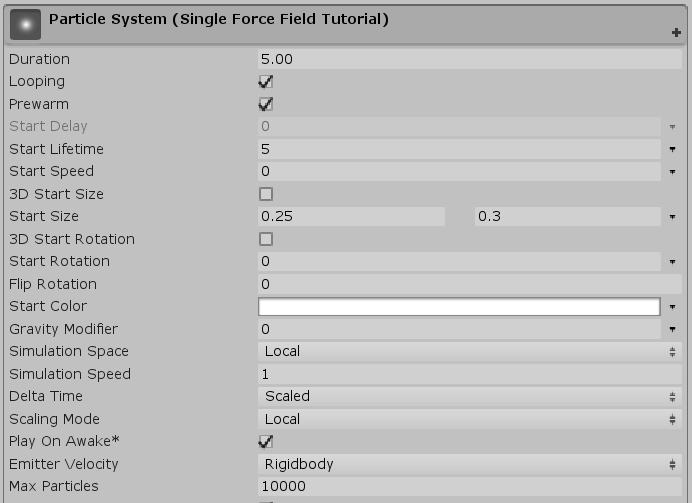
Next, set the Emission module’s Rate over Time to 2,000.

Set the Shape to Box and the Scale to (25, 0, 25).
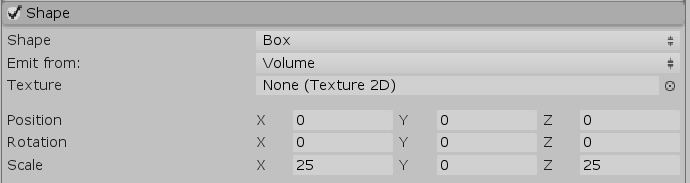
You should have your basic flat bed now. Now just enable Custom Vertex Streams and add in the Center stream. As usual, ignore the warning. Once we assign a new material with our new shader, it’ll go away.
That’s really all there is for the pre-setup phase!
Part 2 – Vertex Shader
Create a new shader with the contents of the extended base shader from the previous tutorial. You can find the code below with only the name changed.
Shader "Custom/Particles/GPU Force Field Unlit (Tutorial)"
{
	Properties
	{
		_MainTex("Texture", 2D) = "white" {}
	}

	SubShader
	{
		Tags { "Queue" = "Transparent" "RenderType" = "Opaque" }
		LOD 100

		Blend One One // Additive blending.
		ZWrite Off // Depth test off.

		Pass
		{
			CGPROGRAM
			#pragma vertex vert
			#pragma fragment frag
			// make fog work
			#pragma multi_compile_fog

			#include "UnityCG.cginc"

			struct appdata
			{
				float4 vertex : POSITION;
				fixed4 color : COLOR;
				float4 tc0 : TEXCOORD0;
				float4 tc1 : TEXCOORD1;
			};

			struct v2f
			{
				float4 tc0 : TEXCOORD0;
				float4 tc1 : TEXCOORD1;
				UNITY_FOG_COORDS(1)
				float4 vertex : SV_POSITION;
				fixed4 color : COLOR;
			};

			sampler2D _MainTex;
			float4 _MainTex_ST;

			v2f vert(appdata v)
			{
				v2f o;

				float3 vertexOffset = 0;

				v.vertex.xyz += vertexOffset;
				o.vertex = UnityObjectToClipPos(v.vertex);

				// Initialize outgoing colour with the data recieved from the particle system stored in the colour vertex input.

				o.color = v.color;

				o.tc0.xy = TRANSFORM_TEX(v.tc0, _MainTex);

				// Initialize outgoing tex coord variables.

				o.tc0.zw = v.tc0.zw;
				o.tc1 = v.tc1;

				UNITY_TRANSFER_FOG(o,o.vertex);
				return o;
			}

			fixed4 frag(v2f i) : SV_Target
			{
				// sample the texture
				fixed4 col = tex2D(_MainTex, i.tc0);

				// Multiply texture colour with the particle system's vertex colour input.

				col *= i.color;
				col *= col.a;

				// apply fog
				UNITY_APPLY_FOG(i.fogCoord, col);
				return col;
			}
			ENDCG
		}
	}
}
We’re creating a spherical force field. Since a sphere is just a radius and world-space position, let’s add in these two additional properties.
	Properties
	{
		_MainTex("Texture", 2D) = "white" {}

		_ForceFieldRadius("Force Field Radius", Float) = 4.0
		_ForceFieldPosition("Force Field Position", Vector) = (0.0, 0.0, 0.0, 0.0)
	}
Don’t forget to add the matching variables, too.
			sampler2D _MainTex;
			float4 _MainTex_ST;

			float _ForceFieldRadius;
			float3 _ForceFieldPosition;
Create a new function which takes in the particle position/center and returns a float3 (position as x, y, and z). We’ll eventually need the results in both the vertex and fragment parts, so instead of having to write the same code twice, we can just put the meat of this effect’s code in here.
			float3 GetParticleOffset(float3 particleCenter)
			{

			}
The basic logic of the force field will be this:
if (particle is within force field)
{
    move particle to edge of force field (radius)
}
We can determine if a point is within a sphere by checking if the distance between the sphere center and point is less than the sphere radius.
float distanceToParticle = distance(particleCenter, _ForceFieldPosition);
We’ll continue if the distance is less than the radius of the force field.
			float3 GetParticleOffset(float3 particleCenter)
			{
				float distanceToParticle = distance(particleCenter, _ForceFieldPosition);

				if (distanceToParticle < _ForceFieldRadius)
				{

				}
			}
Inside the if-statement (analogous to operations on the particle vertices if its center is inside the force field), we need to get the distance of the particle to the force field radius (line 1) and use the direction towards the radius (line 2) to move the particle outward equal to that distance (line 4).
					float distanceToForceFieldRadius = _ForceFieldRadius - distanceToParticle;
					float3 directionToParticle = normalize(particleCenter - _ForceFieldPosition);

					return directionToParticle * distanceToForceFieldRadius;
We return 0 (no offset, equal to float3(0.0, 0.0, 0.0)) if we aren’t within the force field (line 13).
And that’s it. Our offset-calculating function is complete (for now…).
			float3 GetParticleOffset(float3 particleCenter)
			{
				float distanceToParticle = distance(particleCenter, _ForceFieldPosition);

				if (distanceToParticle < _ForceFieldRadius)
				{
					float distanceToForceFieldRadius = _ForceFieldRadius - distanceToParticle;
					float3 directionToParticle = normalize(particleCenter - _ForceFieldPosition);

					return directionToParticle * distanceToForceFieldRadius;
				}

				return 0;
			}
We can now use this function in the vertex shader. Grab the particle center from the TEXCOORD streams (line 5), pass that into the offset function (line 7), and use the return value as the offset (9).
			v2f vert(appdata v)
			{
				v2f o;

				float3 particleCenter = float3(v.tc0.zw, v.tc1.x);

				float3 vertexOffset = GetParticleOffset3(particleCenter);

				v.vertex.xyz += vertexOffset;
				o.vertex = UnityObjectToClipPos(v.vertex);

				// Initialize outgoing colour with the data recieved from the particle system stored in the colour vertex input.

				o.color = v.color;

				o.tc0.xy = TRANSFORM_TEX(v.tc0, _MainTex);

				// Initialize outgoing tex coord variables.

				o.tc0.zw = v.tc0.zw;
				o.tc1 = v.tc1;

				UNITY_TRANSFER_FOG(o,o.vertex);
				return o;
			}
Create a new material using this shader and assign it to our particle system. Here’s what you should be able to do now.
[IMAGE REMOVED]
Part 3 – Fragment Shader
Let’s add some colour. Just like the simplex particle noise shader tutorial, we’ll interpolate the colour based on the normalized offset/displacement value. Start by adding in the appropriate properties and variables.
Material properties:
		_ForceFieldRadius("Force Field Radius", Float) = 4.0
		_ForceFieldPosition("Force Field Position", Vector) = (0.0, 0.0, 0.0, 0.0)

		[HDR] _ColourA("Color A", Color) = (0.0, 0.0, 0.0, 0.0)
		[HDR] _ColourB("Color B", Color) = (1.0, 1.0, 1.0, 1.0)
Shader variables:
			float _ForceFieldRadius;
			float3 _ForceFieldPosition;

			float4 _ColourA;
			float4 _ColourB;
The normalized offset value is simply the distance to the force field radius over the radius. If we change our function return type to float4 (line 1), we can store the offset in xyz (line 13), and the normalized offset scalar in w (line 14).
			float4 GetParticleOffset(float3 particleCenter)
			{
				float distanceToParticle = distance(particleCenter, _ForceFieldPosition);

				if (distanceToParticle < _ForceFieldRadius)
				{
					float distanceToForceFieldRadius = _ForceFieldRadius - distanceToParticle;
					float3 directionToParticle = normalize(particleCenter - _ForceFieldPosition);

					float4 particleOffset;

					particleOffset.xyz = directionToParticle * distanceToForceFieldRadius;
					particleOffset.w = distanceToForceFieldRadius / _ForceFieldRadius;

					return particleOffset;
				}

				return 0;
			}
Then, in the fragment function, it’s just a matter of retrieving this value and using it to interpolate between the two colours. You’ll probably notice at this point a lot of this code is similar to the simplex noise tutorial.
			fixed4 frag(v2f i) : SV_Target
			{
				// sample the texture
				fixed4 col = tex2D(_MainTex, i.tc0);

				// Multiply texture colour with the particle system's vertex colour input.

				col *= i.color;

				float3 particleCenter = float3(i.tc0.zw, i.tc1.x);
				float particleOffsetNormalizedLength = GetParticleOffset2(particleCenter).w;

				col = lerp(col * _ColourA, col * _ColourB, particleOffsetNormalizedLength);

				col *= col.a;

				// apply fog
				UNITY_APPLY_FOG(i.fogCoord, col);
				return col;
			}
So now, with just those small adjustments, you can see your particle system in colour.
[IMAGE REMOVED]
Part 4 – Optimization and Extended Features
I kept the shader as simple as possible in the earlier parts so it was easy to follow along, but there a few things we can change to better conform to best practices when programming on the GPU while adding support for negative radius values (inverted force fields).
First off, we can get rid of our if-statement by simply getting the max between the particle’s distance to the force field and 0 (line 7). This works because if the distance to the particle is greater than the radius (the particle is outside the force field), we get a negative value which ends up being clamped up to 0. You’ll generally want to avoid branching when working with the super-parallelism of GPUs so you can “blast” the data through.
A minor detail is to add a small value to the radius when using it as the divisor to prevent undefined behaviour should it ever be 0 (line 12).
			float4 GetParticleOffset(float3 particleCenter)
			{
				float distanceToParticle = distance(particleCenter, _ForceFieldPosition);
				float3 directionToParticle = normalize(particleCenter - _ForceFieldPosition);

				float distanceToForceFieldRadius = _ForceFieldRadius - distanceToParticle;
				distanceToForceFieldRadius = max(distanceToForceFieldRadius, 0.0);

				float4 particleOffset;

				particleOffset.xyz = directionToParticle * distanceToForceFieldRadius;
				particleOffset.w = distanceToForceFieldRadius / (_ForceFieldRadius + 0.0001); // Add small value to prevent divide by zero and undefined colour/behaviour at r = 0.0.

				return particleOffset;
			}
Next, we can allow for negative radius values which, instead of moving particles away from the center of the force field, will suck them in. We do this by first processing the radius as an absolute (positive) value (lines 4 and 8), and then multiplying by the sign (which will return -1.0 or 1.0, as seen on line 11) immediately before using it to scale the offset direction.
			float4 GetParticleOffset(float3 particleCenter)
			{
				float distanceToParticle = distance(particleCenter, _ForceFieldPosition);
				float forceFieldRadiusAbs = abs(_ForceFieldRadius);

				float3 directionToParticle = normalize(particleCenter - _ForceFieldPosition);

				float distanceToForceFieldRadius = forceFieldRadiusAbs - distanceToParticle;
				distanceToForceFieldRadius = max(distanceToForceFieldRadius, 0.0);

				distanceToForceFieldRadius *= sign(_ForceFieldRadius);

				float4 particleOffset;

				particleOffset.xyz = directionToParticle * distanceToForceFieldRadius;
				particleOffset.w = distanceToForceFieldRadius / (_ForceFieldRadius + 0.0001); // Add small value to prevent divide by zero and undefined colour/behaviour at r = 0.0.

				return particleOffset;
			}
Behold! Inverted force fields.
[IMAGE REMOVED]
Here’s the completed shader.
Shader "Custom/Particles/GPU Force Field Unlit (Tutorial)"
{
	Properties
	{
		_MainTex("Texture", 2D) = "white" {}

		_ForceFieldRadius("Force Field Radius", Float) = 4.0
		_ForceFieldPosition("Force Field Position", Vector) = (0.0, 0.0, 0.0, 0.0)

		[HDR] _ColourA("Color A", Color) = (0.0, 0.0, 0.0, 0.0)
		[HDR] _ColourB("Color B", Color) = (1.0, 1.0, 1.0, 1.0)
	}

	SubShader
	{
		Tags { "Queue" = "Transparent" "RenderType" = "Opaque" }
		LOD 100

		Blend One One // Additive blending.
		ZWrite Off // Depth test off.

		Pass
		{
			CGPROGRAM
			#pragma vertex vert
			#pragma fragment frag
			// make fog work
			#pragma multi_compile_fog

			#include "UnityCG.cginc"

			struct appdata
			{
				float4 vertex : POSITION;
				fixed4 color : COLOR;
				float4 tc0 : TEXCOORD0;
				float4 tc1 : TEXCOORD1;
			};

			struct v2f
			{
				float4 tc0 : TEXCOORD0;
				float4 tc1 : TEXCOORD1;
				UNITY_FOG_COORDS(1)
				float4 vertex : SV_POSITION;
				fixed4 color : COLOR;
			};

			sampler2D _MainTex;
			float4 _MainTex_ST;

			float _ForceFieldRadius;
			float3 _ForceFieldPosition;

			float4 _ColourA;
			float4 _ColourB;

			float4 GetParticleOffset(float3 particleCenter)
			{
				float distanceToParticle = distance(particleCenter, _ForceFieldPosition);
				float forceFieldRadiusAbs = abs(_ForceFieldRadius);

				float3 directionToParticle = normalize(particleCenter - _ForceFieldPosition);

				float distanceToForceFieldRadius = forceFieldRadiusAbs - distanceToParticle;
				distanceToForceFieldRadius = max(distanceToForceFieldRadius, 0.0);

				distanceToForceFieldRadius *= sign(_ForceFieldRadius);

				float4 particleOffset;

				particleOffset.xyz = directionToParticle * distanceToForceFieldRadius;
				particleOffset.w = distanceToForceFieldRadius / (_ForceFieldRadius + 0.0001); // Add small value to prevent divide by zero and undefined colour/behaviour at r = 0.0.

				return particleOffset;
			}

			v2f vert(appdata v)
			{
				v2f o;

				float3 particleCenter = float3(v.tc0.zw, v.tc1.x);

				float3 vertexOffset = GetParticleOffset(particleCenter);

				v.vertex.xyz += vertexOffset;
				o.vertex = UnityObjectToClipPos(v.vertex);

				// Initialize outgoing colour with the data recieved from the particle system stored in the colour vertex input.

				o.color = v.color;

				o.tc0.xy = TRANSFORM_TEX(v.tc0, _MainTex);

				// Initialize outgoing tex coord variables.

				o.tc0.zw = v.tc0.zw;
				o.tc1 = v.tc1;

				UNITY_TRANSFER_FOG(o,o.vertex);
				return o;
			}

			fixed4 frag(v2f i) : SV_Target
			{
				// sample the texture
				fixed4 col = tex2D(_MainTex, i.tc0);

				// Multiply texture colour with the particle system's vertex colour input.

				col *= i.color;

				float3 particleCenter = float3(i.tc0.zw, i.tc1.x);
				float particleOffsetNormalizedLength = GetParticleOffset(particleCenter).w;

				col = lerp(col * _ColourA, col * _ColourB, particleOffsetNormalizedLength);

				col *= col.a;

				// apply fog
				UNITY_APPLY_FOG(i.fogCoord, col);
				return col;
			}
			ENDCG
		}
	}
}
Part 5 – GPU Force Field GameObject
We could leave our force field as-is, but it’s not very intuitive to use right now. Let’s create a small script to help us manipulate it as if it were a game object. This’ll allow us to easily visualize it in the scene and scale it just like any other object.
using System.Collections;
using System.Collections.Generic;
using UnityEngine;

[ExecuteInEditMode]
public class GPUParticleForceField : MonoBehaviour
{
    public Material material;

    void LateUpdate()
    {
        material.SetFloat("_ForceFieldRadius", transform.lossyScale.x);
        material.SetVector("_ForceFieldPosition", transform.position);
    }

    void OnDrawGizmos()
    {
        Gizmos.DrawWireSphere(transform.position, transform.lossyScale.x);
    }
}
Let’s walk through the code.
The ExecuteInEditMode attribute (line 5) allows the script to be executed in full even when the editor is not in play mode. This way, we can use the script and see the results immediately.
I take a public reference to the force field material (line 8) for which this CPU-side object is used. I’ll be settings the radius and position properties for this material inside LateUpdate to account for any changes and movement that may be applied to this object (line 10).
The scalar float radius and vector position are set using the world scale of the object’s transform (x-axis) and position respectively (lines 12 and 13). Remember that the scale is the total size, which is why I use half the value for the radius (else we’d be passing the intended diameter as the radius).
I use OnDrawGizmos (line 16) to draw a wire sphere representing the sphere using the position and x-axis world scale of the transform (line 18).
using System.Collections;
using System.Collections.Generic;
using UnityEngine;

[ExecuteInEditMode]
public class GPUParticleForceField : MonoBehaviour
{
    public Material material;

    void LateUpdate()
    {
        material.SetFloat("_ForceFieldRadius", transform.lossyScale.x / 2.0f);
        material.SetVector("_ForceFieldPosition", transform.position);
    }

    void OnDrawGizmos()
    {
        Gizmos.DrawWireSphere(transform.position, transform.lossyScale.x / 2.0f);
    }
}
Now just attach it to any game object and drag the material into the reference slot, and… ta-da!
[IMAGE REMOVED]
Part 6 – Particle Noise
There’s not a whole lot left to do at this point, so let’s make a few tweaks to our particle system to get a similar look to the preview.
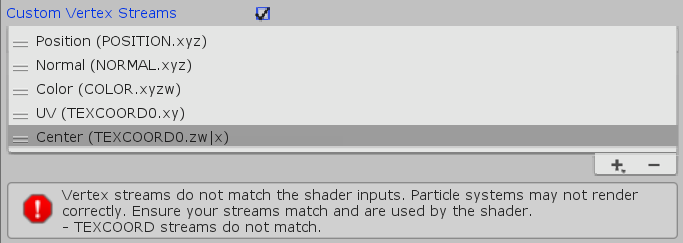
Enable the Colour over Lifetime module and apply a quick fade in, sustain, followed by a moderate-length fade out.
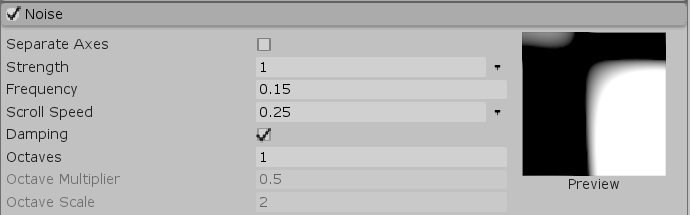
Enable the Noise module and change the Frequency to 0.15 and the Scroll Speed to 0.25.
And with that, we’re done!
[IMAGE REMOVED]
In the next tutorial, we’ll learn how to add support for multiple GPU force fields. Stay tuned!
Hi,
thank you very much for this tutorial.
I’m an indie developer and this effect inspired me a game mechanic.
So here is my question : can i use your shader in a commercial game ?
(I’m not really good in english, so sorry if it seems rude or something)
Have a great day,
Theophile.
Hi Theophile,
Sure! And thanks for asking.
Regards,
– Mirza
Hi, how can I translate shaders into HDRP?
Do I also choose unlit shader or unlit graph?