26,804 total views, 2 views today
In this tutorial we’ll be learning how to use Custom Vertex Streams for particle systems in Unity. Vertex streams are set through a particle system’s Renderer module and can be used to pass in additional per-particle data to a shader.
The shader can then use this data to create a range of effects unique to each particle in the system – all processed on the GPU at blazing fast speeds.
[IMAGE REMOVED]
Naturally, we’ll need to have a shader that actually uses this data for anything to happen. While the results of this tutorial aren’t super impressive, this is only the first step to creating some incredible effects covered in later tutorials.
Let’s get started!
Part 1 – Basics
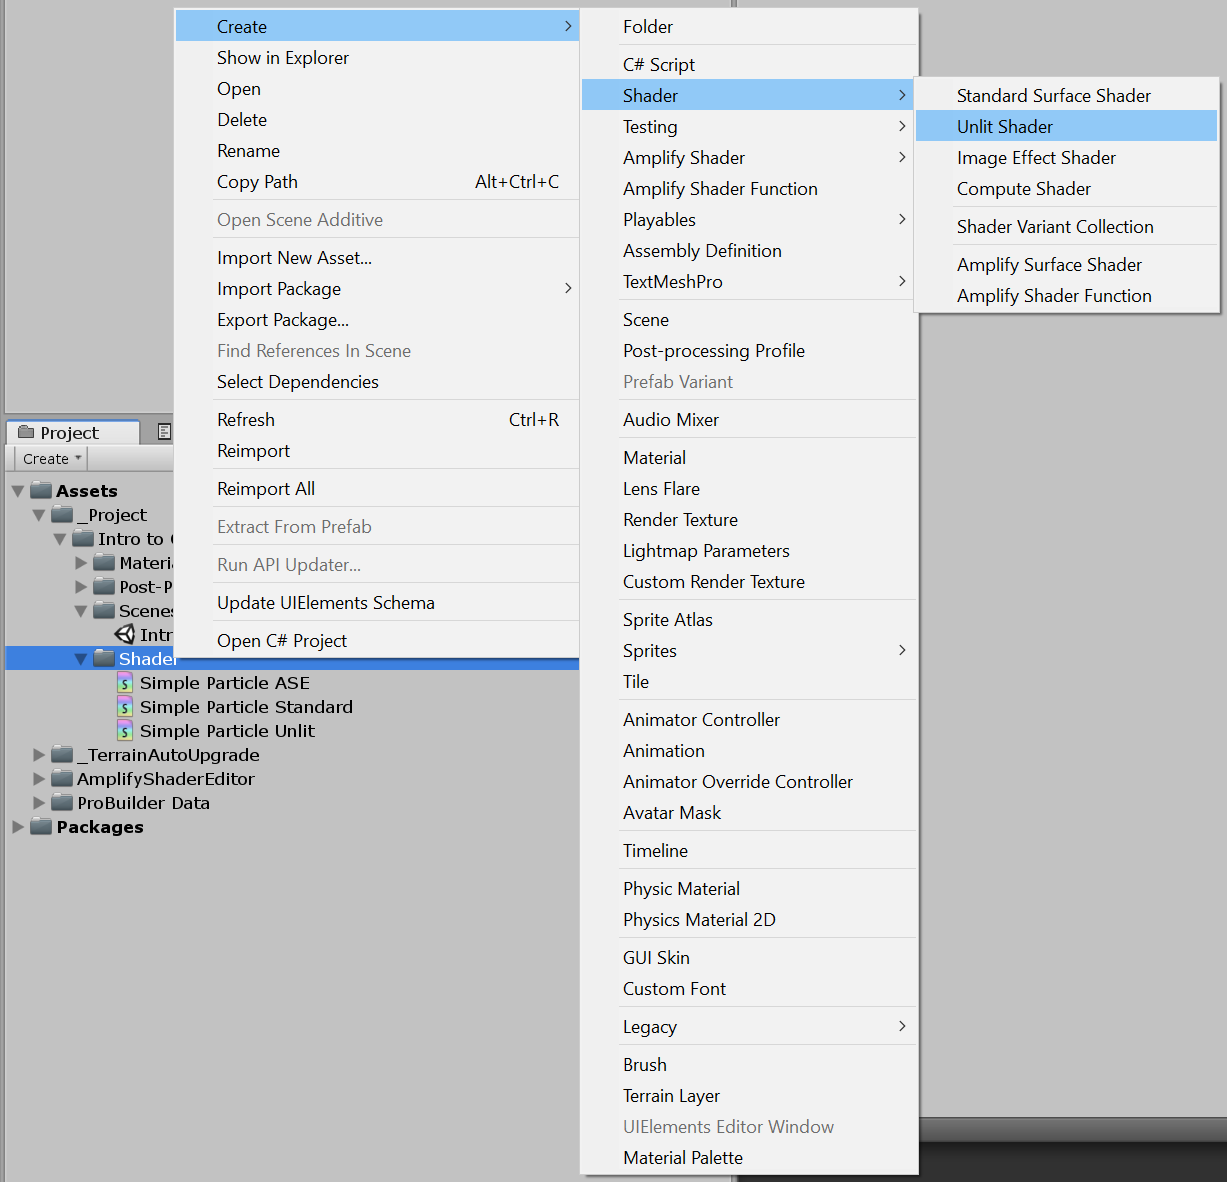
First, let’s make a very simple unlit particle shader based on Unity’s template. Right click anywhere in your project and Create -> Shader -> Unlit Shader.
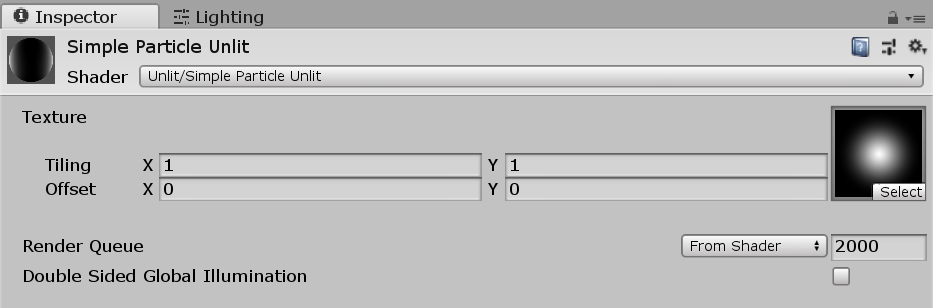
I’ve named the file, “Simple Particle Unlit”. If you open it up, this is what you should see.
Shader "Unlit/Simple Particle Unlit"
{
	Properties
	{
		_MainTex ("Texture", 2D) = "white" {}
	}
	SubShader
	{
		Tags { "RenderType"="Opaque" }
		LOD 100

		Pass
		{
			CGPROGRAM
			#pragma vertex vert
			#pragma fragment frag
			// make fog work
			#pragma multi_compile_fog

			#include "UnityCG.cginc"

			struct appdata
			{
				float4 vertex : POSITION;
				float2 uv : TEXCOORD0;
			};

			struct v2f
			{
				float2 uv : TEXCOORD0;
				UNITY_FOG_COORDS(1)
				float4 vertex : SV_POSITION;
			};

			sampler2D _MainTex;
			float4 _MainTex_ST;

			v2f vert (appdata v)
			{
				v2f o;
				o.vertex = UnityObjectToClipPos(v.vertex);
				o.uv.xy = TRANSFORM_TEX(v.uv, _MainTex);
				UNITY_TRANSFER_FOG(o,o.vertex);
				return o;
			}

			fixed4 frag (v2f i) : SV_Target
			{
				// sample the texture
				fixed4 col = tex2D(_MainTex, i.uv);
				// apply fog
				UNITY_APPLY_FOG(i.fogCoord, col);
				return col;
			}
			ENDCG
		}
	}
}
Create a new material, assign the shader, and set the texture property to the default particle texture.
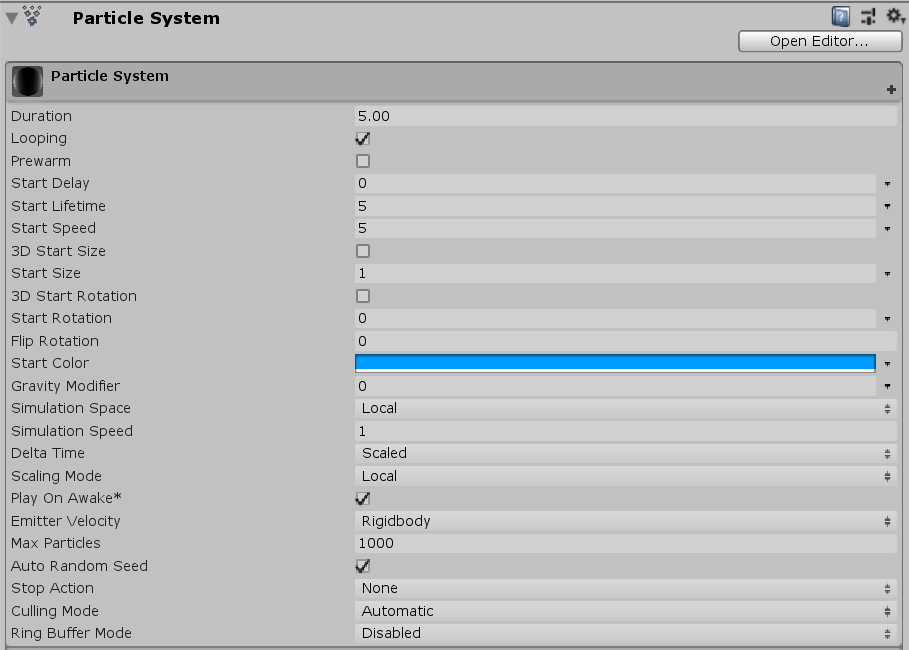
Now create a new particle system and assign this material in its Renderer module.

Here’s what you should see.
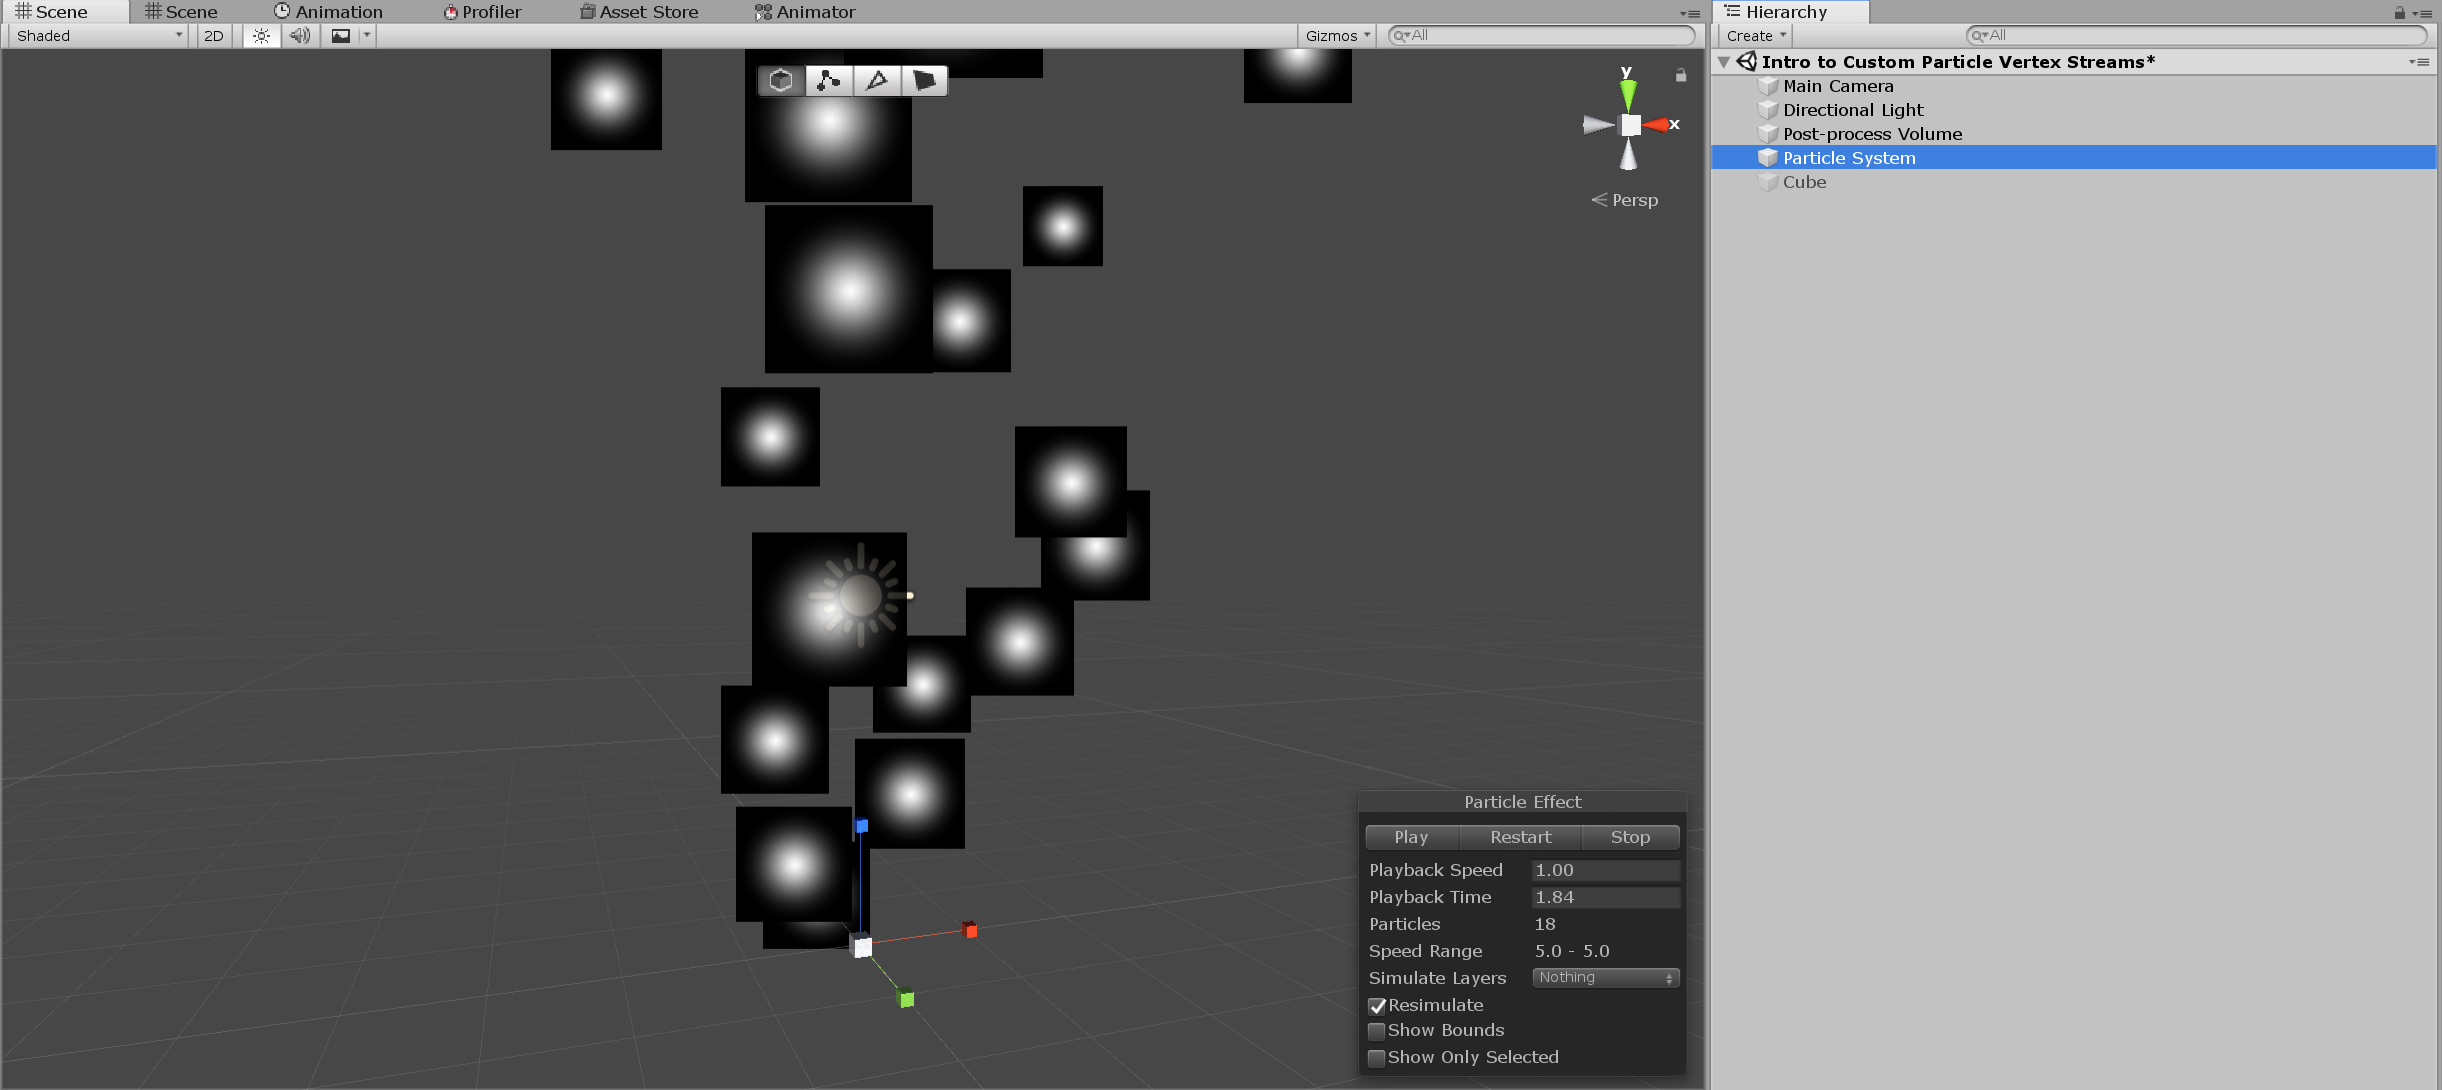
There are obviously some transparency issues, but for this first part I’m making a shader purely to demonstrate custom vertex stream basics. We’ll fix these issues later.
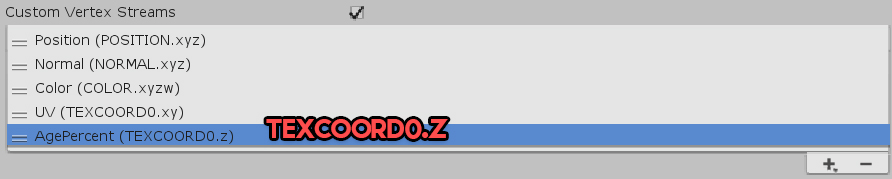
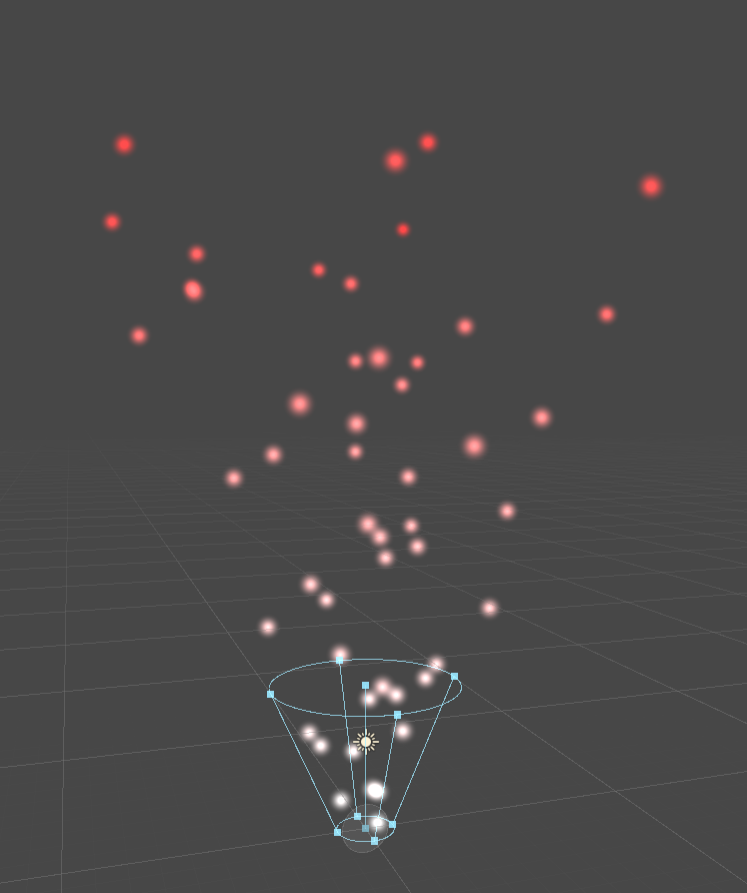
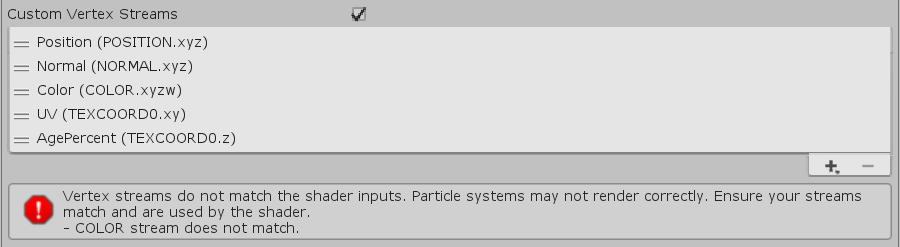
In the same particle system’s Renderer module, enable Custom Vertex Streams, and then add the AgePercent stream under the Lifetime category by clicking the “+” on the bottom right. The AgePercent is simply a 1D value representing the normalized [0.0, 1.0] “life” of the particle. It’s 0.0 at birth, 0.5 mid-way, and 1.0 at death.
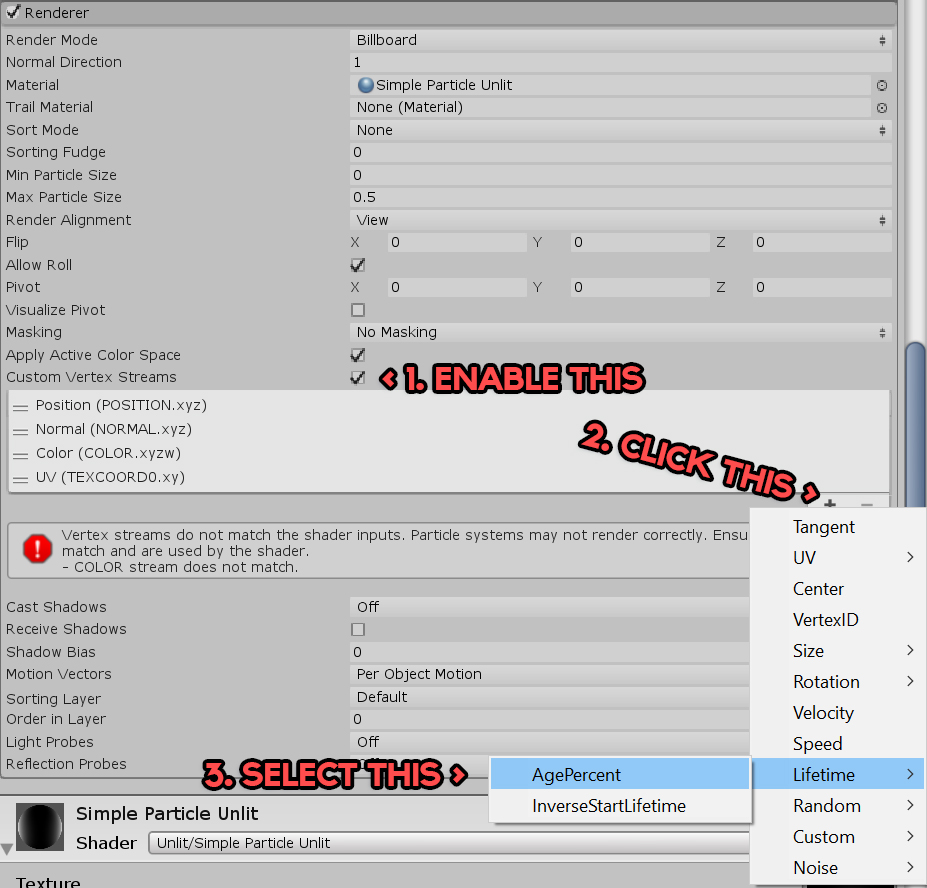
Ignore that scary red warning about vertex streams not matching the shader input. We know what we’re doing (and we’ll fix it later, etc.).
Now that we’re passing the stream to the shader, we need to actually recieve it and do something with the data. You’ll notice in the vertex stream display the data is tightly packed. The actual 2D UV coordinates are in TEXCOORD0.xy, whereas AgePercent is in z. We’ll need to remember this so we know where and how to get this data in the shader.
Each texcoord can be, at most, a 4D vector (aka, float4 in CG/HLSL as [x, y, z, w]). If we were to add an additional 1D stream it would be in TEXCOORD0.w. If the data was larger than what was available of the current texcoord, it would carry over to the next (texcoord1, texcoord2, etc.) as a remainder. Below is an example of that (don’t actually add these vertex streams!).
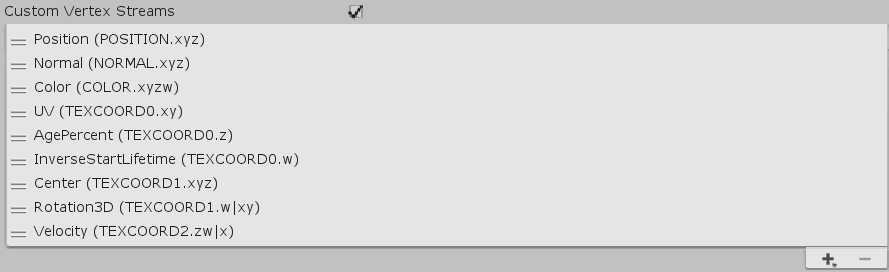
You can see InverseStartLifetime (1D) added to TEXCOORD0.w, Center (3D) added to TEXCOORD1.xyz, and then Rotation3D (3D) added partially to TEXCOORD1 (w) and then partially to TEXCOORD2 (xy). The (w|xy) indicates that the xy belong to the next texcoord (which would be TEXCOORD2), even though it says “TEXCOORD1.w|xy”. That’s why for Velocity you see it starting off at TEXCOORD2.zw, since Rotation3D is partially stored in TEXCOORD1.xy. Velocity is also partially stored in TEXCOORD3 (x).
This can be a little confusing since Rotation3D’s xyz values are in TEXCOORD1.w (Rotation3D’s, x) and TEXCOORD2.xy (Rotation3D’s yz). Something similar happens to Velocity’s xyz which is stored in TEXCOORD2.zw (xy) and TEXCOORD3.x (z).
Hopefully that’s not too confusing.
Anywho~ let’s focus on AgePercent for now. Head back over to our custom shader and let’s get to work.
As it is, the shader only processes x and y of TEXCOORD0 for the actual texture UV coordinates. AgePercent is in TEXCOORD0.z, so we need to change float2 to float3 in both the vertex input and output structs (appdata and v2f respectively). See below for this simple change.
			struct appdata
			{
				float4 vertex : POSITION;
				float3 uv : TEXCOORD0;
			};

			struct v2f
			{
				float3 uv : TEXCOORD0;
				UNITY_FOG_COORDS(1)
				float4 vertex : SV_POSITION;
			};
Next, we need to initialize uv within the vertex part of the shader so that it contains the appropriate value before being passed to the fragment part (these “parts” are actually vertex and fragment/pixel shaders stored in a single .shader file). Remember that vertex operations are processed before rasterization.
			v2f vert (appdata v)
			{
				v2f o;
				o.vertex = UnityObjectToClipPos(v.vertex);
				o.uv.xy = TRANSFORM_TEX(v.uv, _MainTex);

				// Initialize outgoing uv.z (which holds particle age percent).

				o.uv.z = v.uv.z;

				UNITY_TRANSFER_FOG(o,o.vertex);
				return o;
			}
Finally, in the fragment part (aka, the pixel shader part where we actually colour things), we can use this data to do… something. Here I’m using it to interpolate the colour of the particle from that of the texture (col), to red based on it’s age.
			fixed4 frag (v2f i) : SV_Target
			{
				// sample the texture
				fixed4 col = tex2D(_MainTex, i.uv);

				float particleAgePercent = i.uv.z;
				float4 colourRed = float4(1, 0, 0, 1);

				// Lerp from texture colour to red based on particle age percent.

				col = lerp(col, colourRed * col.a, particleAgePercent);

				// apply fog
				UNITY_APPLY_FOG(i.fogCoord, col);
				return col;
			}
With these changes, this is what the shader should look like, in full.
Shader "Unlit/Simple Particle Unlit"
{
	Properties
	{
		_MainTex ("Texture", 2D) = "white" {}
	}
	SubShader
	{
		Tags { "RenderType"="Opaque" }
		LOD 100

		Pass
		{
			CGPROGRAM
			#pragma vertex vert
			#pragma fragment frag
			// make fog work
			#pragma multi_compile_fog

			#include "UnityCG.cginc"

			struct appdata
			{
				float4 vertex : POSITION;
				float3 uv : TEXCOORD0;
			};

			struct v2f
			{
				float3 uv : TEXCOORD0;
				UNITY_FOG_COORDS(1)
				float4 vertex : SV_POSITION;
			};

			sampler2D _MainTex;
			float4 _MainTex_ST;

			v2f vert (appdata v)
			{
				v2f o;
				o.vertex = UnityObjectToClipPos(v.vertex);
				o.uv.xy = TRANSFORM_TEX(v.uv, _MainTex);

				// Initialize outgoing uv.z (which holds particle age percent).

				o.uv.z = v.uv.z;

				UNITY_TRANSFER_FOG(o,o.vertex);
				return o;
			}

			fixed4 frag (v2f i) : SV_Target
			{
				// sample the texture
				fixed4 col = tex2D(_MainTex, i.uv);

				float particleAgePercent = i.uv.z;
				float4 colourRed = float4(1, 0, 0, 1);

				// Lerp from texture colour to red based on particle age percent.

				col = lerp(col, colourRed * col.a, particleAgePercent);

				// apply fog
				UNITY_APPLY_FOG(i.fogCoord, col);
				return col;
			}
			ENDCG
		}
	}
}
And here are our results.
[IMAGE REMOVED]
Probably not super impressive, but we’re only just getting started.
Part 2 – Transparency, Render Queue, and Depth Testing
Before we move on, let’s fix some of the issues we’ve ignored- starting with transparency. All we need to do to get proper alpha from the input texture is to add a blend mode.
To quote Unity’s ShaderLab documentation on blending:
When graphics are rendered, after all Shaders have executed and all Textures have been applied, the pixels are written to the screen. How they are combined with what is already there is controlled by the Blend command.
We can choose between a few of the most common ones, such as additive (One One), alpha blended (SrcAlpha OneMinusSrcAlpha), and alpha blended premultiplied (One OneMinusSrcAlpha). The best options for a texture on a black background (such as the default particle texture) are additive and premultiplied.
Let’s go with additive since it’s the most straightforward, looks the best against a darkened scene, and works well with HDR + threshold bloom as pixels are stacked on top additively (hence the name).
		Tags { "RenderType"="Opaque" }
		LOD 100

		Blend One One // Additive blending.
Back in the Unity editor, I’ve made the size of the particles larger to emphasize a problem we still have. While the particles are clearly rendered additively as is apparent by the “blob” or “lava lamp”-like rendering, they aren’t actually transparent and the billboarded quad is still clearly outlined.
To fix this, we need to disable depth testing.
		Tags { "RenderType"="Opaque" }
		LOD 100

		Blend One One // Additive blending.
		ZWrite Off // Depth test off.
Voila! It worked.
Here’s what it should look like now on your end without the particle size having been changed.
Although it may not be apparent, our shader will still have issues sorting against other transparent objects in the scene (such as sprites). Fixing this is a simple matter of changing the Render Queue on the material to the Transparent layer.

We can do this automatically from the shader by adding the Queue = Transparent tag.
Tags { "Queue" = "Transparent" "RenderType" = "Opaque" }
Part 3 – Vertex Colour / Tinting
All that’s left to do is fix the warning about our vertex streams not matching the shader inputs.
The easiest way would be to simply remove the Color stream by selecting it in the editor and hitting the little “-” next to the “+”.
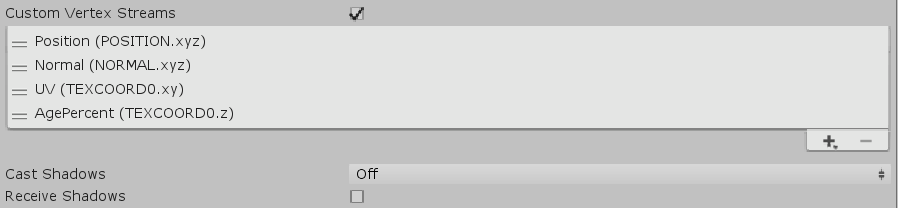
Problem solved! However, I want to show you how to actually fix this error (so don’t delete the Color stream!).
If you familiar with the very basics of Unity’s particle system, you know that you can define a start colour that all particles are initialized to, in addition to a colour over lifetime and colour over speed. With our current shader none of these settings will have any effect since this data is passed through the COLOR vertex input.
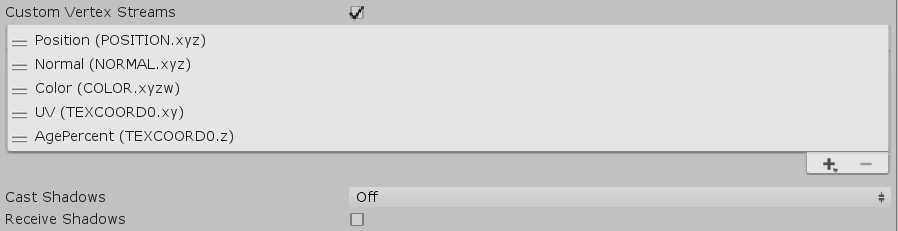
The warning we were getting was basically telling us that nowhere in our shader are we recieving this data, even though the particle system was setup to send it (as seen in the preconfigured Custom Vertex Streams which includes Position, Normal, Color, and UV). That’s why when we removed it, the warning went away. This also works the other way around in that if we were recieving the Color stream inside our shader but weren’t sending it, we’d get the same warning.
Let’s update our shader so that we recieve the Color input stream from the particle system.
			struct appdata
			{
				float4 vertex : POSITION;
				fixed4 color : COLOR;
				float3 uv : TEXCOORD0;
			};

			struct v2f
			{
				float3 uv : TEXCOORD0;
				UNITY_FOG_COORDS(1)
				float4 vertex : SV_POSITION;
				fixed4 color : COLOR;
			};
We then need to initialize the outgoing v2f struct (sent to the fragment part) with the input to the vertex part (which is what we’re recieving from the particle system).
			v2f vert (appdata v)
			{
				v2f o;
				o.vertex = UnityObjectToClipPos(v.vertex);

				// Initialize outgoing colour with the data recieved from the particle system stored in the colour vertex input.

				o.color = v.color;

				o.uv.xy = TRANSFORM_TEX(v.uv, _MainTex);

				// Initialize outgoing uv.z (which holds particle age percent).

				o.uv.z = v.uv.z;

				UNITY_TRANSFER_FOG(o,o.vertex);
				return o;
			}
Going back to the particle system in Unity’s editor, you’ll notice the warning is gone.
Now try set the Start Color in the Main module to blue.
You may have already figured this out by now, but nothing will change. That’s because we’re receiving the data, but we’re still not doing anything with it in the fragment part. Let’s change that so that the colour we use on the particle system component tints the texture colour before it’s interpolated to red.
			fixed4 frag (v2f i) : SV_Target
			{
				// sample the texture
				fixed4 col = tex2D(_MainTex, i.uv);

				// Multiply texture colour with the particle system's vertex colour input.

				col *= i.color;

				float particleAgePercent = i.uv.z;
				float4 colourRed = float4(1, 0, 0, 1);

				// Lerp from texture colour to red based on particle age percent.

				col = lerp(col, colourRed * col.a, particleAgePercent);

				// apply fog
				UNITY_APPLY_FOG(i.fogCoord, col);
				return col;
			}
You should now see this in the editor. Notice how the particles start out tinted blue just as we intended?
We’ve successfully written our very own particle shader that can process custom vertex streams!
Here’s the shader so far.
Shader "Unlit/Simple Particle Unlit"
{
	Properties
	{
		_MainTex ("Texture", 2D) = "white" {}
	}
	SubShader
	{
		Tags { "Queue" = "Transparent" "RenderType" = "Opaque" }
		LOD 100

		Blend One One // Additive blending.
		ZWrite Off // Depth test off.

		Pass
		{
			CGPROGRAM
			#pragma vertex vert
			#pragma fragment frag
			// make fog work
			#pragma multi_compile_fog

			#include "UnityCG.cginc"

			struct appdata
			{
				float4 vertex : POSITION;
				fixed4 color : COLOR;
				float3 uv : TEXCOORD0;
			};

			struct v2f
			{
				float3 uv : TEXCOORD0;
				UNITY_FOG_COORDS(1)
				float4 vertex : SV_POSITION;
				fixed4 color : COLOR;
			};

			sampler2D _MainTex;
			float4 _MainTex_ST;

			v2f vert (appdata v)
			{
				v2f o;
				o.vertex = UnityObjectToClipPos(v.vertex);

				// Initialize outgoing colour with the data recieved from the particle system stored in the colour vertex input.

				o.color = v.color;

				o.uv.xy = TRANSFORM_TEX(v.uv, _MainTex);

				// Initialize outgoing uv.z (which holds particle age percent).

				o.uv.z = v.uv.z;

				UNITY_TRANSFER_FOG(o,o.vertex);
				return o;
			}

			fixed4 frag (v2f i) : SV_Target
			{
				// sample the texture
				fixed4 col = tex2D(_MainTex, i.uv);

				// Multiply texture colour with the particle system's vertex colour input.

				col *= i.color;

				float particleAgePercent = i.uv.z;
				float4 colourRed = float4(1, 0, 0, 1);

				// Lerp from texture colour to red based on particle age percent.

				col = lerp(col, colourRed * col.a, particleAgePercent);

				// apply fog
				UNITY_APPLY_FOG(i.fogCoord, col);
				return col;
			}
			ENDCG
		}
	}
}
Part 4 – Vertex Animation
Still, this isn’t very impressive because now that we can recieve and process the particle system’s input colour, we could get the exact same result by reverting the Start Color to solid white, commenting out the line that interpolates from col to red, and using the Color over Lifetime module to transition from red to blue over the normalized particle lifetime.

If we went this far just to create a custom shader, it should be able to do more™. Let’s try making something that can’t easily be done by simply changing a few things on the component or by scripting on the CPU.
So far we’ve learned how to manipulate the pixels of a rendered particle using custom vertex streams. Let’s do something with its vertices. In the vertex part, before transforming the position (o.vertex = UnityObjectToClipPos(v.vertex)), add this code.
				// Bizarre vertex animation.

				float sineFrequency = 5.0;
				float sineAmplitude = 4.0;

				float sineOffset = sin(_Time.y * sineFrequency) * sineAmplitude;
				float agePercent = v.uv.z;

				float3 vertexOffset = float3(0, sineOffset * agePercent, 0);

				v.vertex.xyz += vertexOffset;
Note: _Time is a 4D built-in Unity shader variable, where the Y component is unaltered. We could’ve used _SinTime.w, which is the unaltered sine of time, but I wanted to be explicit for the tutorial.
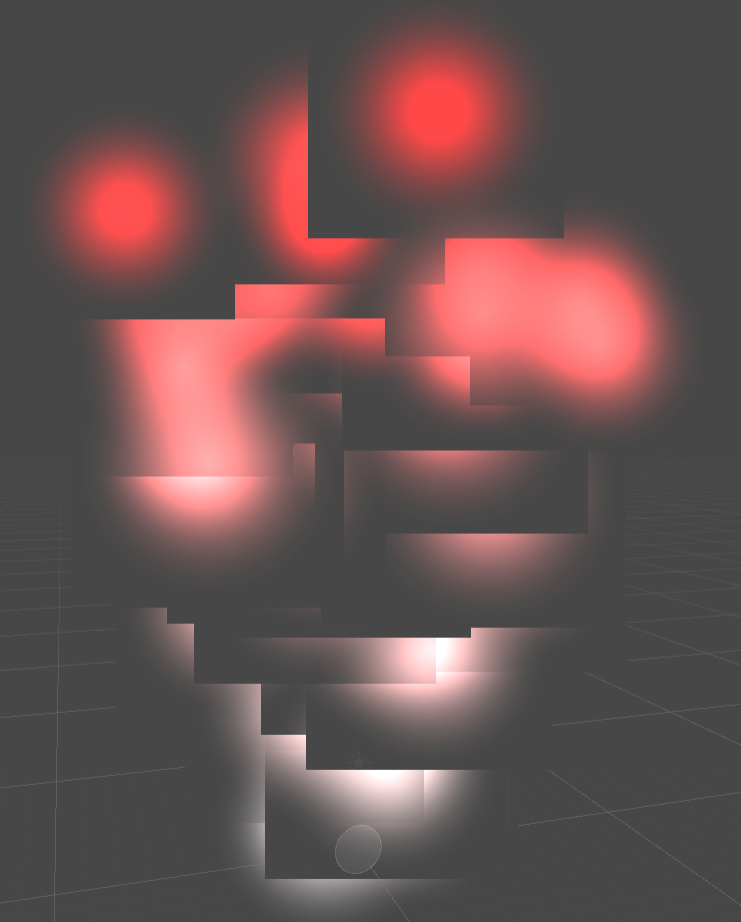
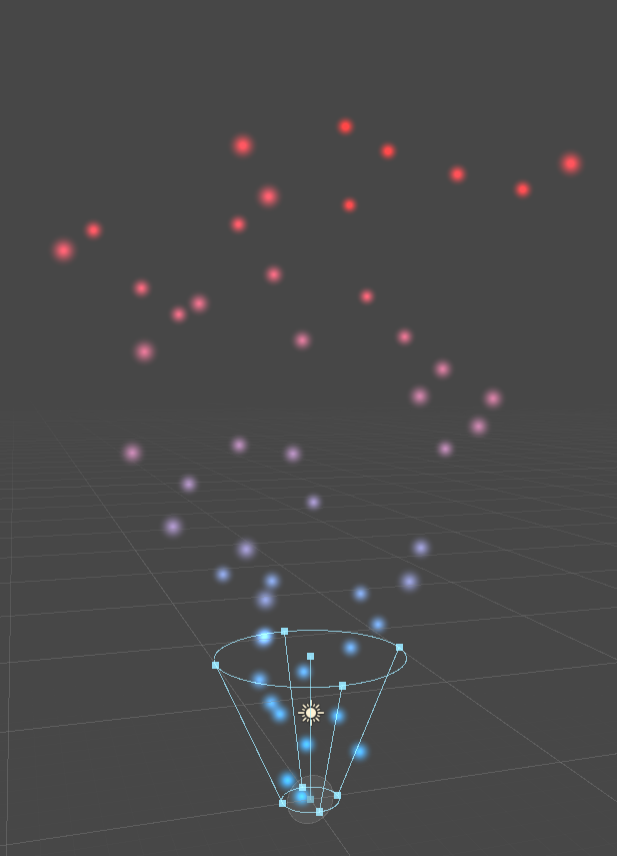
We’re essentially creating an animation using a sine wave, where the Y offset is modulated as a product of the sine offset and the particle’s age. The older the particle, the greater the offset… until we get this:
[IMAGE REMOVED]
Why would you want to do this? I don’t know. It’s weird.
We can make slightly less weird by turning our basic particle system into a spring. It’s actually really easy to make our particle system look like a spring now that we have our vertex animation running. Onwards to Part 5!
Part 5 – Particle Spring(s)
If you’ve read the Stylized Particle Galaxy tutorial, you may even have an idea on how to do it already, but let’s go through it step-by-step.
First off, new particle systems have a default rotation of x = -90, so just make sure to reset that to zero.

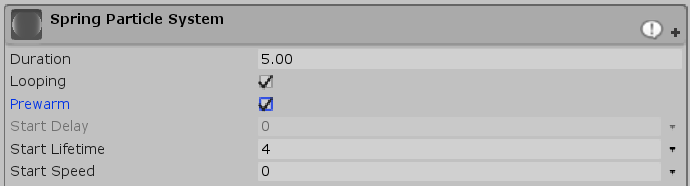
Next, in the Main module, enable Prewarm, set the Start Lifetime to 4, and the Start Speed to 0.
Disable the Shape module entirely. We want a perfect point emitter.
![]()
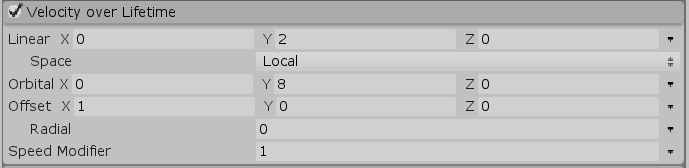
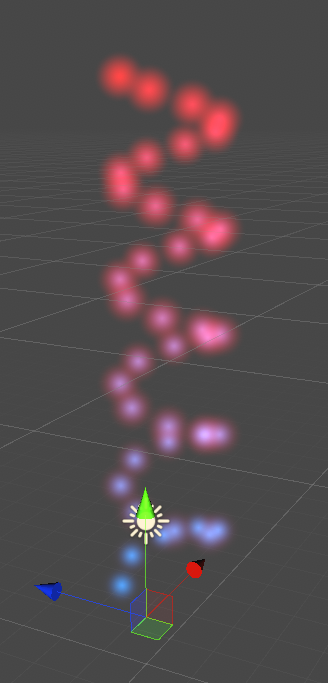
And finally, enable the Velocity over Lifetime module and use the settings you see below. Linear Y = 2, Orbital Y = 8, and Offset X = 1. This is so the particles rise up, spin around the local Y axis (Space = Local), and create a spiral pattern as the result of the center of rotation being offset by 1 on X. By changing any of these, you can control the shape of the spring form.
Here’s what you should have now (animating up and down).
But what if we want multiple spring particles? Because the shader uses the same input for noise, regardless of the material, every spring would animate the same. We need a way to be able to specify some sort of offset per-material. Back to the shader!
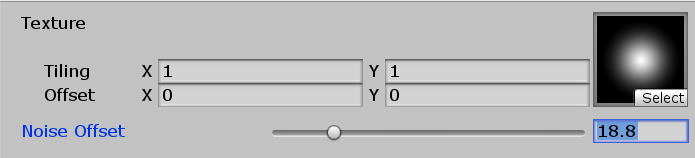
Add a new property just below the main texture for offsetting the time. We’re creating a slider here with a range between 0.0 and 100.0, with a default value of 0.0 (no offset).
		_MainTex("Texture", 2D) = "white" {}
		_TimeOffset("Noise Offset", Range(0, 100)) = 0.0
Next, add the time offset variable.
			sampler2D _MainTex;
			float4 _MainTex_ST;

			float _TimeOffset;
NOTE: You may notice the uniform storage-class modifier used a lot for global variables to specify that it has a persistent per-execution lifetime inside the shader, but just like private class variables in C#, a global variable in a shader created outside of a function is “uniform” by default. You could write “uniform float _TimeOffset” if you really wanted to be explicit, but it’s optional.
And finally, we need to actually add the offset to _Time.y, which I then store as a new variable for clarity, and then pass that to the sine function multiplied by the frequency.
				float time = _Time.y + _TimeOffset;
				float sineOffset = sin(time * sineFrequency) * sineAmplitude;
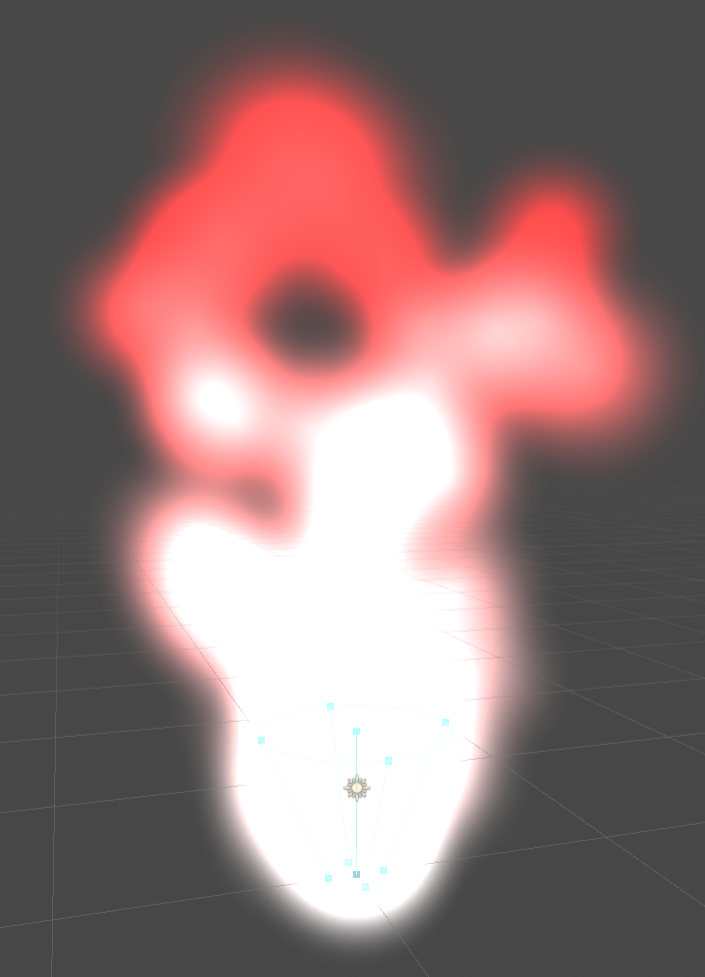
All you have to do now is duplicate the particle system and the material a few times, and then change the offset property we just added for each one by any amount. Basically, make duplicates of the current particle system and make sure each one has a unique material with different offset values using the same shader.
And that’s it, we’re done!
[IMAGE REMOVED]
I hope this has been a good introduction to using custom particle vertex streams in Unity. And don’t worry, we’re going to kick it up a notch again in the next tutorial!
You’ll find the completed shader below.
Shader "Unlit/Simple Particle Unlit"
{
	Properties
	{
		_MainTex("Texture", 2D) = "white" {}
		_TimeOffset("Noise Offset", Range(0, 100)) = 0.0
	}
	SubShader
	{
		Tags { "Queue" = "Transparent" "RenderType" = "Opaque" }
		LOD 100

		Blend One One // Additive blending.
		ZWrite Off // Depth test off.

		Pass
		{
			CGPROGRAM
			#pragma vertex vert
			#pragma fragment frag
			// make fog work
			#pragma multi_compile_fog

			#include "UnityCG.cginc"

			struct appdata
			{
				float4 vertex : POSITION;
				fixed4 color : COLOR;
				float3 uv : TEXCOORD0;
			};

			struct v2f
			{
				float3 uv : TEXCOORD0;
				UNITY_FOG_COORDS(1)
				float4 vertex : SV_POSITION;
				fixed4 color : COLOR;
			};

			sampler2D _MainTex;
			float4 _MainTex_ST;

			float _TimeOffset;

			v2f vert(appdata v)
			{
				v2f o;

				// Bizarre vertex animation.

				float sineFrequency = 5.0;
				float sineAmplitude = 4.0;

				float time = _Time.y + _TimeOffset;
				float sineOffset = sin(time * sineFrequency) * sineAmplitude;

				float agePercent = v.uv.z;

				float3 vertexOffset = float3(0, sineOffset * agePercent, 0);

				v.vertex.xyz += vertexOffset;
				o.vertex = UnityObjectToClipPos(v.vertex);

				// Initialize outgoing colour with the data recieved from the particle system stored in the colour vertex input.

				o.color = v.color;

				o.uv.xy = TRANSFORM_TEX(v.uv, _MainTex);

				// Initialize outgoing tex coord variables.

				o.uv.z = v.uv.z;

				UNITY_TRANSFER_FOG(o,o.vertex);
				return o;
			}

			fixed4 frag(v2f i) : SV_Target
			{
				// sample the texture
				fixed4 col = tex2D(_MainTex, i.uv);

				// Multiply texture colour with the particle system's vertex colour input.

				col *= i.color;

				float particleAgePercent = i.uv.z;
				float4 colourRed = float4(1, 0, 0, 1);

				// Lerp from texture colour to red based on particle age percent.

				col = lerp(col, colourRed * col.a, particleAgePercent);

				// apply fog
				UNITY_APPLY_FOG(i.fogCoord, col);
				return col;
			}
			ENDCG
		}
	}
}
Hey thanks for taking the time to make this tutorial! Shaders are a pretty tricky subject for me and definitely something where I need a hand to hold onto. Couple things – To start with, I’m stuck using Unity 5.6.3p2 until I finish my current project and so that’s what I used while trying to follow this tutorial. I ran into a couple issues though and I’m pretty sure at least one of the two issues I ran into stem from the discrepancy between the version I’m using and the version you’re using.
Firstly, right around the first modification to the ‘Unlit/Simple Particle Unlit’ shader, where we modify the ‘v2f vert (appdata v)’ function, the line of code before “// Initialize outgoing uv.z (which holds particle age percent). ” is “o.uv = TRANSFORM_TEX(v.uv, _MainTex);” on my script, and “”o.uv.xy = TRANSFORM_TEX(v.uv, _MainTex);” on yours. The difference being the “.xy”. Not a big deal, but it’s something that wasn’t mentioned and it was preventing the shader from operating as expected until I discovered I needed to add on the ‘.xy’.
Second, and perhaps more importantly, in the ‘Velocity over Lifetime’ part of the Particle System in v 5.6, I couldn’t find any options/fields for Orbital velocities. For this part, I was unable to find a solution or workaround. I’m pretty sure the absence of those fields is because I don’t think they exist in v 5.6. Little bit of a bummer, especially since I didn’t find out till pretty much the end of the tutorial.
So anyway, in the future, I might suggest you consider adding (at the beginning) what versions of Unity your tutorials work with or at least what version they were made with. It’s not the end of the world and I’m still very grateful for your efforts, just my 2 cents! Thanks again!
Hi Charles,
Thanks for the feedback! I really appreciate it.
You can still simulate orbital velocity as I’ve done for the galaxy effect in the background here: https://youtu.be/Twdtsza0CMc?t=86. Set the velocity over lifetime to use curves, and create displaced sine waves for the XZ axes with increasing amplitude.
I used to have a free tool on the store to automatically do this (which is what I used in the video), but I’ve since removed it following the release of the native orbital velocity property for Shuriken.
– Mirza