33,881 total views, 5 views today
Here’s what we’ll be making using Unity’s default “Shuriken” particle system.
No plugins or scripting required.
[IMAGE REMOVED]
It’s a fully realtime effect running in Unity. You can use any image regardless of whether it has colour or not. In this tutorial, however, I’m using a pure white texture and the settings are geared towards that. You can change some of the particle colours on your end to better suit the image you use.
Let’s get started!
Part 1 – Logo Fade
We’ll begin by working on the particle system for fading the full logo image in and out.
[IMAGE REMOVED]
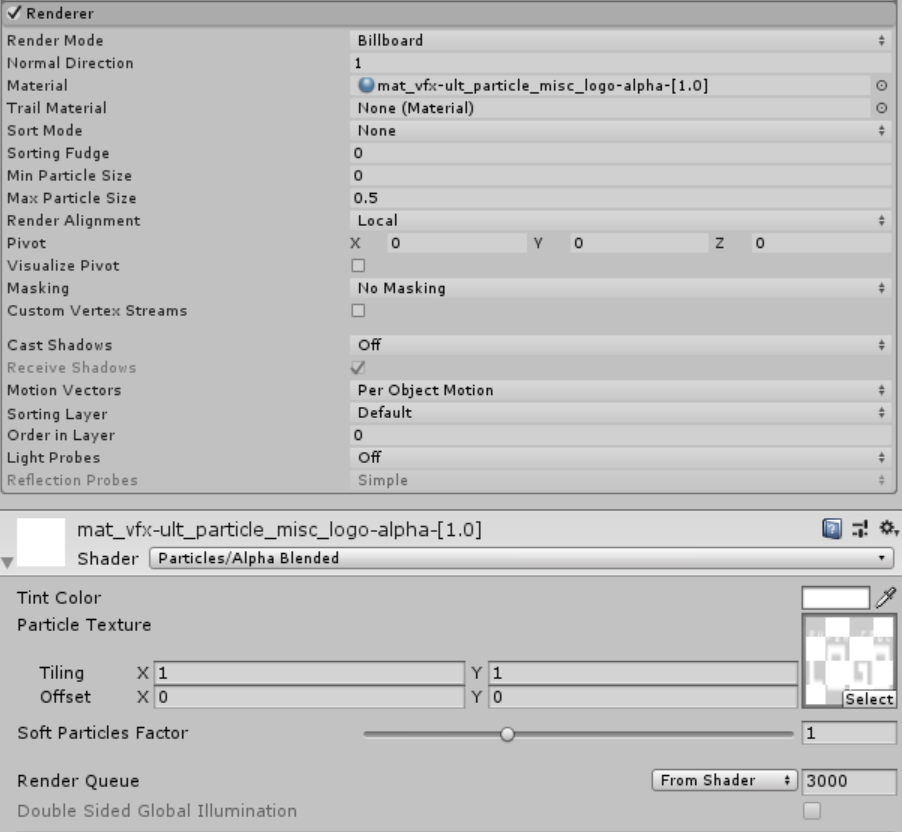
Create a new material with your logo texture. Set it to use the Particles/Alpha Blended shader.
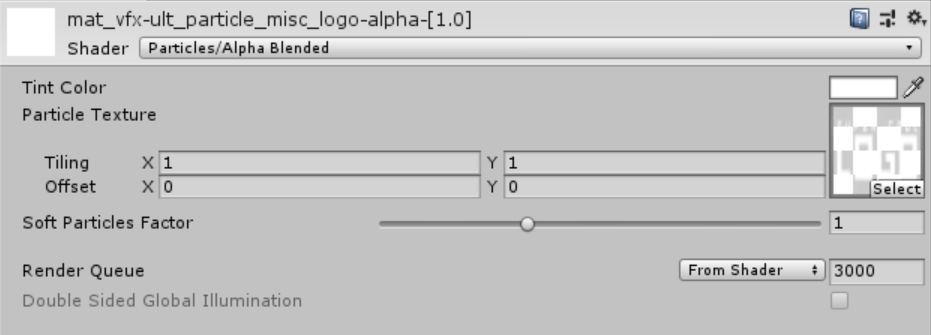
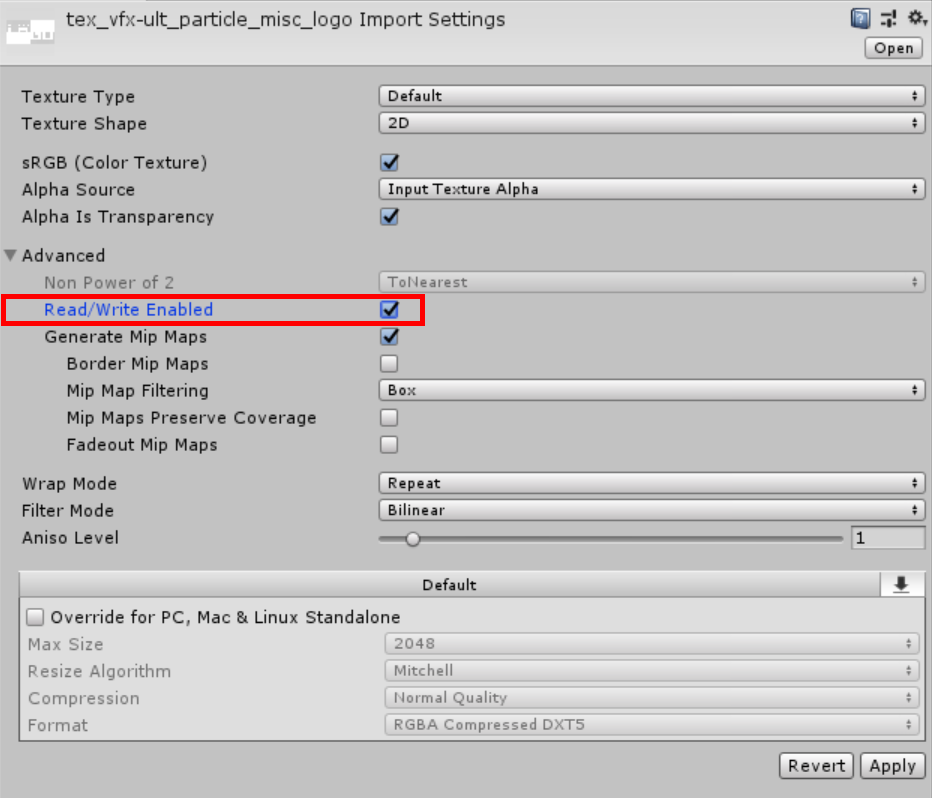
Make sure that your texture has read/write permission. Without this, texture-based particle emission will only work in the editor (and break in actual builds).
Create a new particle system. Every time we do this make sure the transform is reset so there’s no translation or rotation on the game object unless you explicitly intend to have it moved and rotated in some way.

Open up the Renderer module and set the particle material to the one you just created. If you want more brightness and you’re using post-processing bloom, you can crank up the colour to pure white and maximum alpha like I’ve done with the Tint Color for the material. I’ve also set the Render Alignment setting to Local. We don’t want the base logo texture particle to face the camera, and this ensures that it’ll instead face the direction of the local transform.
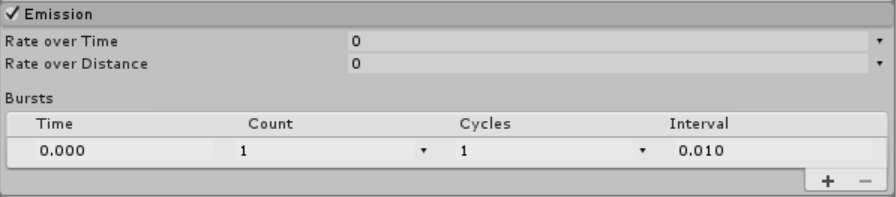
Next, go to the Emission module and copy these settings. We only want a single particle to be emitted, and this will do just that.
Now we can work on the Main module settings.
We don’t need any of the particle systems in this effect to loop. Disable it by unchecking the Looping property.
I’ve set the Start Lifetime to 1. This is just to make it easier for me once I start scaling the simulation time through a script and while I work on the timing for this effect, but if you don’t plan on doing that, you should set this value to something else that makes sense. You probably want it at a value that will give enough time for viewers to really look at your logo before it explodes into a beautiful mess of particles.
You’ll may need to enable 3D Start Size and fiddle with the values if you’re not using a square texture. We’re emitting a 2D particle, so only the X and Y values matter. My image is 1024 x 512, giving it an aspect ratio of 2:1. This is how I settled on 2 and 1 for the X and Y values respectively – so that it matches the aspect ratio and the image doesn’t appear distorted. You can then choose any multiple of this ratio, such as (for my image) 4×2, 8×4, etc.
I’ve also reduced the Start Color alpha because with my post-processing settings for bloom, the image becomes too bright. You can probably leave the alpha alone on your end.
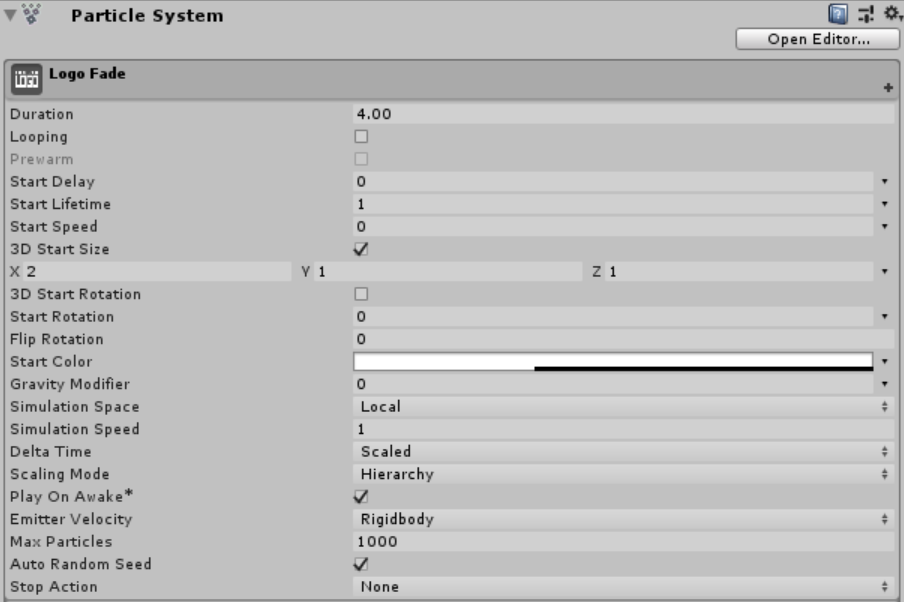
We also need to disable the Shape module so that our only particle emits perfectly at the center of the transform.
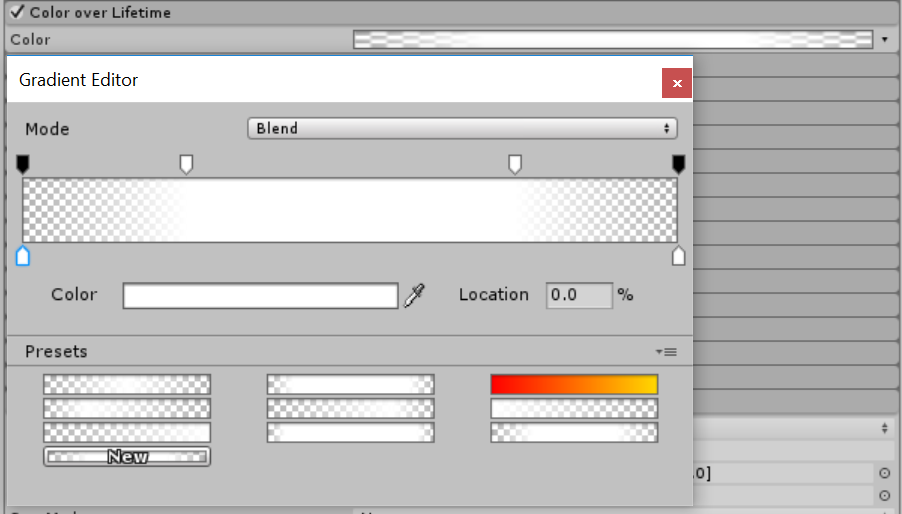
Now all we need to do is actually animate the alpha by using the Color over Lifetime module. Here are my settings for fading the logo in/out. The alpha fades in completely 25% of the way, holds to 75%, and then fades out. Because we’re using a duration of 1 for this particle, this calculates to 0.25 and 0.75. This’ll be important later.
Part 2 – Logo Burst
Next, we’ll work on the particle system used for the intial logo dispersal effect. So, create a new particle system.
[IMAGE REMOVED]
At this point, you have a few options. You can…
A. Create your own simple particle texture for a point sprite and assign it to an additive material.
B. Use the point material from Ultimate VFX if you have it (the material I used in the image below is from this asset).
C. Use the additive glow sphere material from Inferno VFX if you have that (search for “inf sprite glow add” in the editor material selector).
Any of these is fine, so it’s up to you. If you don’t want to make the texture/material yourself and don’t want to spend any money, you can download Inferno VFX, which is FREE. Whatever you choose, we’ll be using this material again for the remaining particle systems.
Note: I made both assets, and these are all affiliate links.
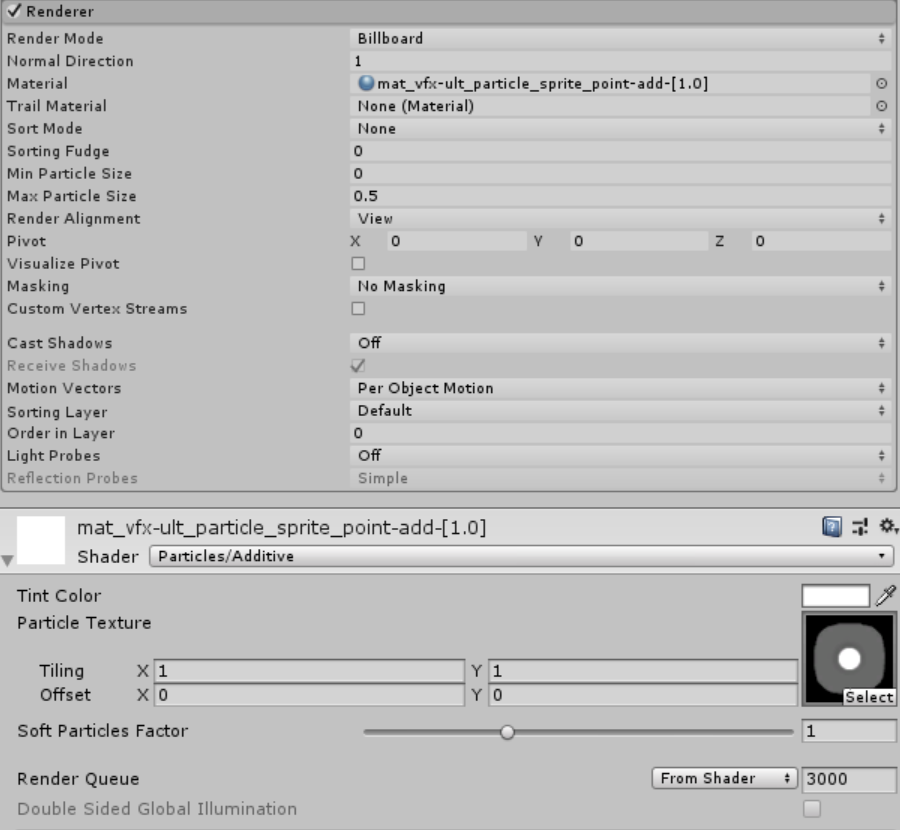
Go to the Renderer module of the new particle system and set the material. You don’t have to change any other settings this time.
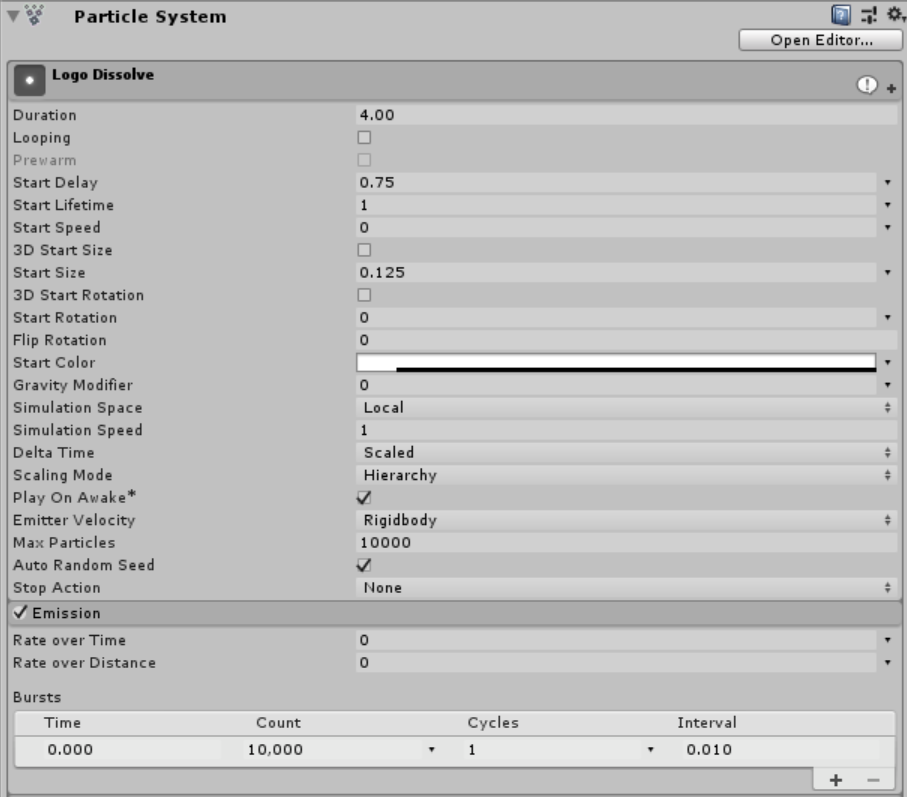
Set the Main and Emission module settings as follows.
The Start Delay prevents emission up to the value assigned in seconds. We want this effect to kick in just as the logo begins to fade out, which if you remember from the transparency animation for the previous particle system starts at 0.75.
These particles are going to be extremely small, hence the Start Size is 1/8 of a unit or meter. I’ve set this to 0.125.
I also don’t want these particles to be too bright, and I’ve drastically lowered the Start Colour alpha.
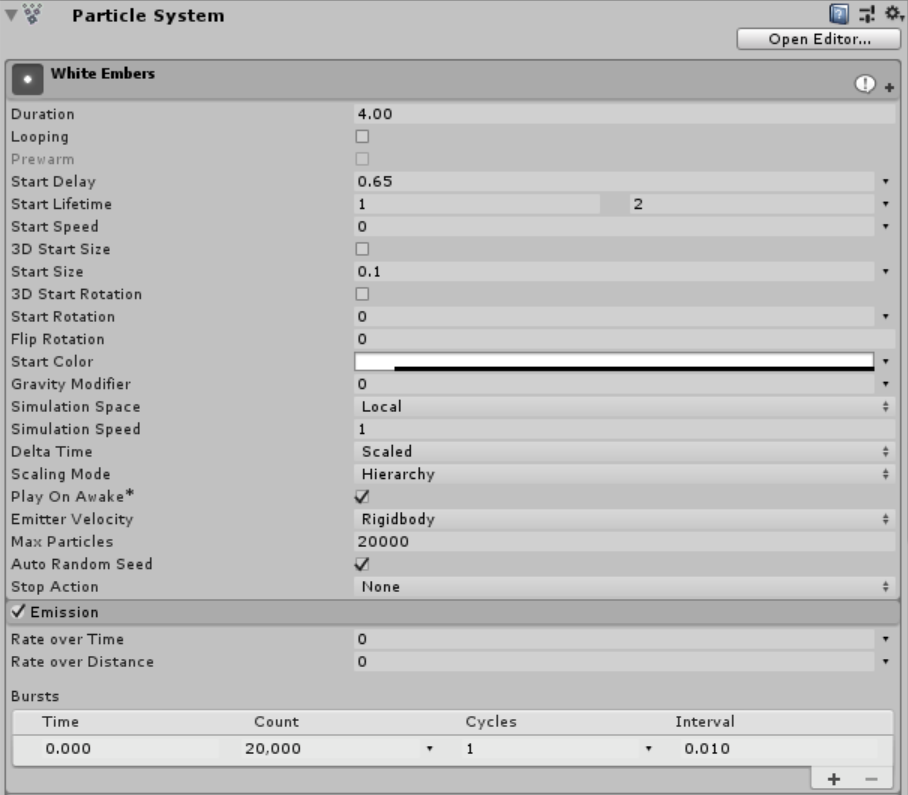
Because we’re going to have a lot of these tiny particles, we’ll need to bump up the Max Particles to 10,000 and set the Emission burst count to match.
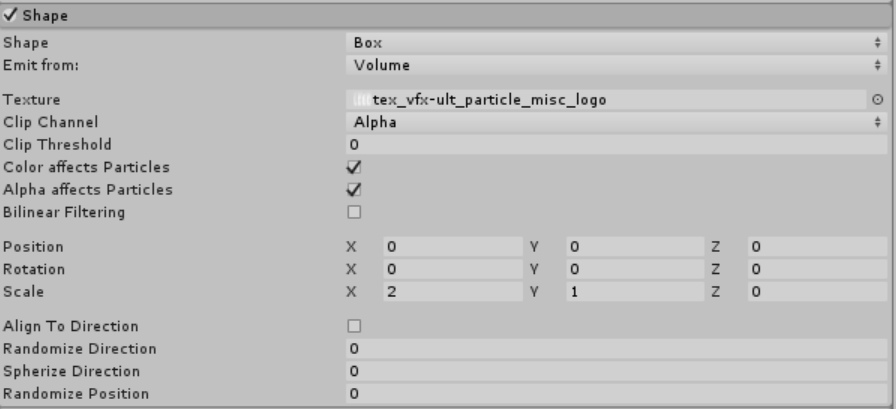
Let’s work on getting these particle to emit in the shape of the logo texure. Copy the settings below.
I’ve set the Shape to Box and assigned the Texture to the logo image. If you want the particles to inherit the colours of the logo, enable Color affects Particles. Similar to the previous particle system Start Size setting, I adjust the bounds of the emitter to match the image aspect ratio by settings the Scale [2, 1, 0]. The Z is 0 because I want the emitter to be flat.
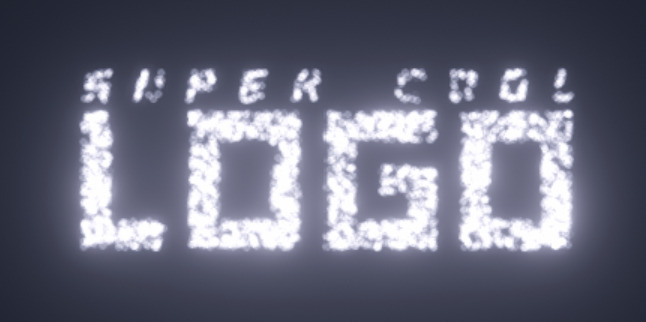
At this point, once the particles are emitted following the Start Delay, you should see something like the image below. Now that we have the basics of emitting in the shape of a texture down, we can do anything we want.
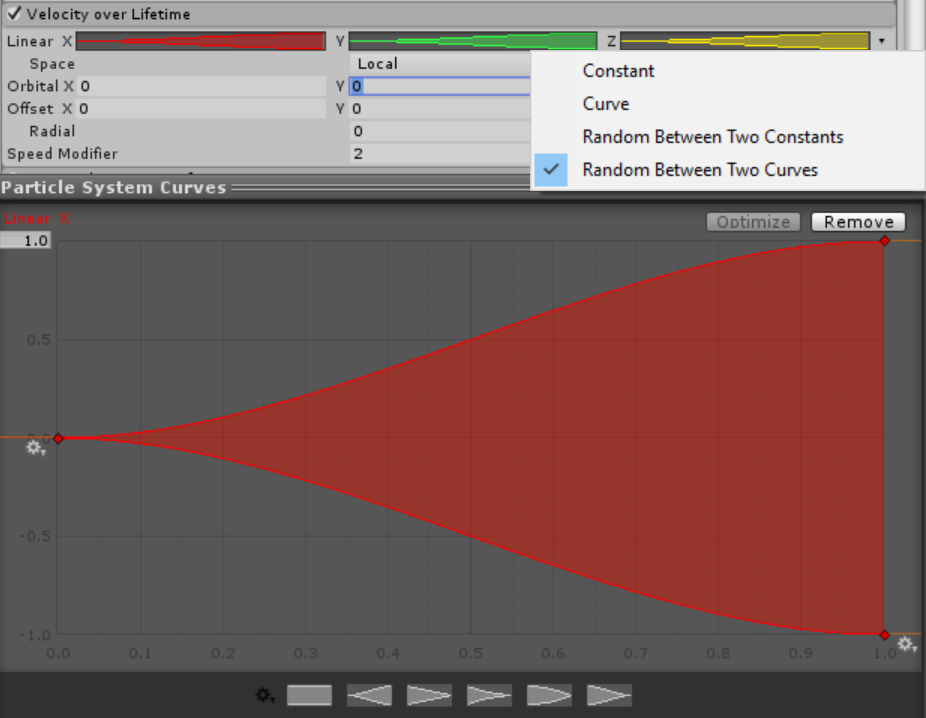
Let’s work on dispersal next. Enable the Velocity over Lifetime module.
Set the Linear property to use Random Between Two Curves by hitting the little arrow dropdown to the right. Assign similar curves to all axes, which range from -1 to 1. The curve here will slowly ramp up the dispersion over time rather than immediately so that it blends in better with the previous particle system and provides a transition to the noisy dispersion particle system we’ll work on next.
Note: I used the Speed Modifer to scale the values for convenience, but it’s better to set the scale directly for each axis so that the particle system can be automatically culled. For our use-case as a logo animation effect, this doesn’t matter… at all.
Finally, enable and edit the Color over Lifetime and Size over Lifetime modules as follows.
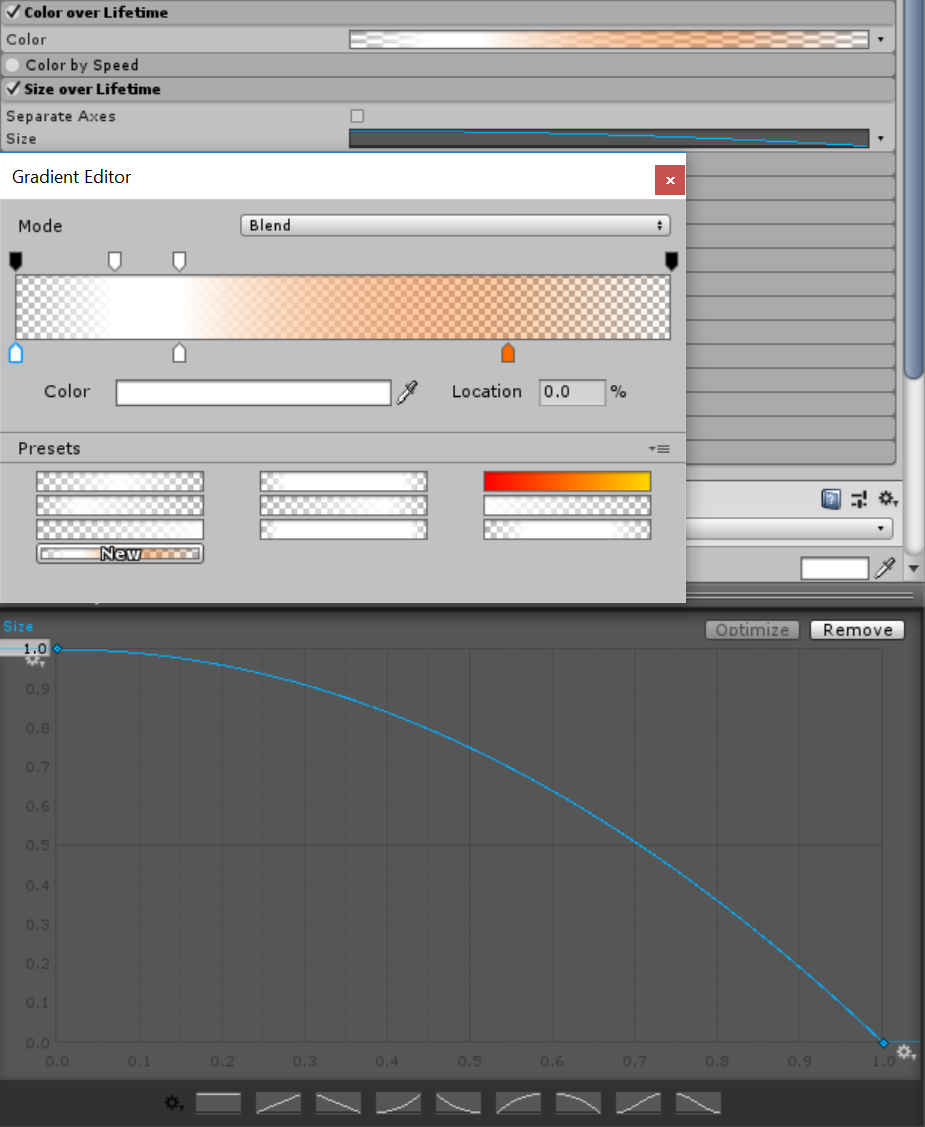
Part 3 – Logo Noise Dispersal
Next up, we’ll work on the first noise dispersion effect as seen below. This calls for another new particle system! This time, however, we can copy the particle system we just worked on because many of the settings will be the same.
[IMAGE REMOVED]
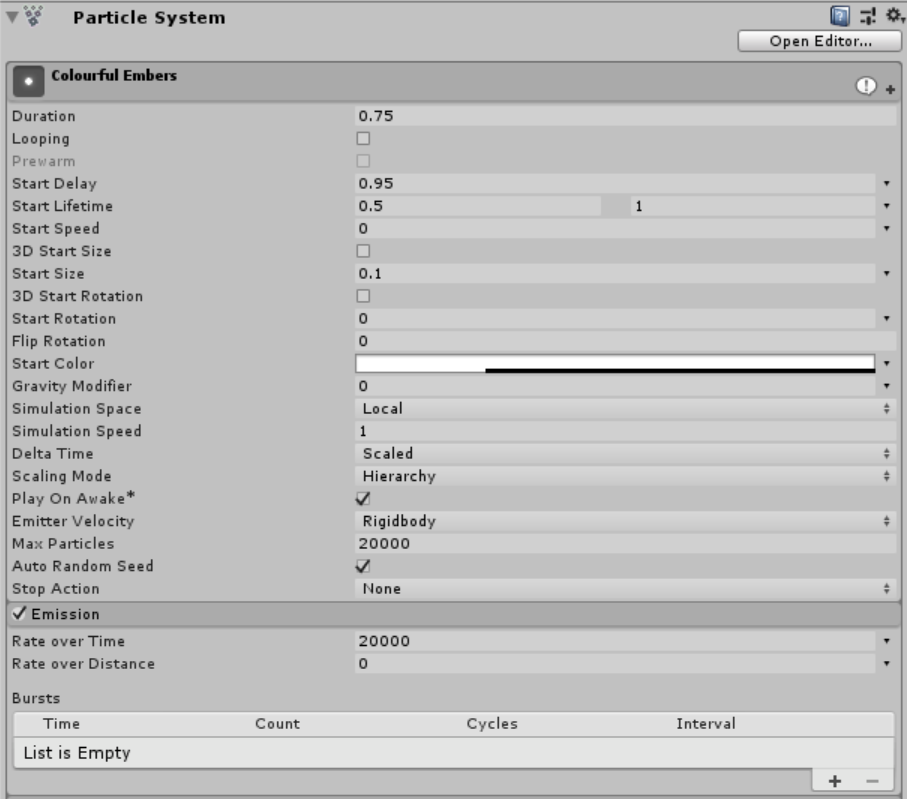
We still have to change some things. In the Main and Emission modules, you’ll notice a few differences. Namely, the Start Delay, Start Lifetime randomization between 1 and 2 seconds, a slightly smaller Start Size, and with the Max Particles set to a whopping 20,000 with a single burst to match. To randomize the Start Lifetime, click the little dropdown arrow and select Random Between Two Constants.
The Color over Lifetime module is also a bit different.
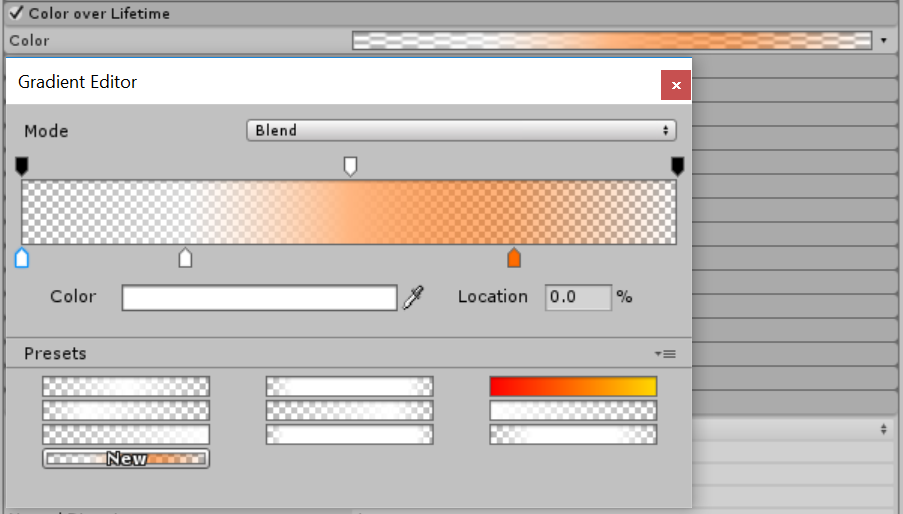
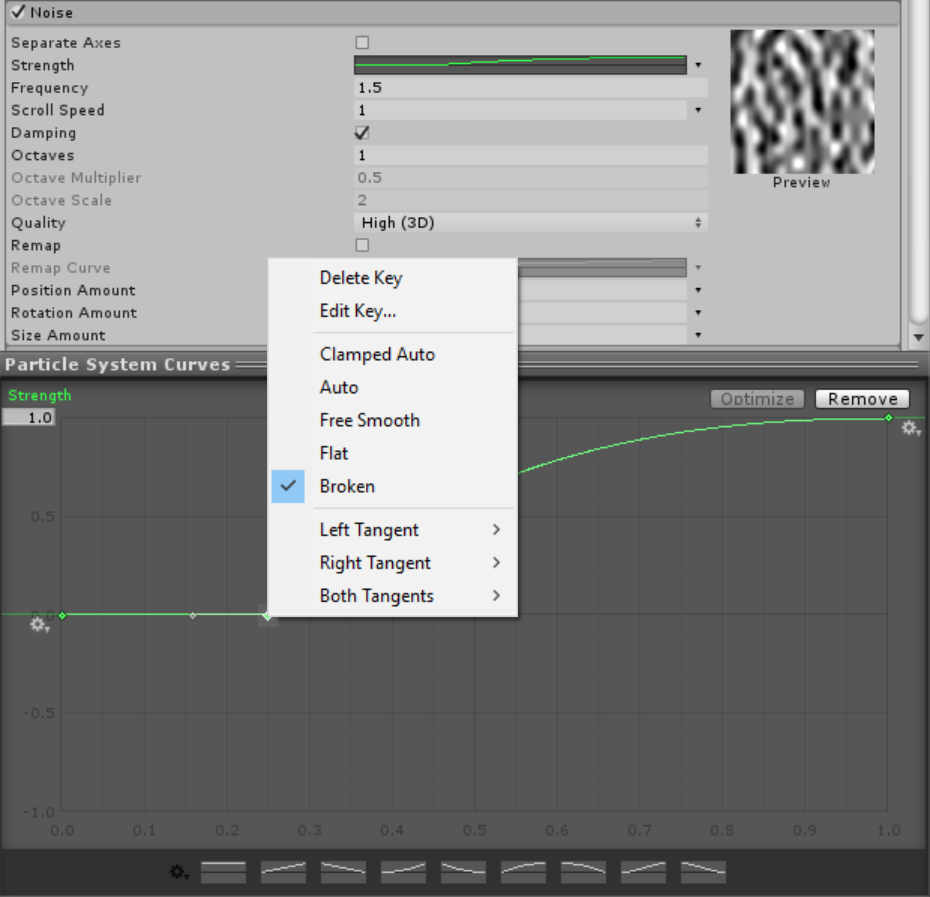
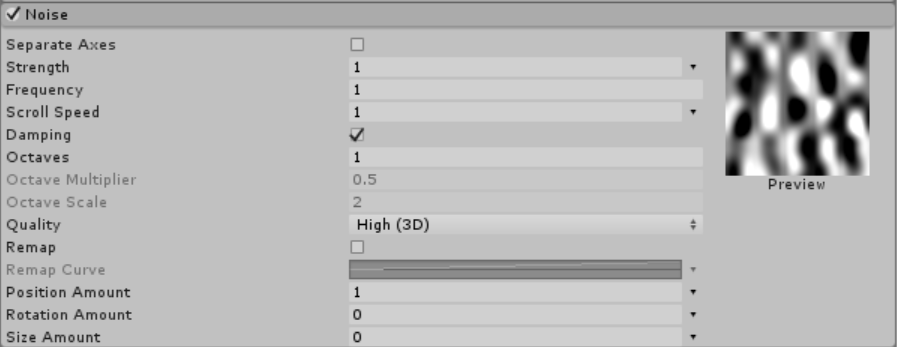
This is where the fun begins – once we introduce noise. Enable the Noise module and copy the settings below.
I’ve change the Strength to use a Curve, so that the particles don’t immediately disperse in a noisy way to better integrate with the other effects. You can right-click on the control points on the curve and choose Edit Key… to directly control edit their place on the graph. Using the Broken tangent mode allows you to change the left/right tangents without change the curve on the other side. Using these two methods, I’ve placed a control point at 0.25s with the left side flat and the right side curved. The result is no noise being applied until 0.25s where it’s ramped up suddenly towards 1.
A frequency of 1.5 looks pretty good and essentially controls the level of “chaos” as the particle are manipulated by the gradient field (see the Preview on the right).
A Scroll Speed of 1 causes the noise to animate during the lifetime of the particles.
Note: We’re using a lot of particles. We can speed up the simulation if we set Quality to Medium (2D) without really noticing much of a difference.
Change the Render Mode to Stretched Billboard. Set the Speed Scale to 0.1, and the Length Scale to 1. This will stretch the particles slightly based on their current speed in the direction they’re moving, giving them a false motion blur effect.
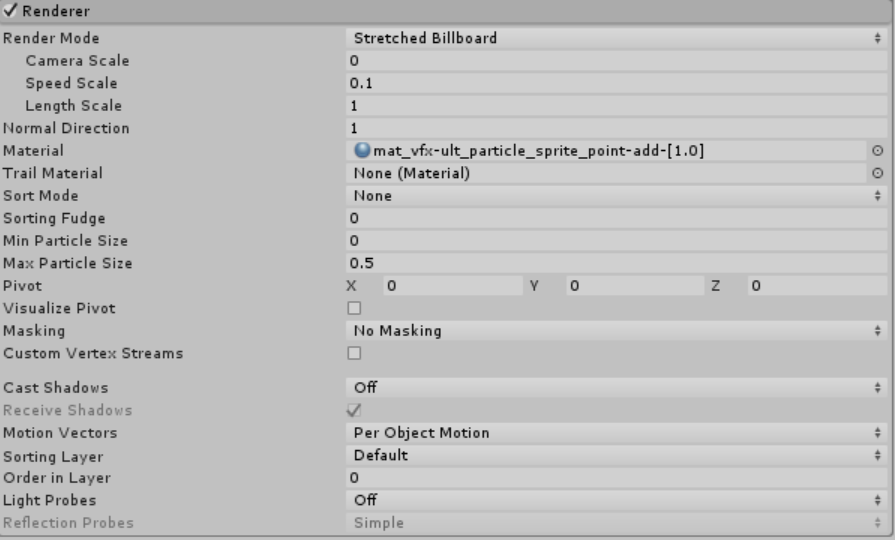
Everything else can be left as-is because we reused the settings of the previous particle system.
Part 4 – Logo Noise Dispersal 2 (The Final One)
Duplicate the particle system we were just working with so we can get a head start on the last and perhaps most beautiful layer of this effect.
[IMAGE REMOVED]
We need to change a few things in the Main and Emission modules. You’ll notice that my Duration is set to 0.75. This is because I’m no longer emitting particles in a single burst, and instead opted to use Rate over Time.
I’ve also changed the Start Delay and Start Lifetime values, as well increased the alpha of the Start Color.
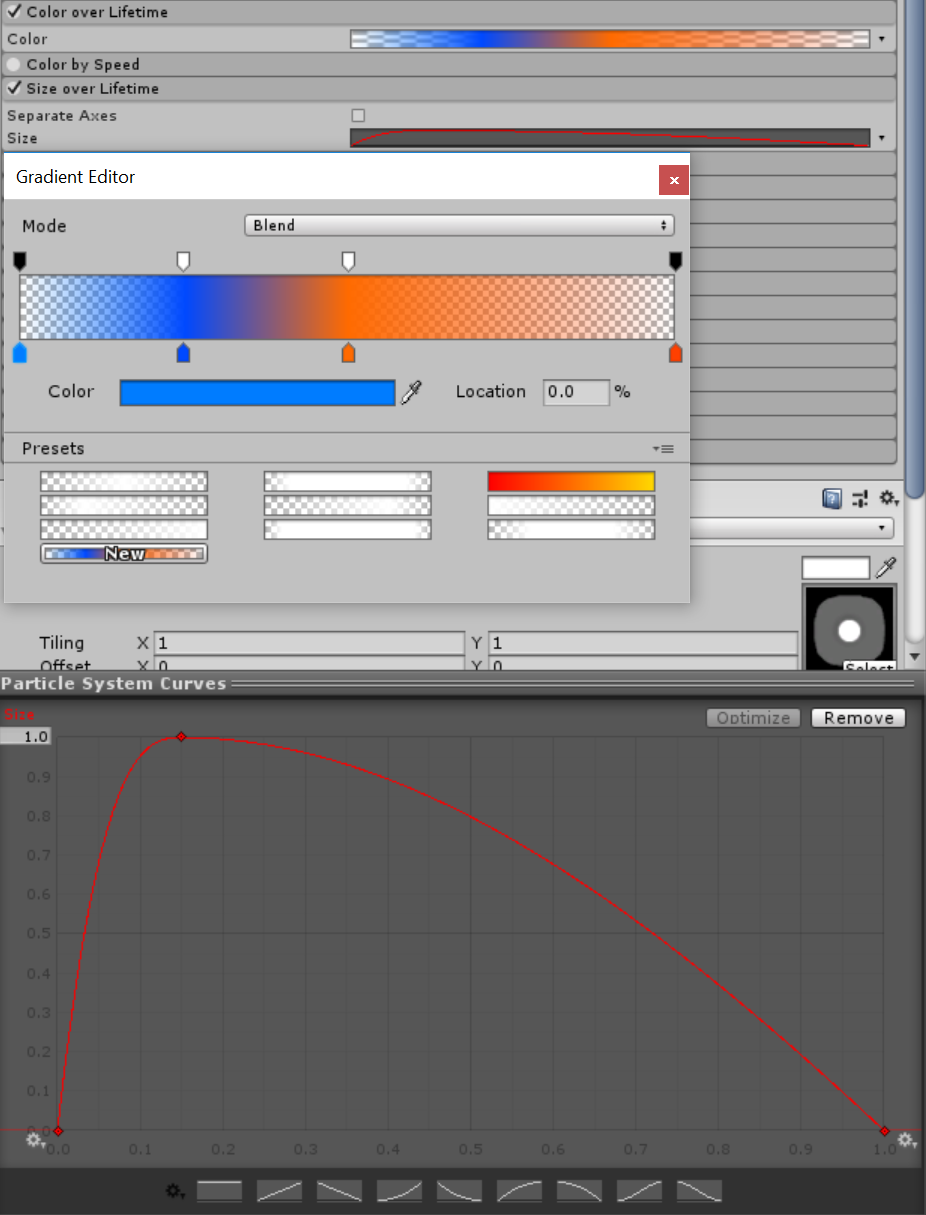
Copy the following settings for the Color over Lifetime and Size over Lifetime modules. This time we want the particles to go from blue to reddish-orange, and the size of each particle to jump up quickly and then ease out slowly.
Finally, change the settings in the Noise module so that both Strength and Frequency are 1. You may again want to change the Quality to Medium (2D).
Part 5 – Putting It All Together
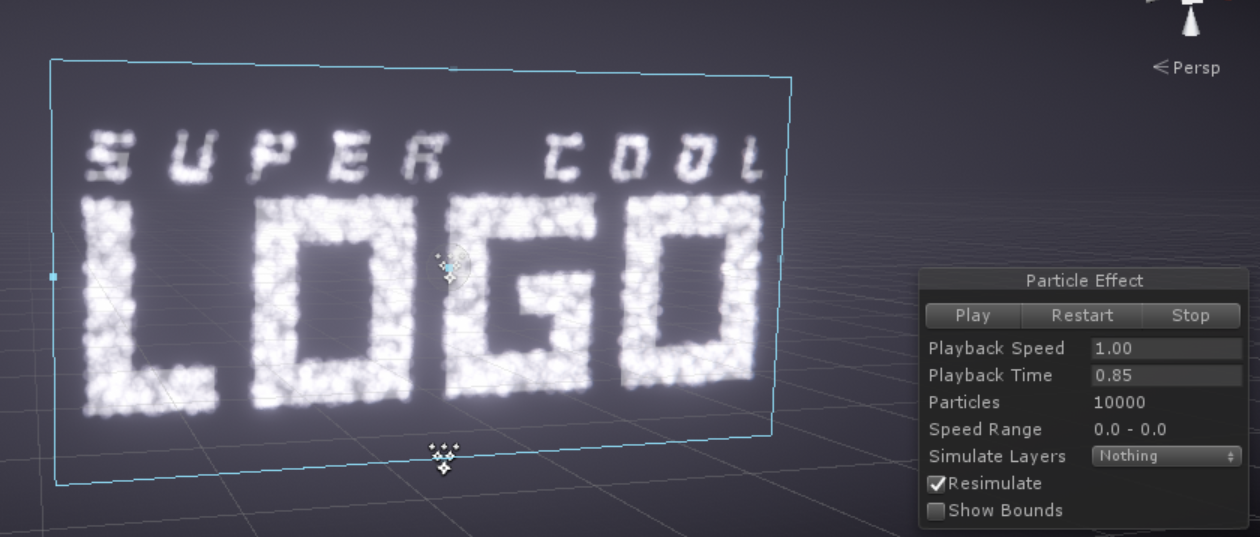
We’re pretty much done now. Here’s what you should have for all the invidiual particle systems.
[IMAGE REMOVED]
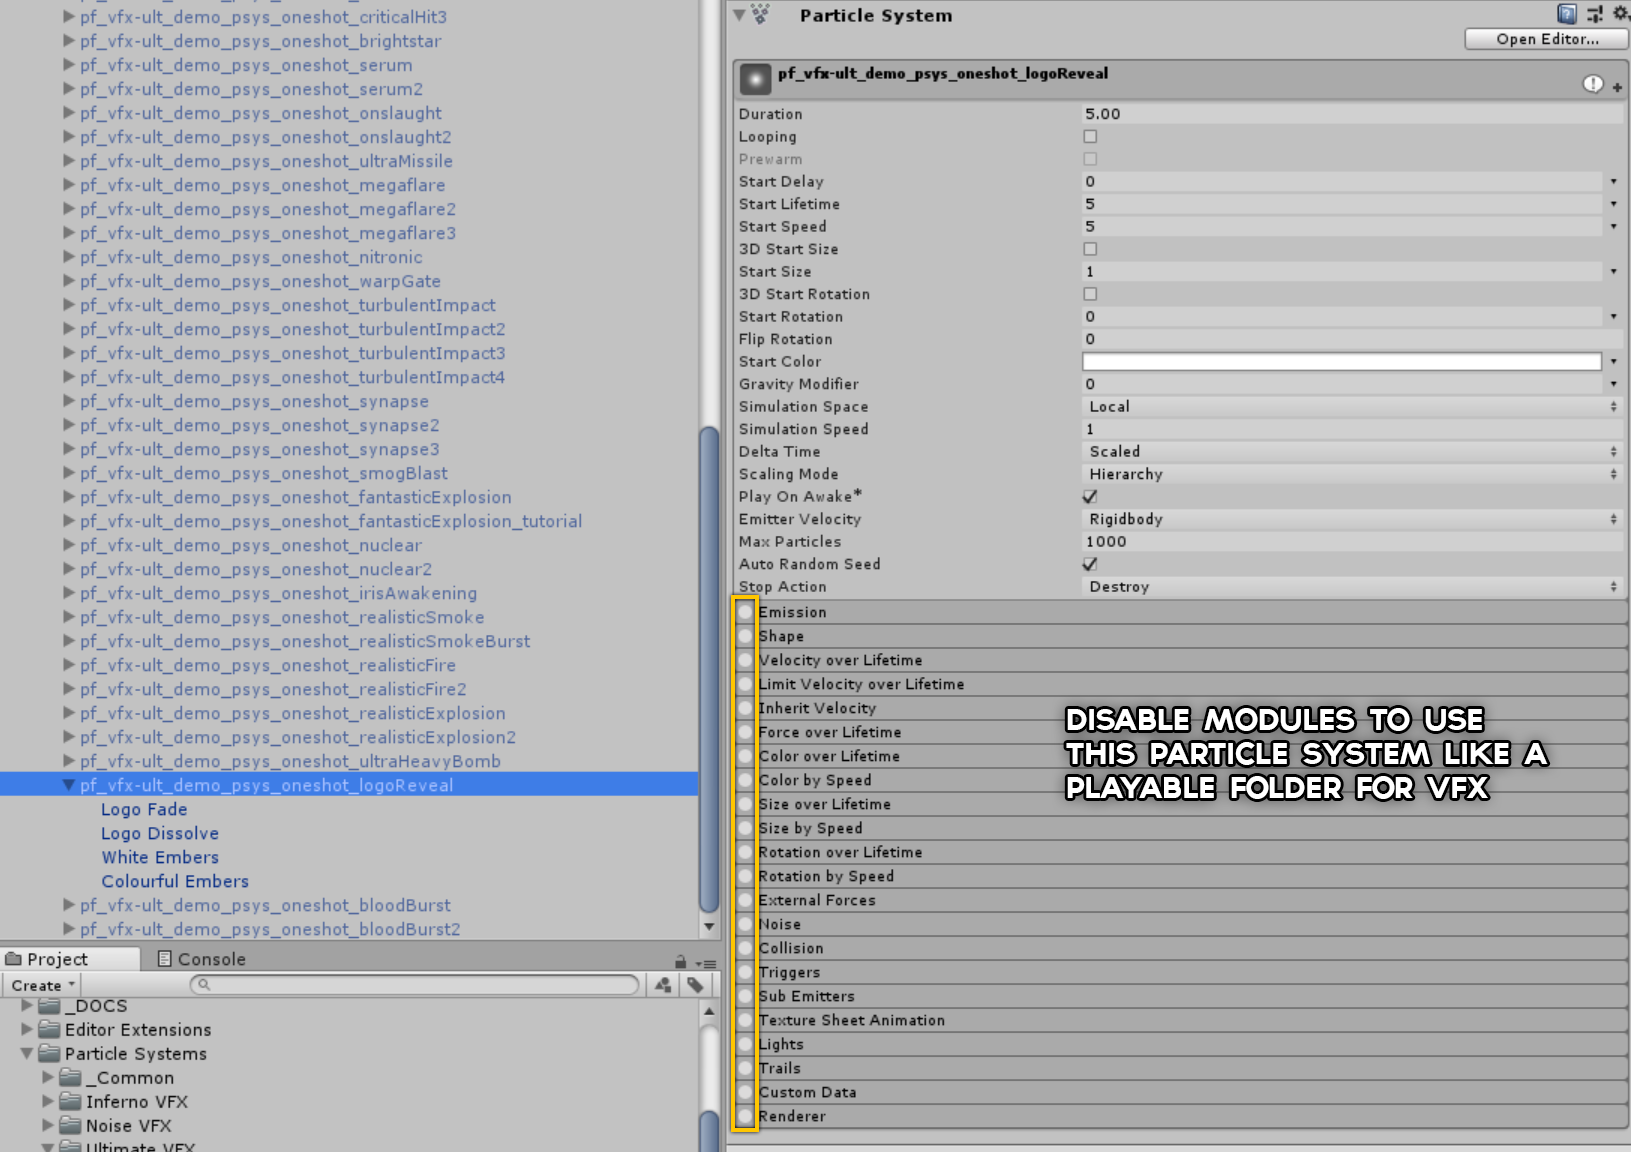
Let’s combine all the effects into a single playable object. You can name and group the particle systems into a another particle system with all modules disabled so that they play together when you select any of them. If you then disable Looping and set the Stop Action to Destroy, you can use this an an instantiable effect that will destroy itself after the Duration time value in seconds.
That’s it! You should have something like below for the final effect once all the particle systems are combined.
[IMAGE REMOVED]
WOW! Thanks for the tutorial, it’s really beautiful.
could you upload this project to github or somewhere, its awesome
Shape :Box
i don’t have the option to assigned the Texture u.u
I have the problem that only the first particle system seems to run after building the project. Inside the editor in Unity all looks fine and I can see all 4 particle systems working together, but once I build the Project the last 3 simply never start apparently.
Did you set the texture to read/write?
This looks great. What version of Unity did you use?
Hi, that is a great effect.
I have make the effect first two step. And I have a problem, that the first layer when I click play the Texture appear and disappear right. But it position is random not in the center of screen and the size don’t suit to second step.
Can I get the sample code on the github.com ?
Is there maybe a video showing how to do this. I’m getting lost with the particles.
ive found this on yt:
https://www.youtube.com/watch?v=PawC1KfgG-0
Thank you Mirza!
Thank you for the tutorial!