26,272 total views, 8 views today
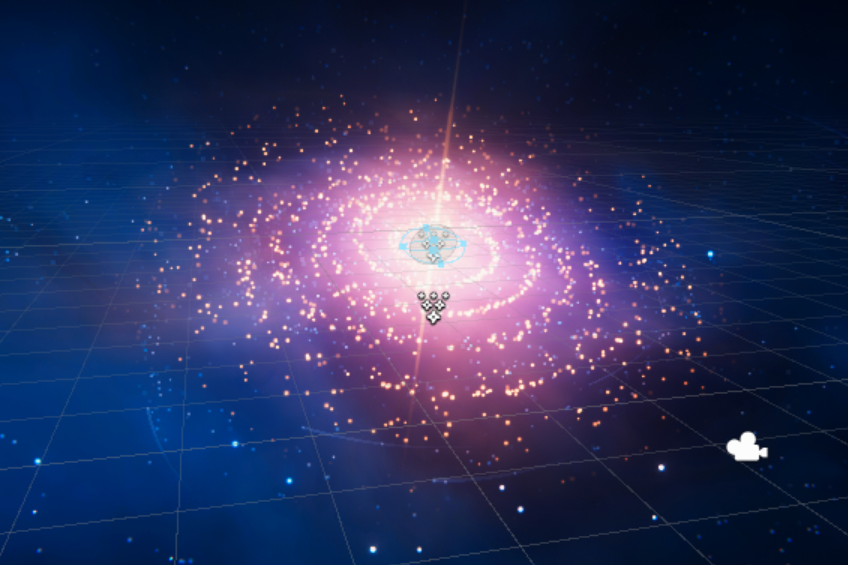
We’re going to be working on a really cool spiral particle galaxy effect today, all done without any scripting or plugins! By the time we’re finished, you should know a lot about manipulating Unity’s particle system to do neat things.
[IMAGE REMOVED]
Note: Each part of this tutorial is a new particle system you should create with the same name.
This is already going to be a long tutorial, and I don’t want to recreate the textures and materials we’ll need. I’ll be using my own particle asset library to help speed things up which you can check out using the affiliate link below.
You’re of course free to use textures and materials you’ve made yourself that fit the description of the effect, but I’ll be moving on as if we’re using Ultimate VFX.
The completed galaxy is included as a prefab in Ultimate VFX.
Part 1 – Main Spiral
We’ll start with the main inner galaxy effect, as seen below.
[IMAGE REMOVED]
Open up the Renderer module and set the Material to some sort of point sprite. Using Ultimate VFX, you can simply search for “sprite point add”.
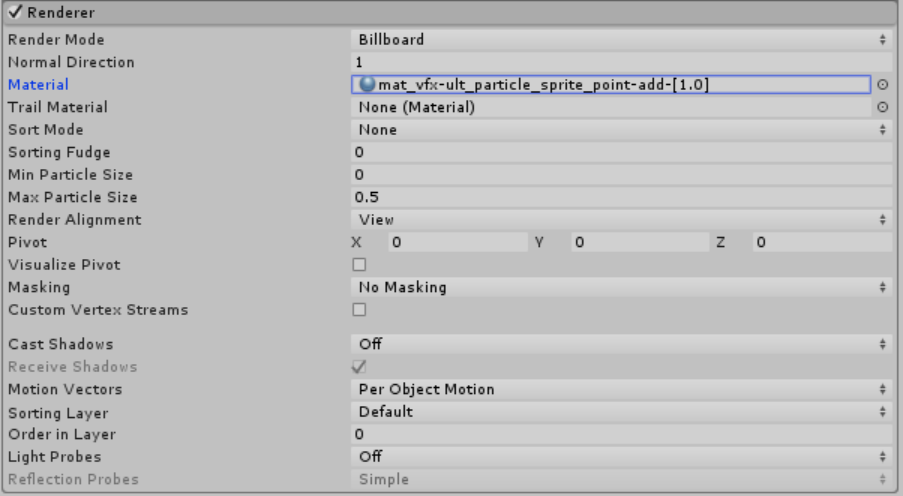
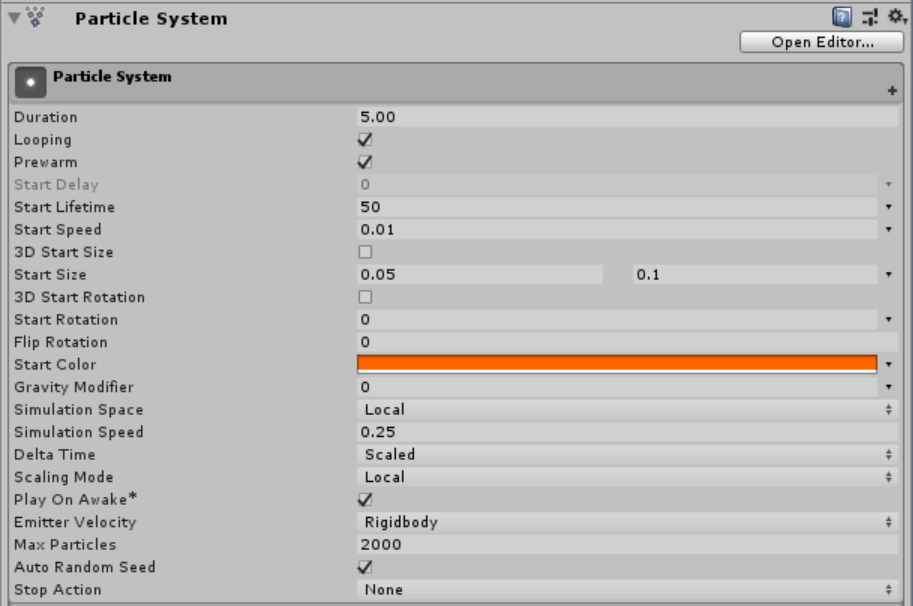
Next, we’ll work on the Main module. You can copy the settings from the image below.
Enable Prewarm. All our particle systems will have this enabled since we don’t want to wait for the effect to simulate in at a snail’s pace. Set the Start Lifetime to 50. The particle system will create a spiral around itself, and we need to give the particles plenty of time to live so they remain in place as the spiral completes by progressively spawning in more particles while the existing particles rotate around an axis (we’ll get to this later). Set the Start Speed to 0.01. This small value will help scatter the particles and give them more of a natural, randomized form. The Start Size will be randomized betwen 0.05 and 0.1 for some size variation. Set the Start Color to orange, and the Simulation Speed to 0.25. You’ll also need to bump up the Max Particles to 2000 (there’ll be about 1200 in this system).
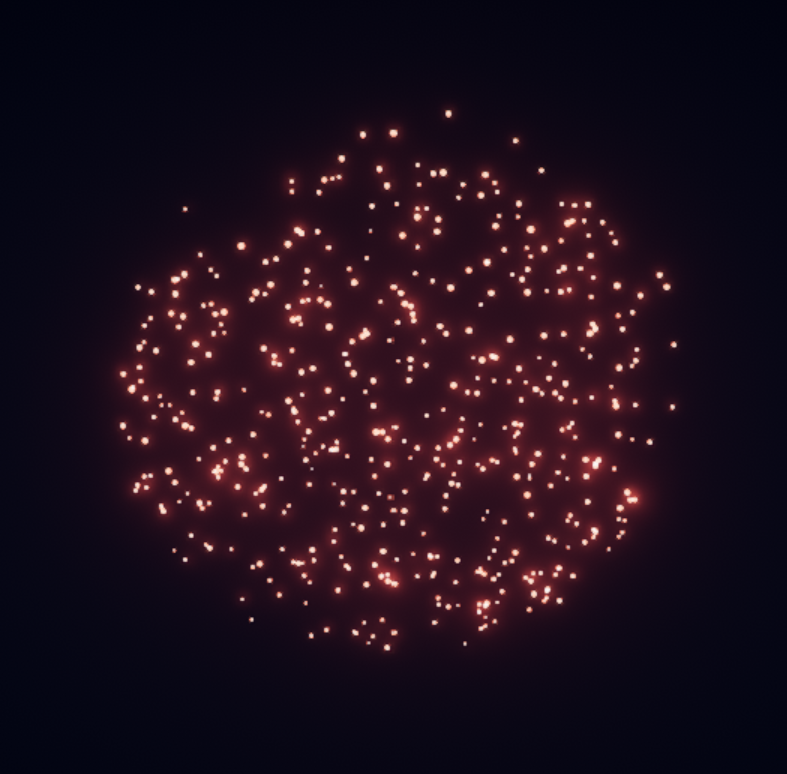
You should have something simple like this now.
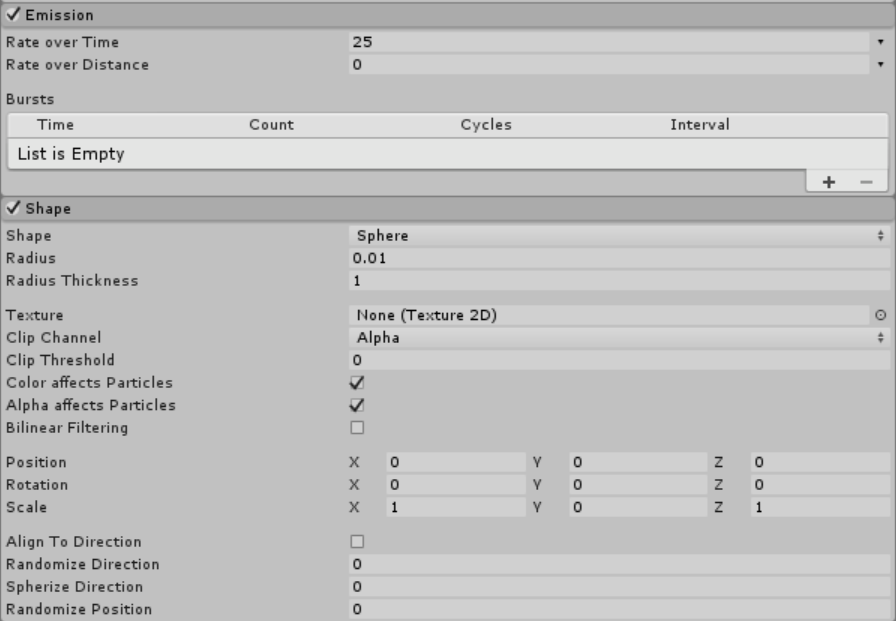
Let’s work on the Emission and Shape modules.
Turn up the Rate over Time to 25. Set the Shape to Sphere, the Radius to 0.01, and flatten the Scale Y to 0. This’ll essentially make the emission point a small point-like area.
We’re working on a spiral galaxy effect, and so far we just have a small spherical cluster. Let’s change that by working on the Velocity over Time module.
Set the Orbital property to use the Random Between Two Constants mode, and set the Y to vary between 1 and 1.125.
Change the Offset X to 0.025, and set it all in motion with Radial dialed to 0.05.

You should now have something that resembles a spiral galaxy.
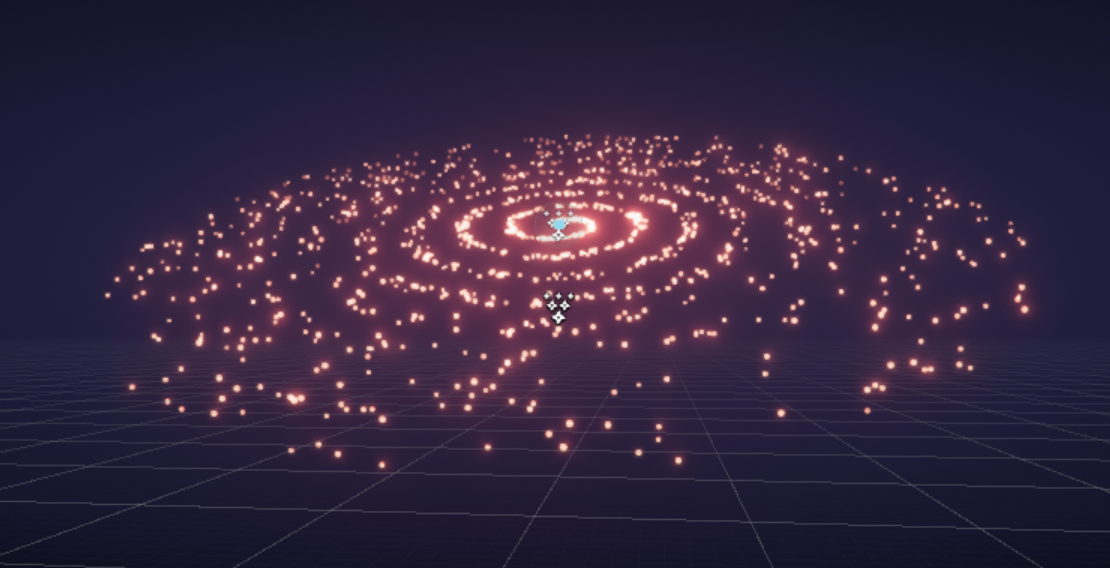
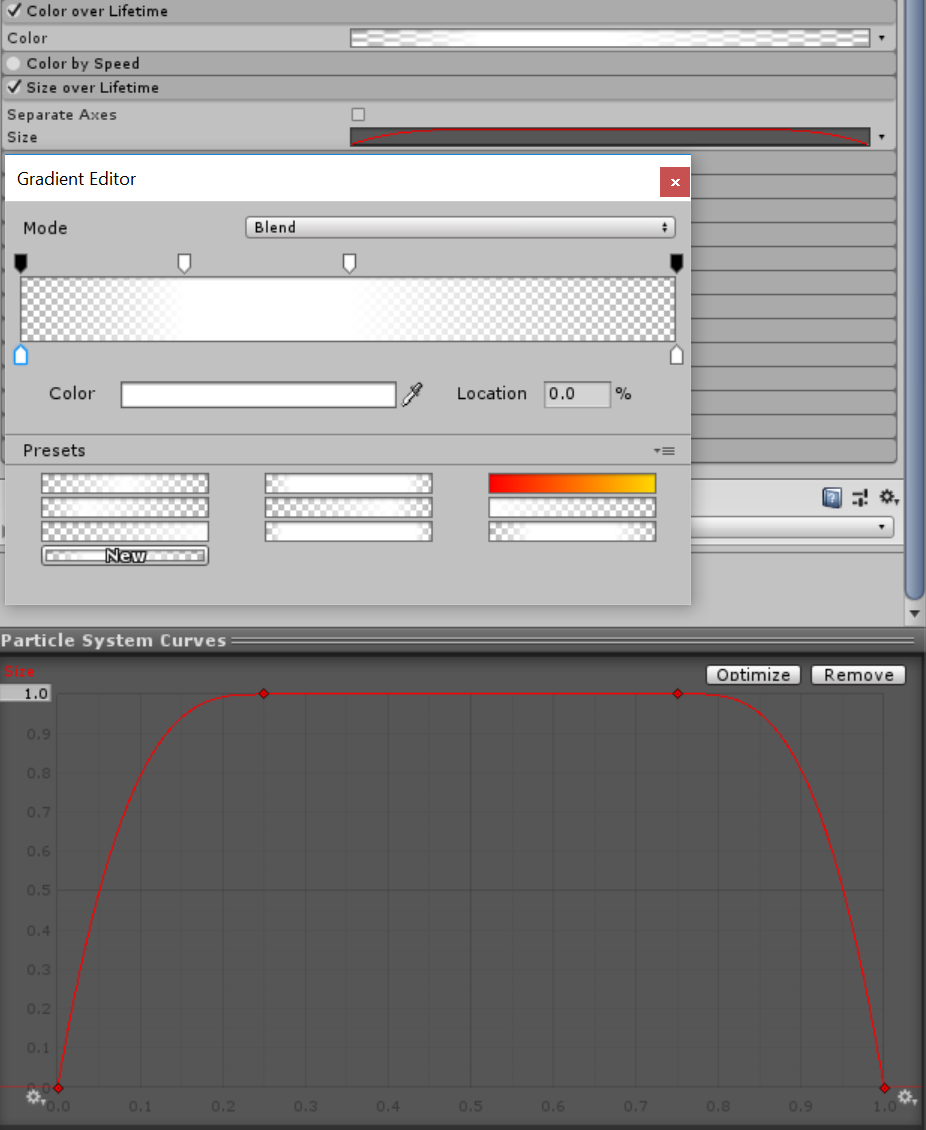
We want the particle to tether off in both size and opacity as they reach the outer rim, so Enable the Color over Lifetime and Size over Lifetime modules, and copy the settings below.
What this essentially does is fade the particles in, hold, and then fade away.
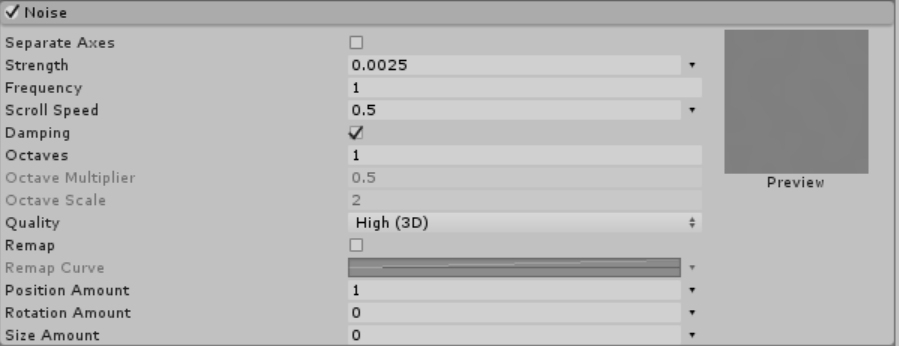
Open up the Noise module, and Change the Strength to 0.0025, the Frequency to 1, and the Scroll speed to 0.5. This’ll smoothly offset the iterations of the spiral coil and animate them slightly over time.
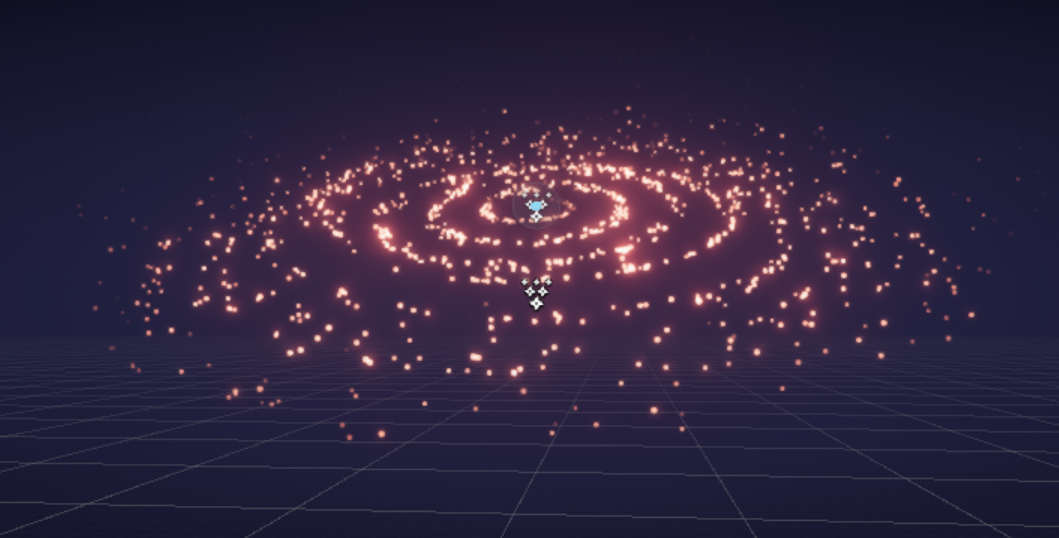
Here’s what you should have now – the completed version of this system.
Part 2 – Inner Small Spiral
This is a smaller, secondary spiral galaxy particle system which will reuse a lot of the same settings. Simply copy and paste the previous particle system object and let’s get started on the effect below.
[IMAGE REMOVED]
We’ll start with changes to the Main module. Increase the Start Lifetime to 100, decrease the Start Size to vary between 0.02 and 0.04, change the Start Color to randomize between two shades of blue, and reduce the Simulation Speed to 0.2.
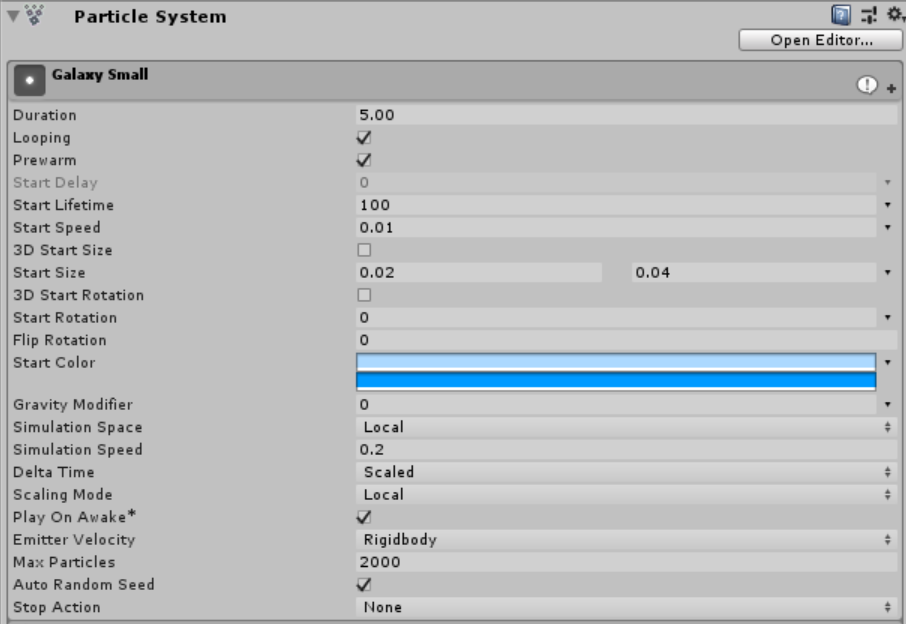
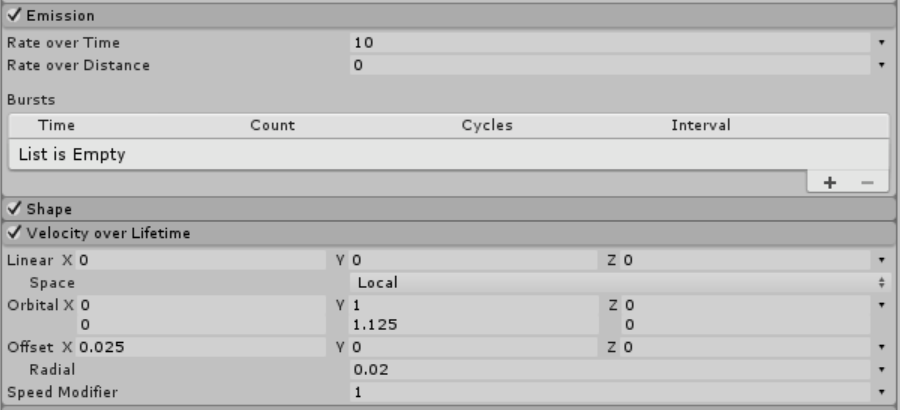
The last changes will be to the Emission and Velocity over Lifetime modules. Reduce the Rate over Time to 10 and the Radial property to 0.02.
Part 3 – Outer Large Spiral
This is going to be be a much larger effect that builds on the previous system to give the overall galaxy effect a sense of scale and natural imperfection. Duplicate the previous systems, and let’s get to work.
[IMAGE REMOVED]
Change the first Start Color to something more tan, increase the second Start Size to 0.05, reduce the Simulation Speed to 0.1, and increase the Max Particle Count to 5000.

Pump up the Rate over Time in the Emission module to 50.

The effect we have now is very dense.

Go to the Velocity over Lifetime module and increase the Radial velocity to 0.2. This will uncoil the spiral some more and have it cover a much larger range.

Increase the Strength in the Noise module to 0.025.

We’ll add some subtle trails on a very small fraction of this system. Enable the Trails module and copy the settings below.
The Ratio and Lifetime are set to 0.005, the Color over Lifetime opacity is 15, the Width over Trail is set to a curve scaled to 0.6, and the Color over Trail is set to a gradient that goes linearly from full opacity, to no opacity.
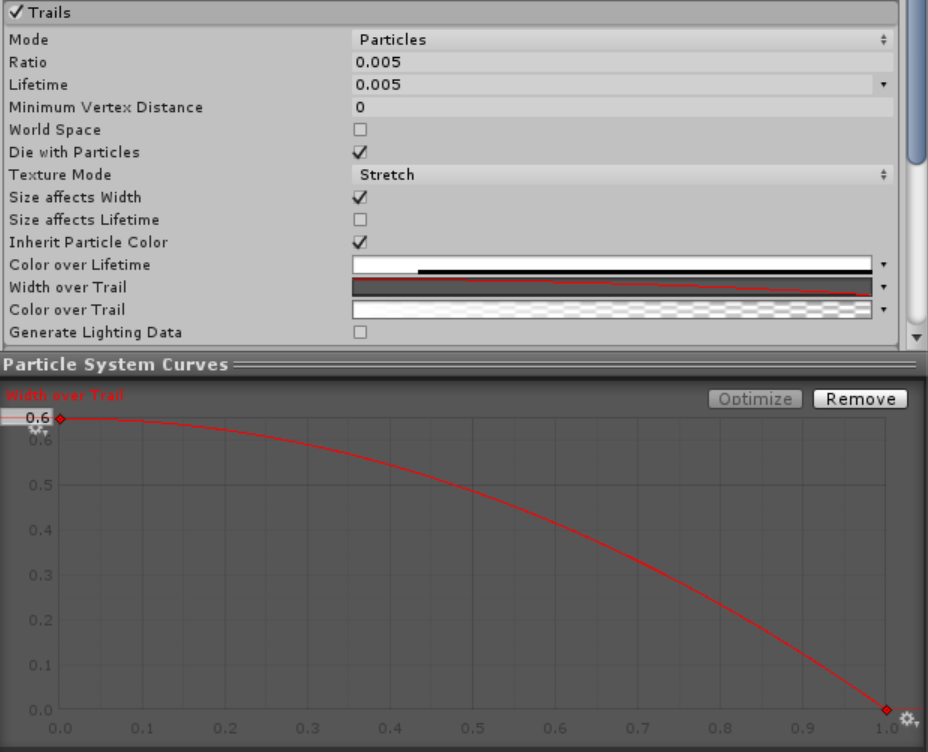
You should now have some ugly, material-less trails.
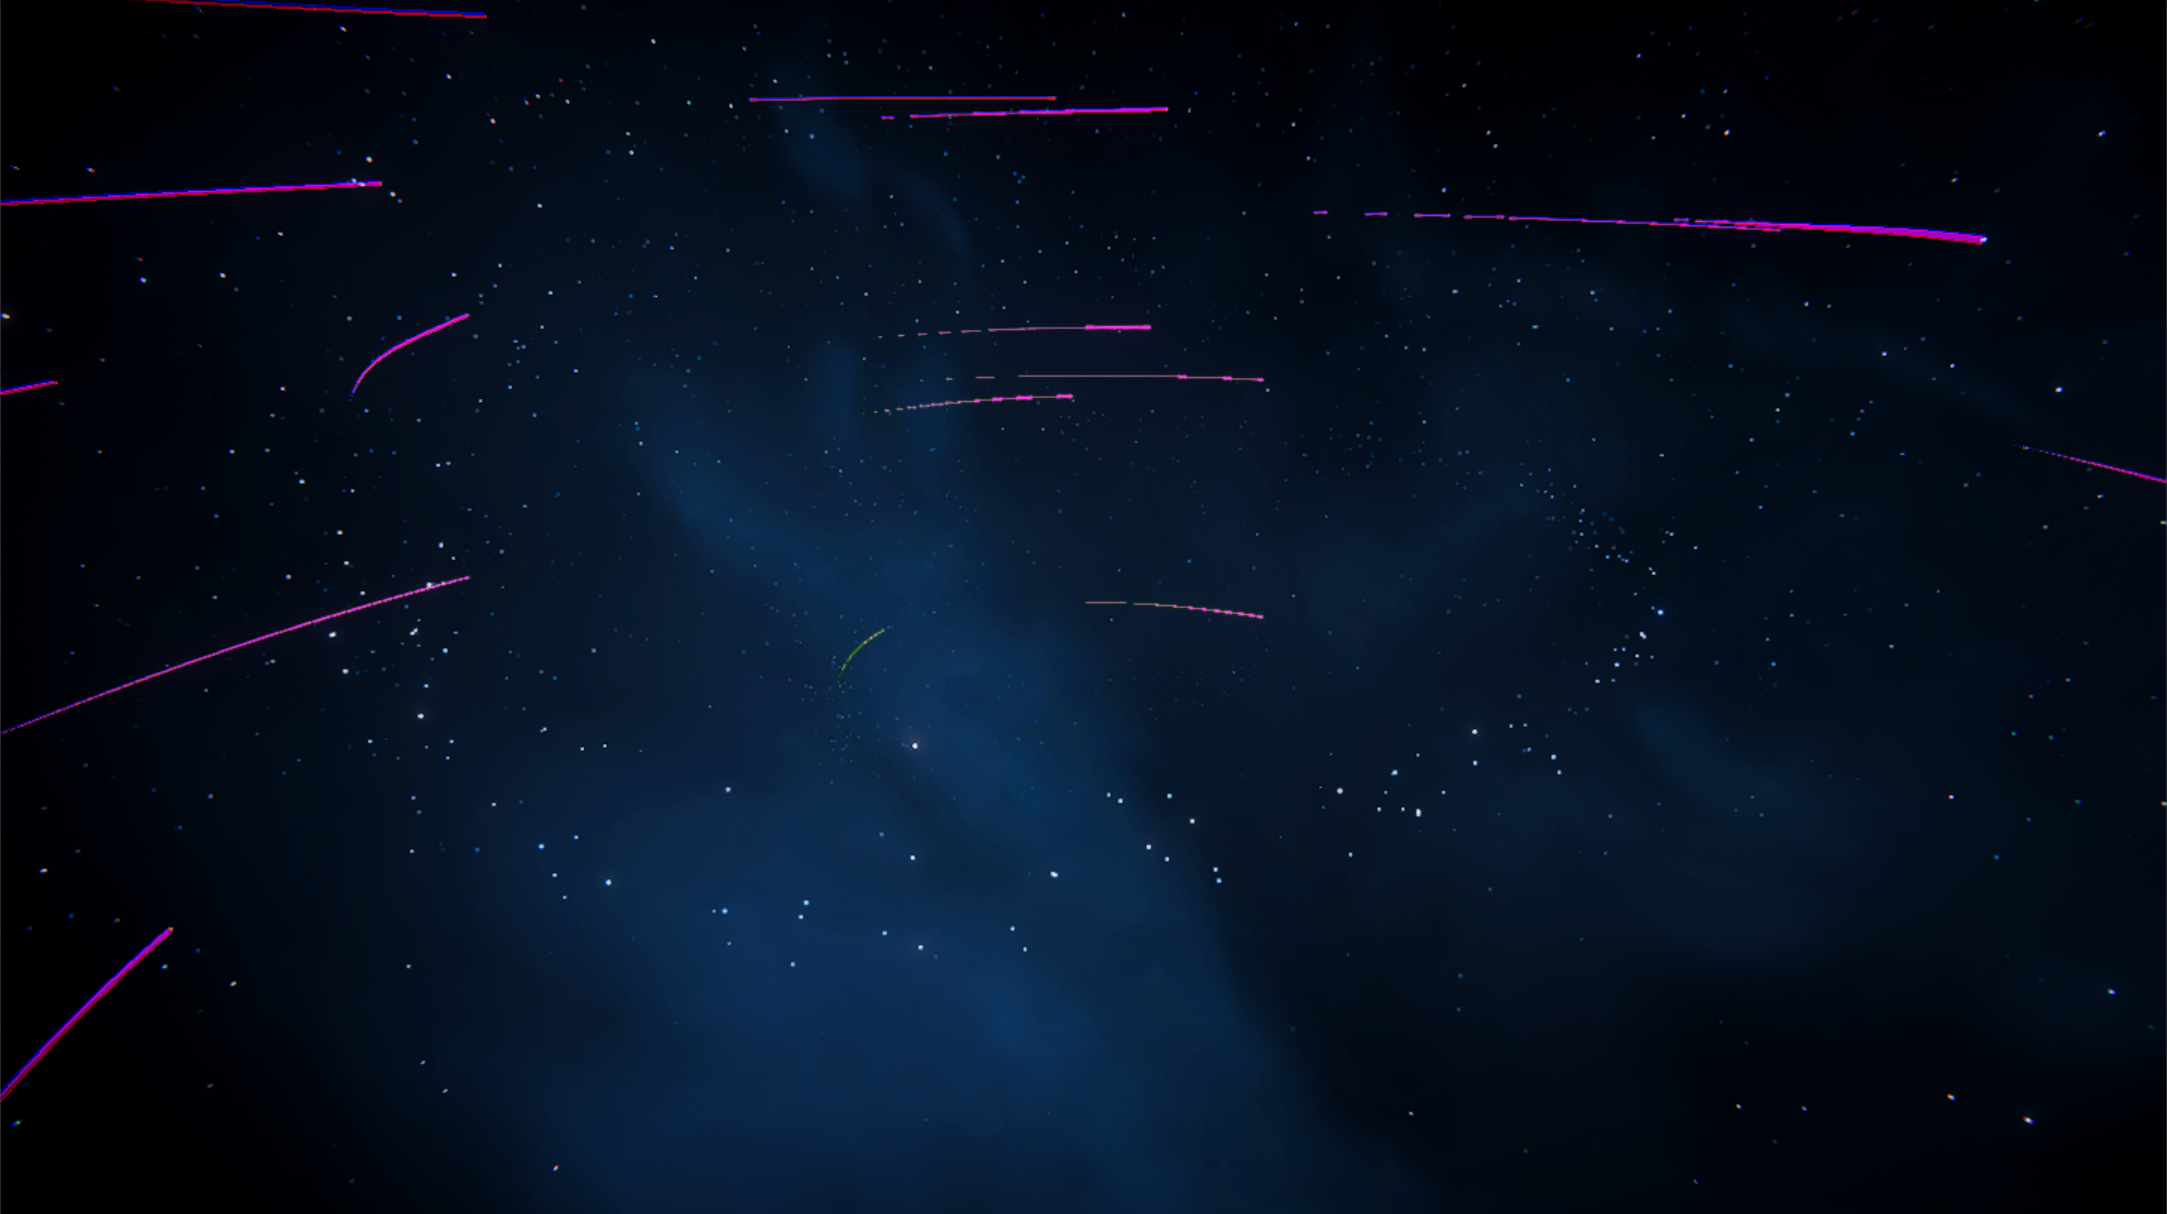
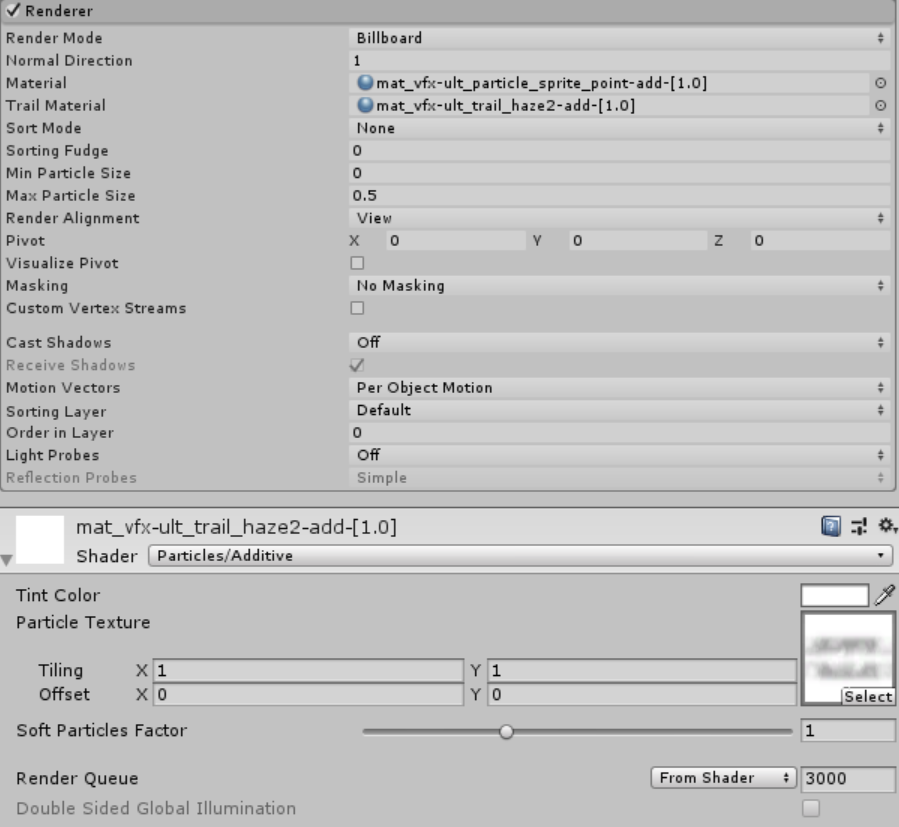
Obviously, the next step is to assign the trail material. I’m using the additive haze2 material from Ultimate VFX below.
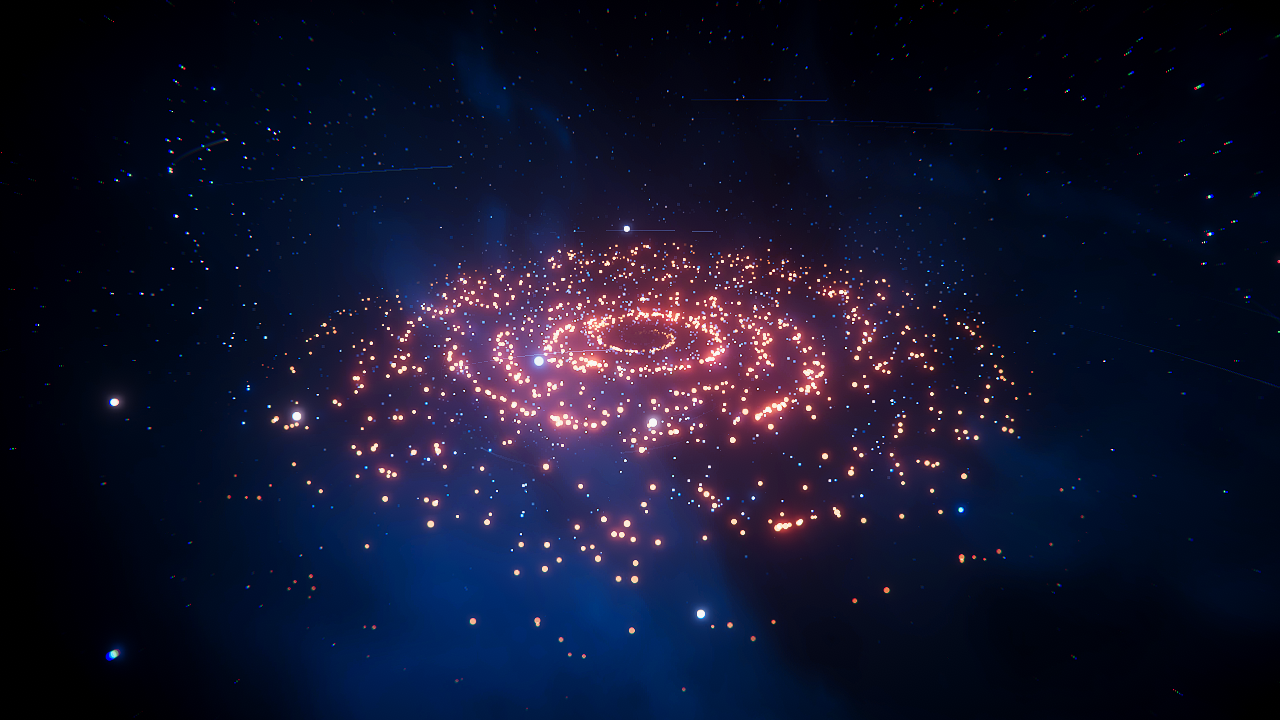
Here’s what you should have so far with all the particle systems combined.
Part 4 – Core Glow
This is a simple particle system that will represent the dense galactic core.
[IMAGE REMOVED]
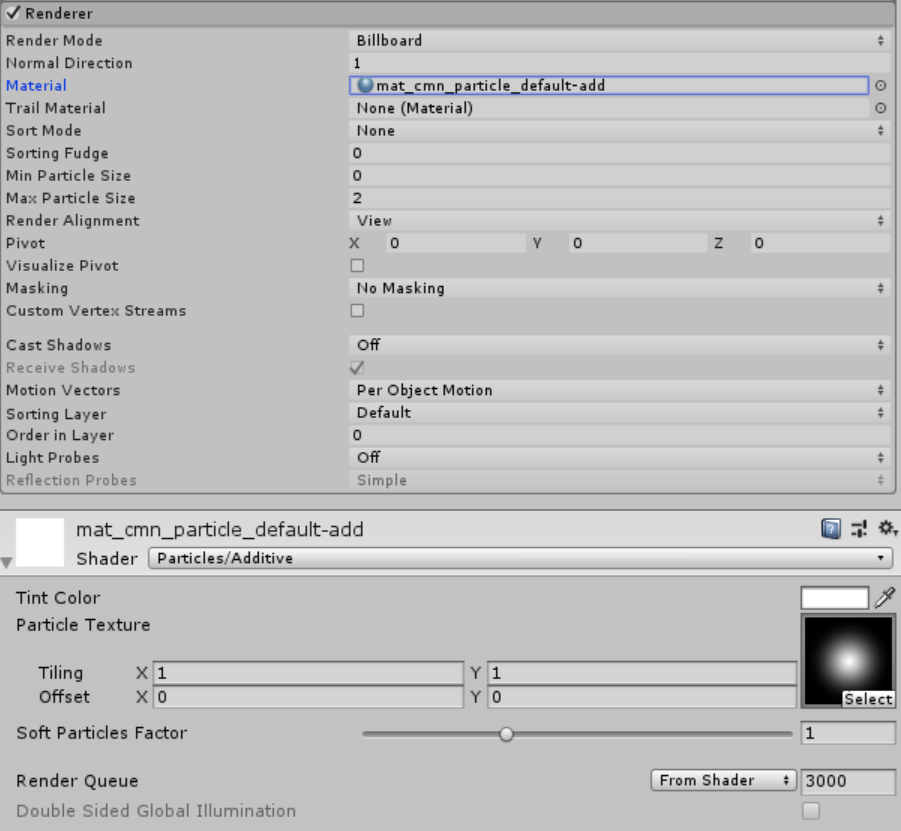
Set the Material to use the default texture with additive blending. Ultimate VFX has a preset material for this.
Set the Max Particle Size to 2. This value controls the maximum space a particle render can take up on the viewport. The default value of 0.5 means that a particle will never be larger than half the size of the viewport its rendered in, and will scale down if the camera is zoomed in so that it remains that way. This is a great way to reduce overdraw since the rendering of transparent pixels can’t be culled the same way as that of those that are fully opaque. In our case, the core will consist of very few particles and needs to remain covering a larger area on the screen in case the camera is zoomed in, hence the value of 2.
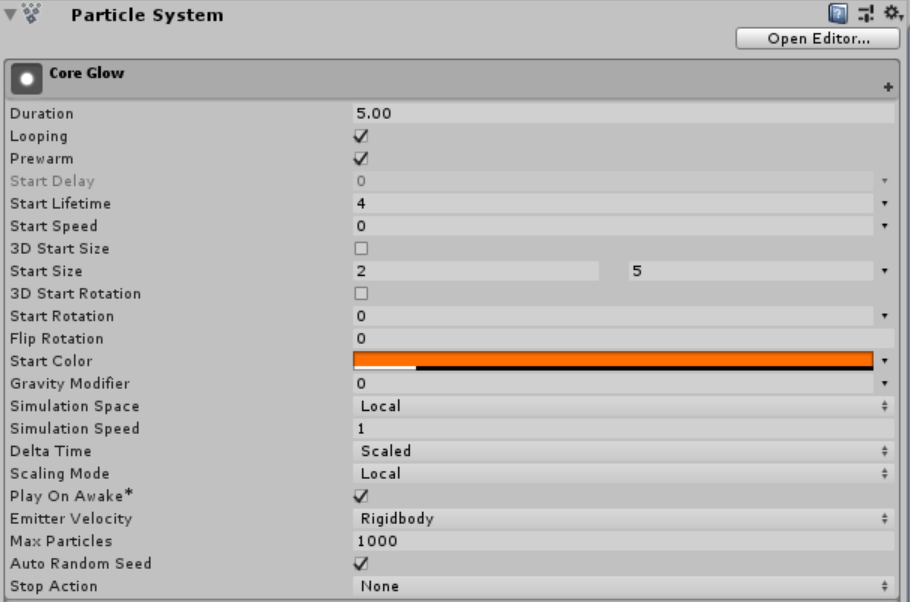
Copy the Main module settings below.
Again, we want Prewarm enabled. Set the Start Lifetime to 4, Start Speed to 0, Start Size to randomize between 2 and 5, and the Start Color to a very transparent orange.
Set the Rate over Time under Emission to 1, and disable the Shape module. We want the area from which particles are emitted to be an infinitely small point.

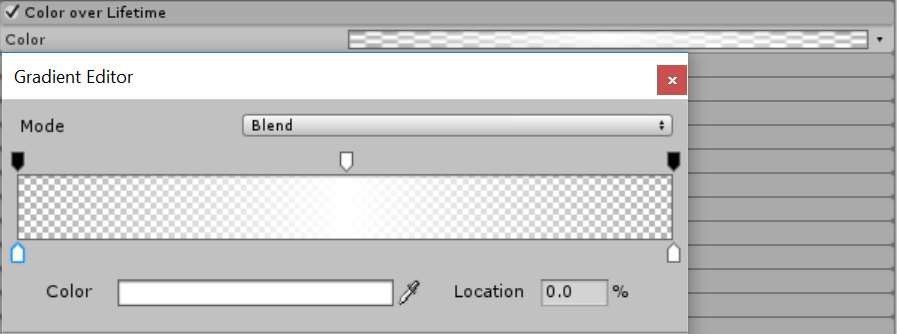
Set the Color over Lifetime module so that particles will fade in and out.
Part 5 – Core Flare
This particle system will be an additional density layer over the core glow. Duplicate the previous system and we’ll start our changes.
[IMAGE REMOVED]
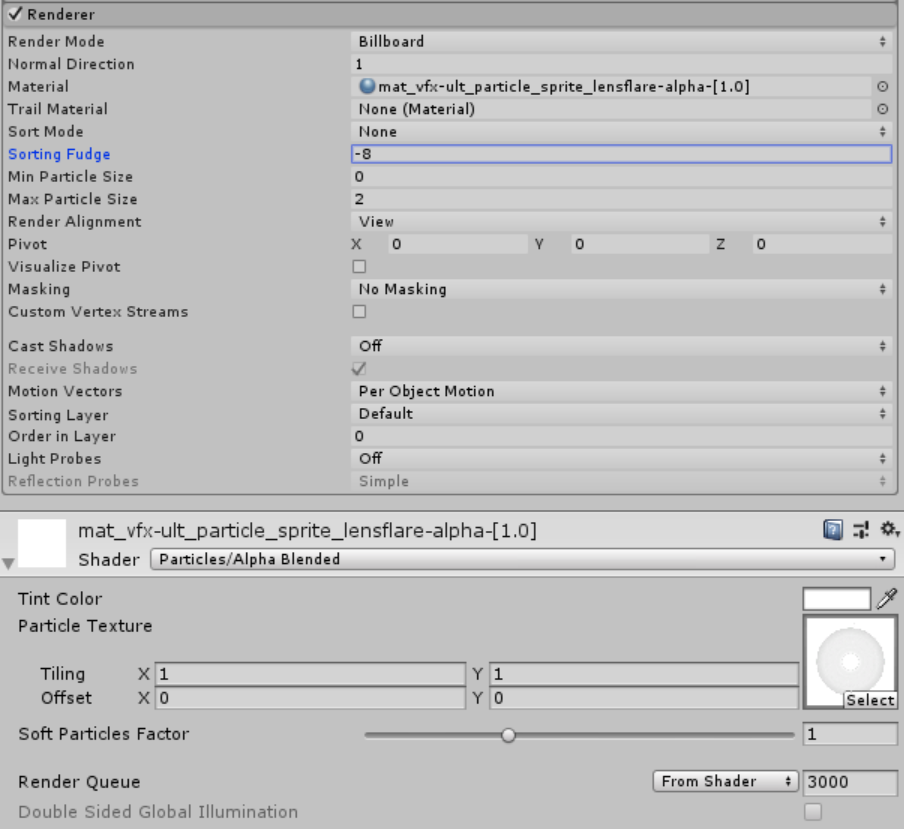
Change the Material to an alpha blended lens flare (see below for the Ultimate VFX preset) and set the Sorting Fudge to -8. The “fudge” value determines the likelyhood of particles in this system being rendered in front of other transparent objects, including other particles.
In the Main Module, decrease the Start Size to randomize between 1 and 2, and double the opacity of the Start Color.

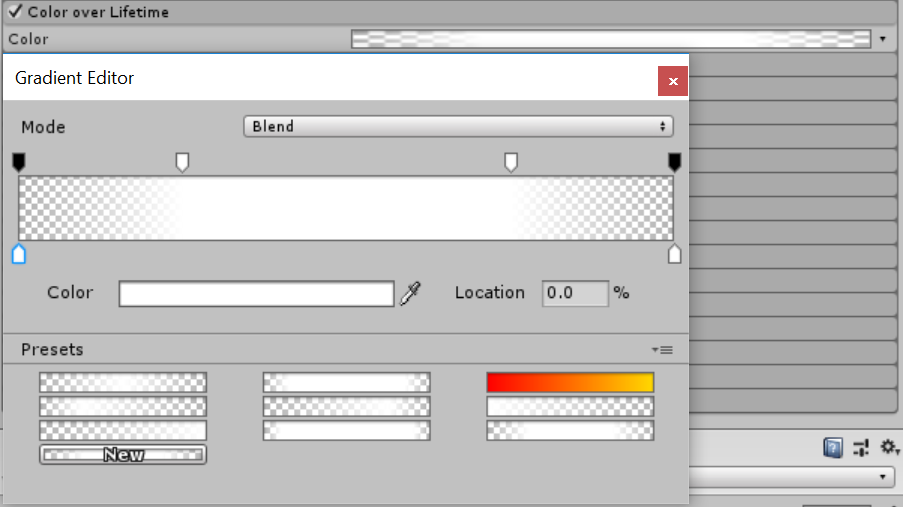
Change the Color over Lifetime so that it fade in, holds for a while, and then fades out.
Part 6 – Core Flare Spikes
This particle system will add more definition to our core flare by adding a “twinkle” effect layered on top. Duplicate the previous system and we’ll start working on our changes.
[IMAGE REMOVED]
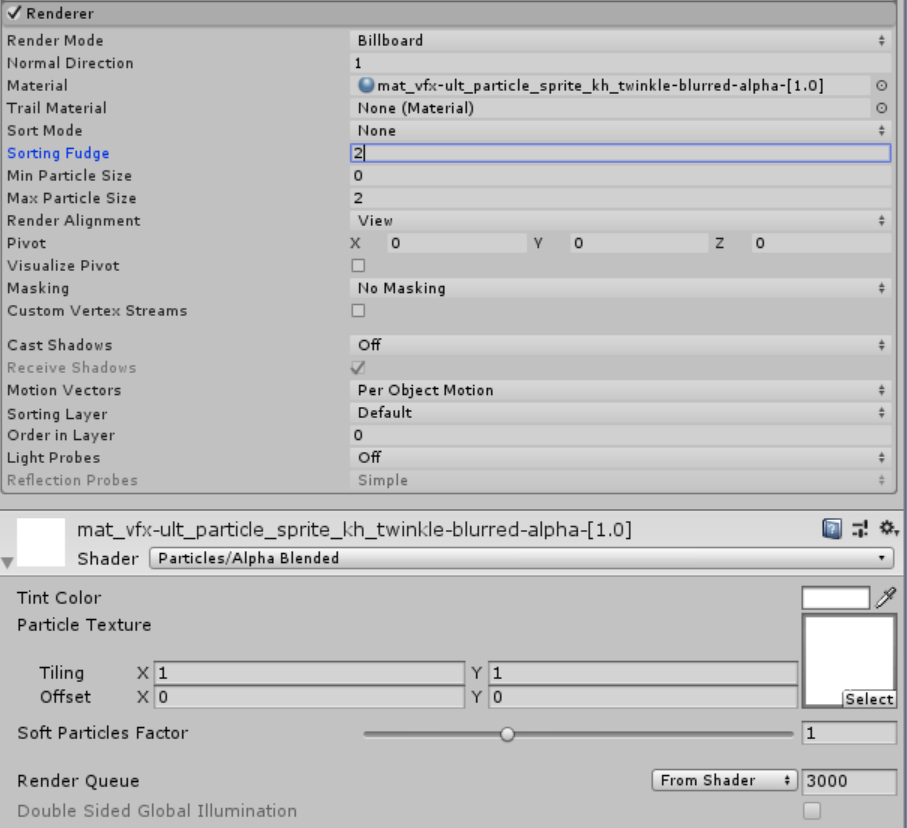
Change the Material to an alpha blended twinkle texture and set the Sorting Fudge to 2.
We’ll change a few things in the Main module. Randomize the Start Lifetime to vary between 3 and 5, the Start Size to 2 and 4, and the Start Rotation to values between -25 and 25.

Copy the changes to the Color over Lifetime and Size over Lifetime modules from below. We essentially want a longer hold time after the particles fade in and before they fade out, with an accelerated expansion.
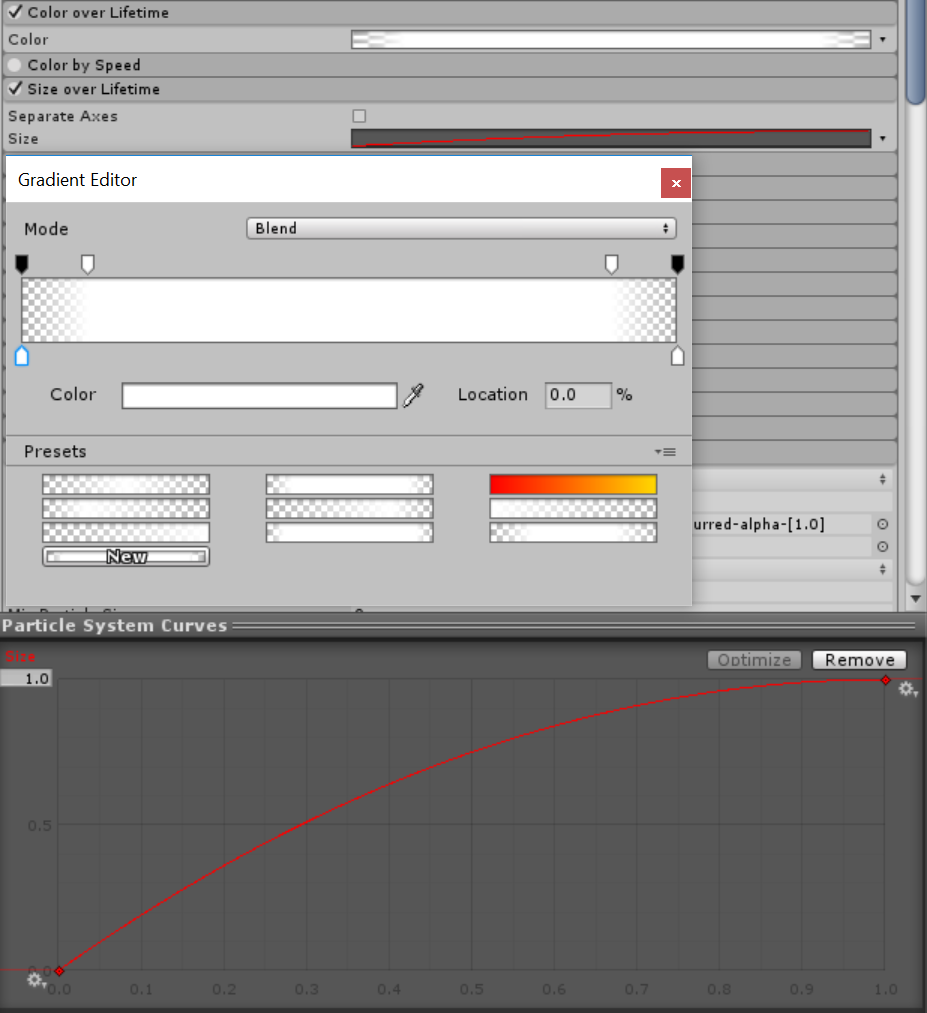
We can add some subtle randomized rotation by editing the Random over Lifetime module to vary the Angular Velocity between -4 and 4.

The core glow, flare, and twinkle systems combined should look something like this.
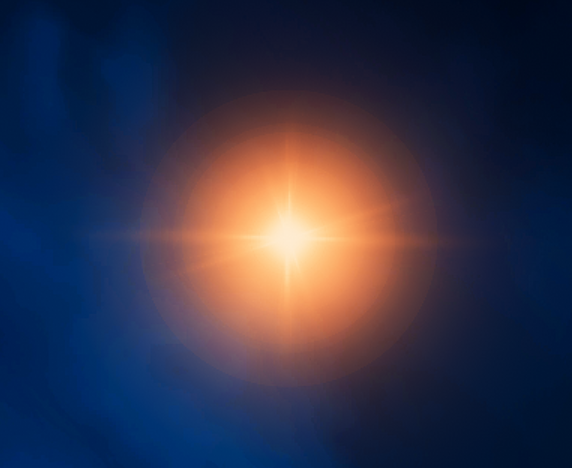
Then, layered with the galaxy systems, you should have something like this. It’s looking pretty good!
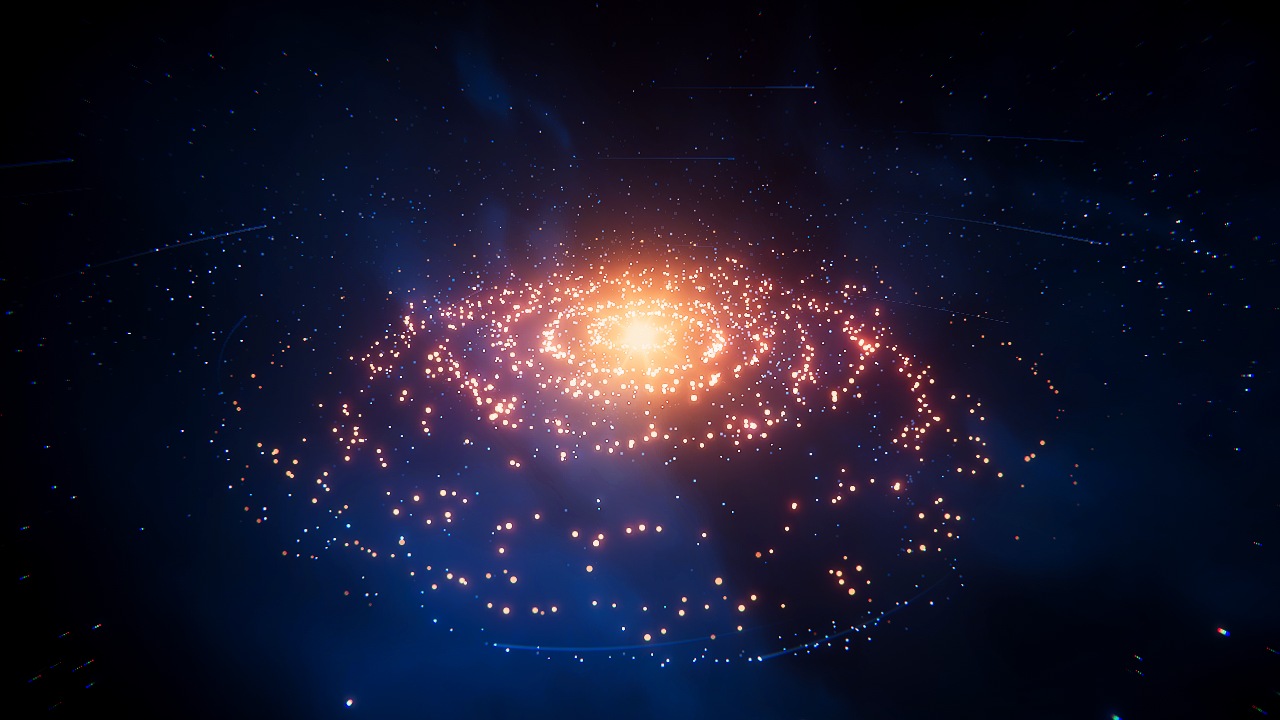
Part 7 – Base Disk
This is going to be a simple, flat particle system to serve as the base of the galactic disk. We’ll duplicate the Core Glow particle system which shares similar settings.
[IMAGE REMOVED]
Change the Start Size to a constant 8, and the Start Color to a highly transparent deep blue.

Change the Emission module’s Rate over Time to 2.

Change the Render Mode to Mesh and set the Mesh to a Quad (one of the default meshes in Unity). Set the Sorting Fudge to -32, and the Render Alignment to Local. The alignment means the particle will fade the direction of the transform. In our case, we want a flat disk, so we need to also set the rotation of the transform.

Set the Transform component’s Rotation X to 90.

Part 8 – Smoke Disk Blue
We’ll add an animated disk with a smokey spritesheet. Duplicate the previous particle system.
[IMAGE REMOVED]
Replace the Material to the realistic smoke burst alpha spritesheet animation and change the Sorting Fudge to 8. The material we have now uses an alpha blended frame interpolation shader, which will smoothly cross fade between the current frame and the next frame over time. We’re using this because the particles of this system will have a much longer lifetime than what the spritesheet frames acount for, and we don’t want to see a jump every time a new frame is selected for the particle by the system. For this shader to work we need to pass in additional data, which we can do by enabling Custom Vertex Streams and adding in the UV2 and AnimBlend streams.
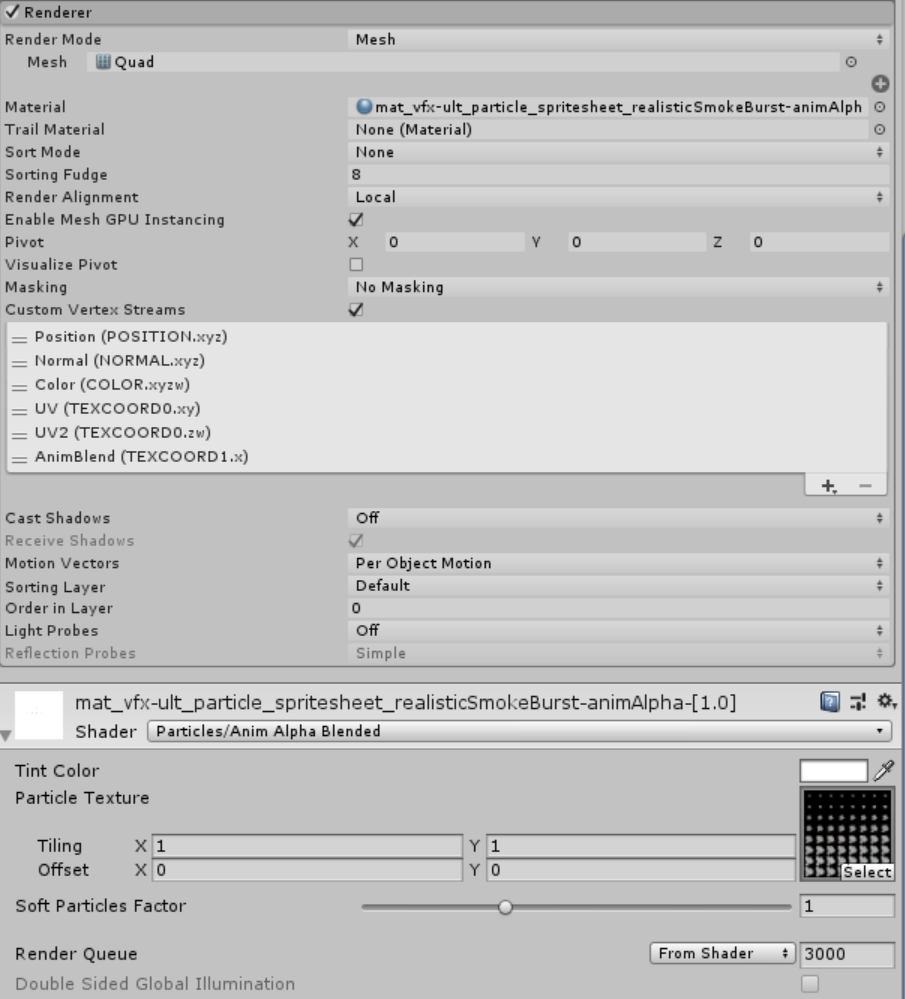
Change the Start Lifetime to 15, randomize the Start Size to between 5 and 8, enabled 3D Start Rotation so you can set a random Z variance between 0 and 360, then and change the color to a very transparent white. The Start Rotation is made 3D because once we enable the Shape module, we’ll need to explicitly specify we only want the rotation randomized around the local Z axis, else the random 2D rotation would cause every axis to be randomized.

Because we haven’t setup this particle system to account for the texture being an 8×8, 64 frame spritesheet, this is what we’ll see.
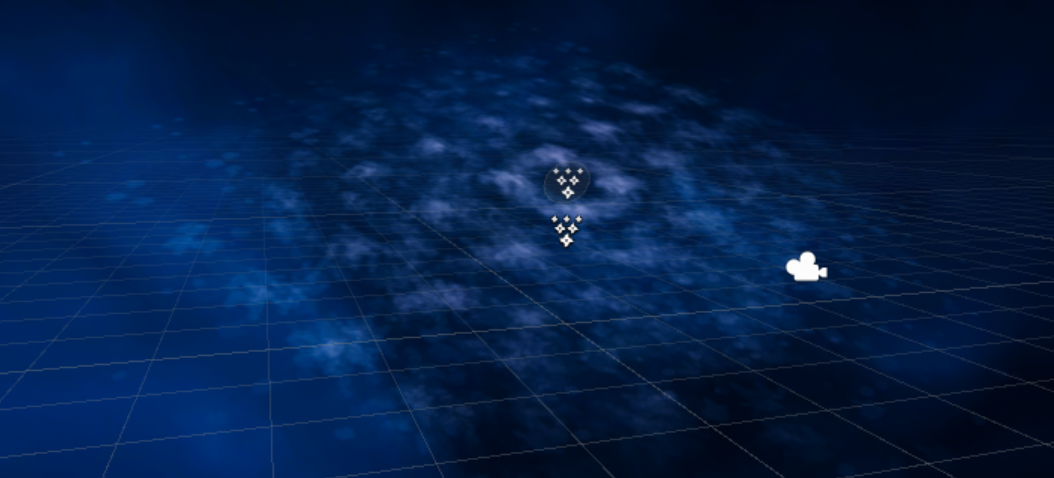
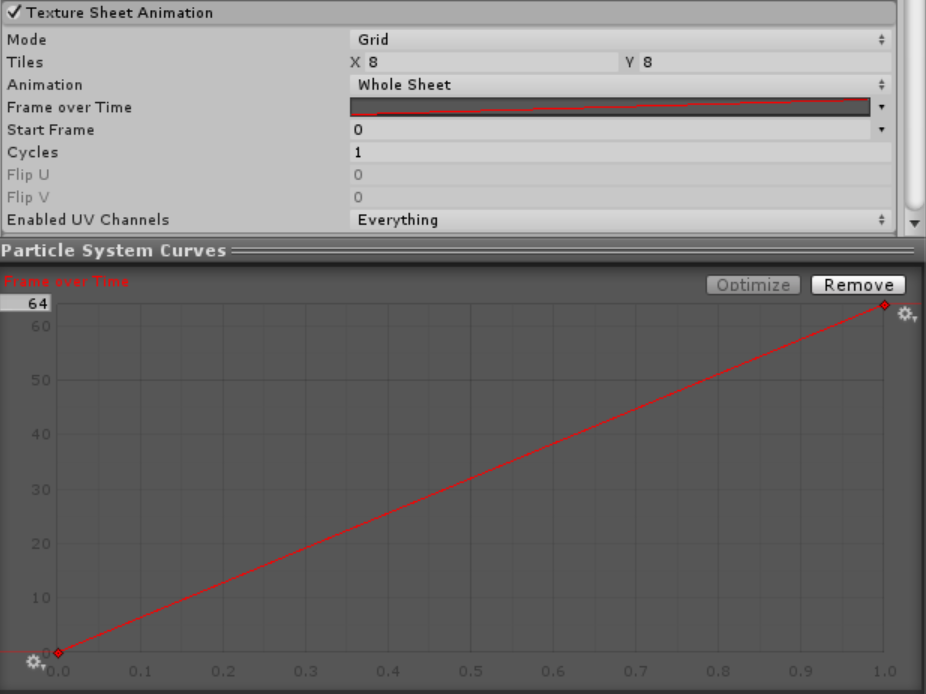
Enable the Texture Sheet Animation module and set the Tiles XY to 8. I also modified the Frame over Time curve slightly so start at a value of 0.05 and with a modified curve, like below.
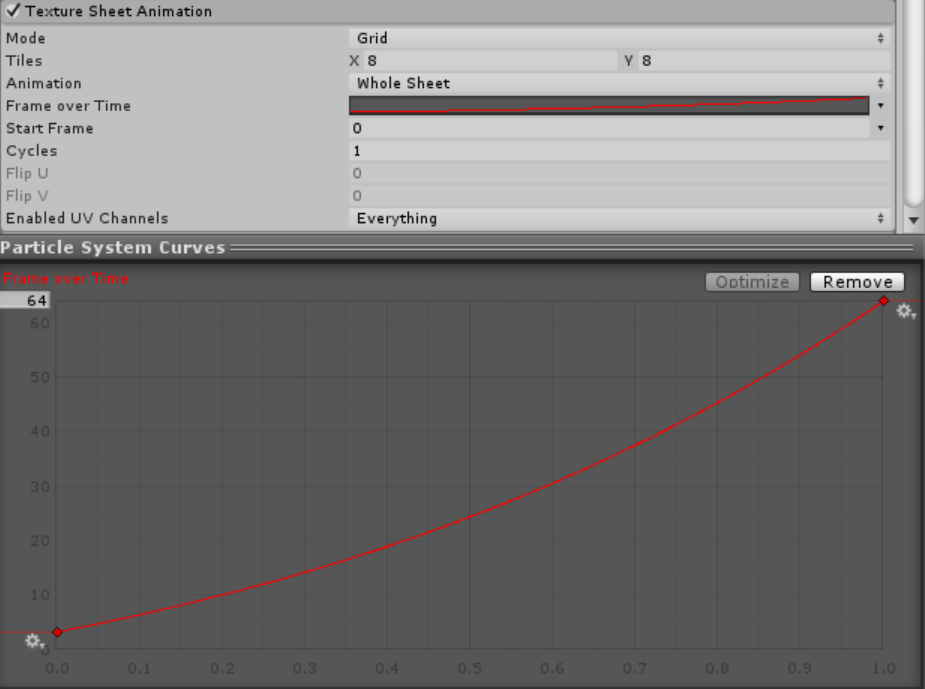
Setting the Tiles to 8×8 should immediately yield the following results. We have our smoke disk, but it’s too dense and won’t mesh well with what we have so far.
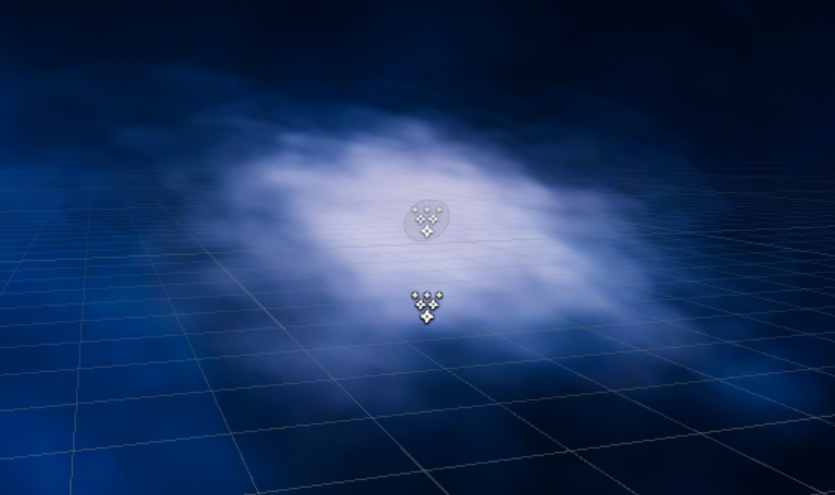
Lower the Rate over Time of Emission to 0.5.

Enable the Shape module and change the Scale to 0.25, 0.25, and 0.05. Remember that this particle system is a copy of Base Disk, which is rotated around its X axis 90 degrees. This will apply a small emission spread along the local X and Y (world XZ), with a smaller distribution on the local Z (the world Y).
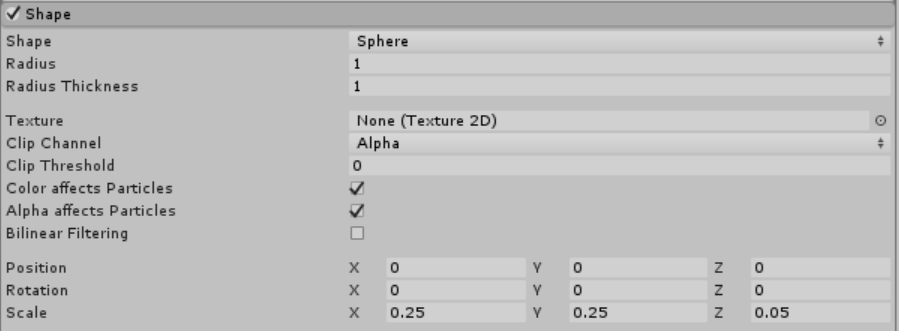
We can now edit the Color over Lifetime and Size over Lifetime modules. I have the color fading in from pure white and fading out towards a milky blue. The Size is animated to uniformly curve upward.
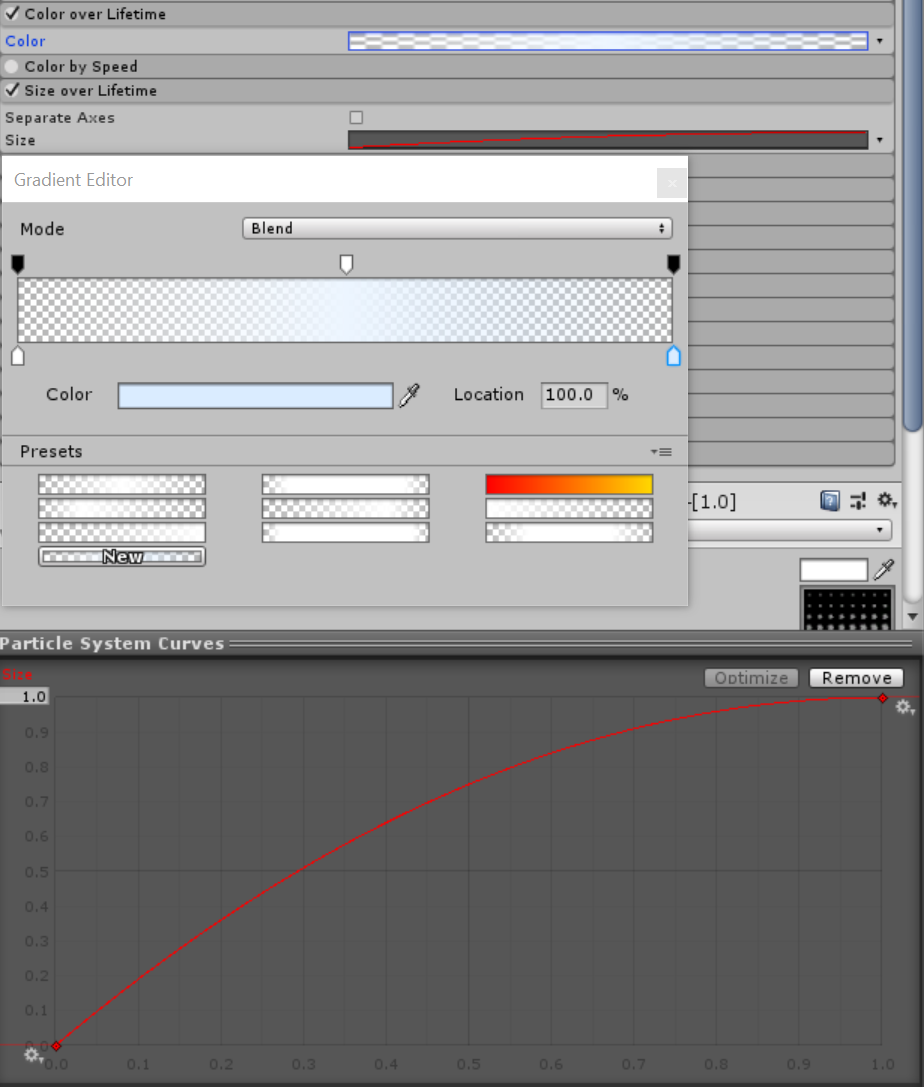
The last change to this particle system is apply some randomized Angular Velocity between -10 and 5 under the Rotation over Lifetime module. This will weight random rotation towards clockwise motion assuming a top-down perspective over the disk.

Part 9 – Smoke Disk Orange
This is a variant of the previous particle system (duplicate it), which is orange-tinted.
[IMAGE REMOVED]
Our first change will be to the Material, which we’ll set to the additive animation blending smoke spritesheet. The Sorting Fudge is -4 so that it layers on top of the other smoke disk.

On the Main module, reduce the Start Lifetime to 10, and increase the Start Size to randomize between 8 and 12. I’ve also set the Start Color to be a Random between Two Colors with varying transparencies for white.

Change the Color gradient end points to animate between a lighter, more tan orange to a darker reddish orange.
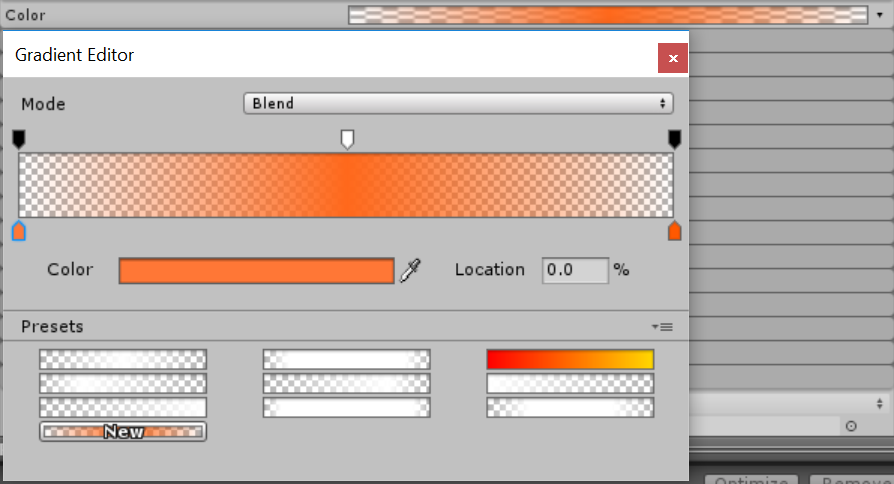
Swap the Angular Velocity randomization values so that it’s now -5 to 10. We want these particles to rotate counter-clockwise – the opposite of the blue smoke disk.

And lastly for this particle system, reset the Texture Sheet Animation module’s Frame over Time curve to be completely linear.
Part 10 – Vertical Flare
I could’ve called this one “Quasar Beam” and it would be an apt naming choice because that’s kind of what this effect mimics. We’ll create an entirely new particle system for this one.
[IMAGE REMOVED]
Set the Render Mode to Mesh, and the Mesh to Quad. We’ll use the additive blurred twinkle sprite material from Ultimate VFX. We want the mesh to face the local transform direction, so set the Render Alignment to Local.

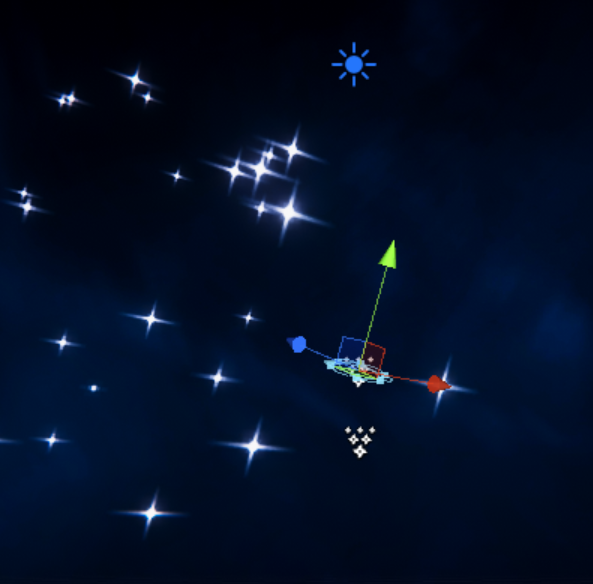
You should end up with something like this (ignore the rotation). This image is also a good reference to the texture for those who aren’t using Ultimate VFX.

In the Main module, Enable Prewarm, set the Start Lifetime to 2 and the Start Speed to 0. We want these particles to be stretched vertically (along the local Y), so enable 3D Start Size and set the XYZ to 0.5, 10, 1 (the Z doesn’t actually matter since a quad is completely flat). Then set the Start Color to a transparent orange.
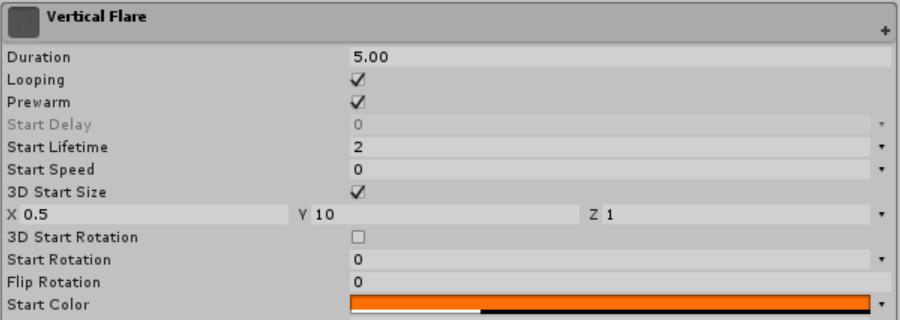
You should now have something like this.
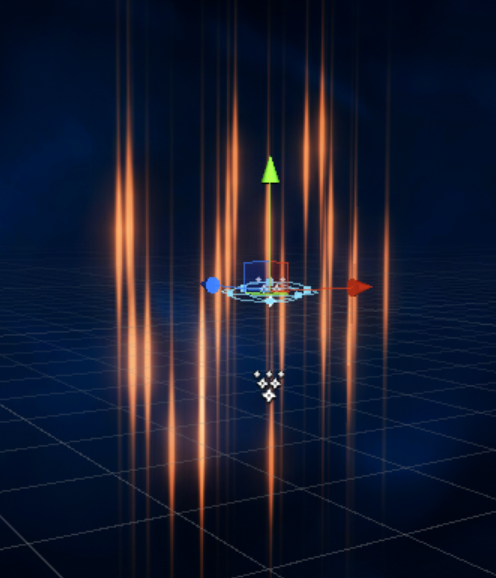
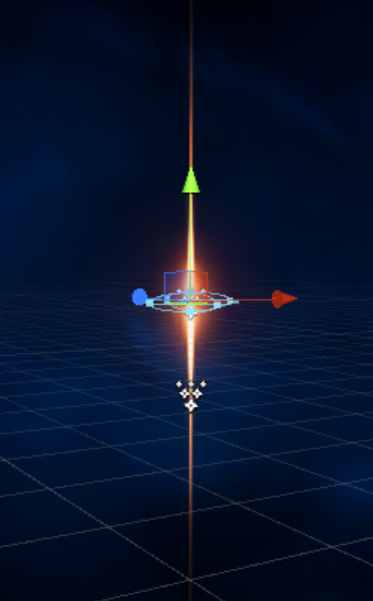
We almost have our flare, but we have too many particles and too much spread. Set the Emission module’s Rate over Time to 2, and disable the Shape module.

There, we have our basic flare/quasar beam shape.
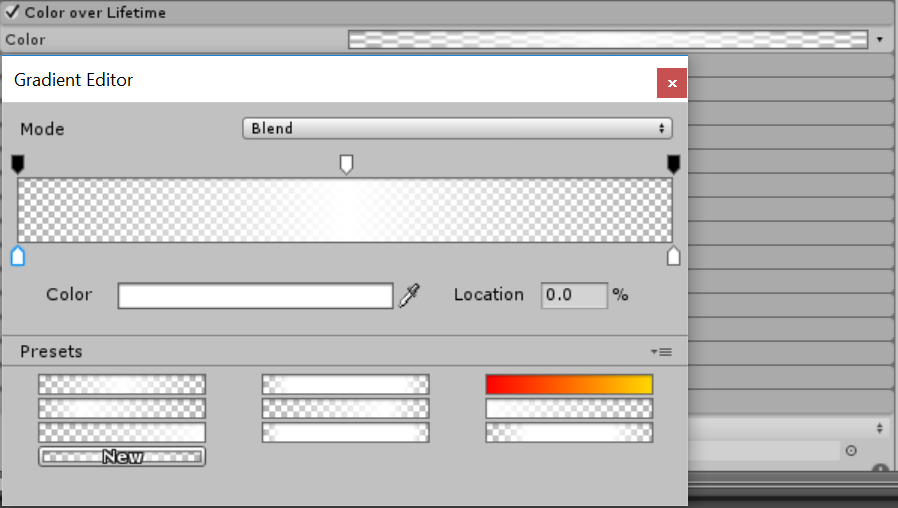
At this point the flare may ocassionally flicker as an older particle is replaced and there’s no smooth transition. We can easily fix this by animating the color to fade in and out. Copy the Color over Lifetime module settings below.
Part 11 – Vertical Flare Flicker
Try saying that five times fast. Although we just removed some unwanted flicker effect on the last system, we do want a special type of controllable flicker applied over the beam to give it a stylized film look. Duplicate the previous system and we can work on some changes.
[IMAGE REMOVED]
O the Main module, change the Start Lifetime to randomize between 0.02 and 0.05. Enable 3D Start Size and randomize the X and Y to be between 0.1 – 0.4, and 5 – 10. Finally, up the Start Color alpha to full.

Randomize the Emission module’s Rate over Time to vary between 1 and 50.

Withthe flare added in you should now have something like this.
Part 12 – Vertical Flare Spinning Embers
These will be the remnant particles cycling around the galaxy’s quasar beam. Create a new particle system.
[IMAGE REMOVED]
Set the Material to use an additive point sprite (the same as the galaxy spiral particles).

Enable Prewarm. Set the Start Lifetime to randomize between 5 and 10. Set the Start Speed to 0.01 (this will give us a subtle randomized spread once the Shape module is configured). Set the Start Size to randomize between 0.05 and 0.125. Set the Start Color to a tannish orange.
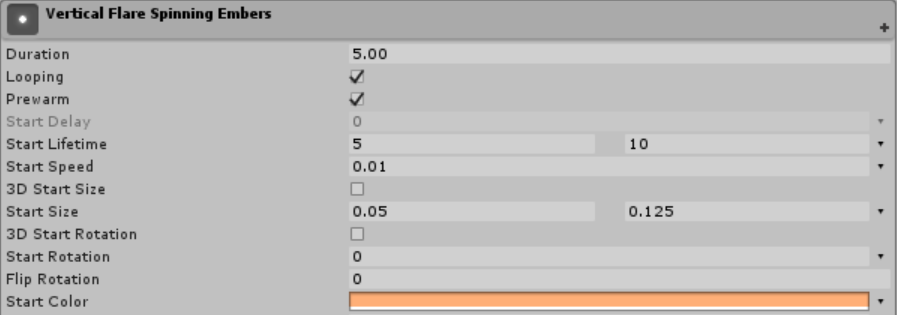
Set the Emission module’s Rate over Time to 5.

We want a point-like emission source. Set the Shape to Sphere, the Radius to 0.01, and the Radius Thickness to 0.

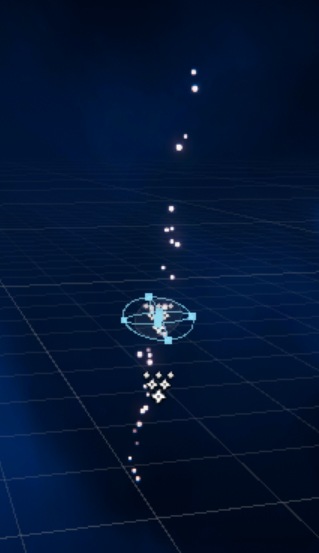
Let’s configure the Velocity over Lifetime module. Set the Linear velocity to randomize Y between -0.25 and 0.25. Randomize the Orbital velocity to vary between 1 and 2. Finally, set the Radial velocity to 0.05.

You should now have the cycling particle beam shape. We just need the particles to have an animated scale and opacity.
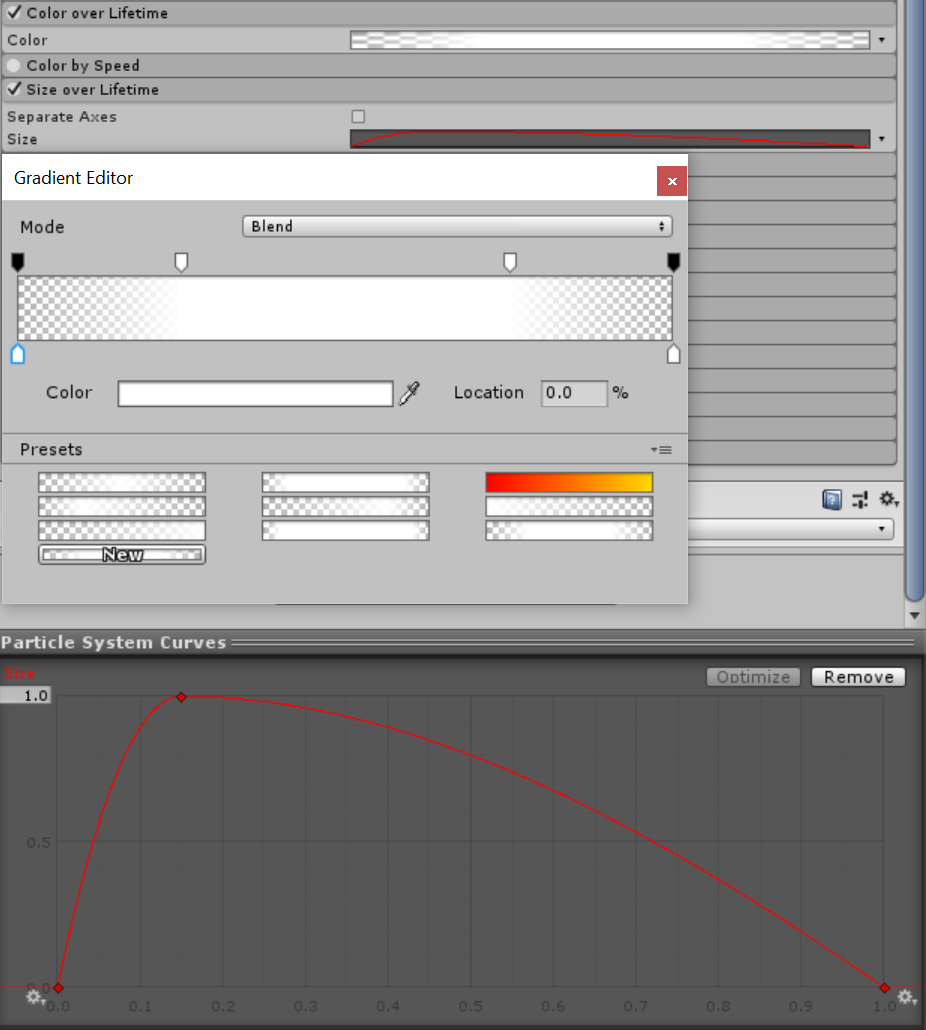
Set the Color over Lifetime alpha to animate in, hold, and then animate out. Set the Size over Lifetime to scale in quickly and then scale out slowly.
Part 13 – Vertical Flare Spinning Embers w/ Trails
Cycling around further out from the spinning embers, we want some streaming trails. Duplicate the previous particle system.
[IMAGE REMOVED]
We only want one change in the Main module, and that’s to reduce the second randomized value for Start Lifetime to 8.
![]()
Reduce the Emisison module’s Rate over Time to 1.

Increase the Shape module Radius to 0.1.

Increase the Velocity over Lifetime module’s Radial velocity to to 0.1.
![]()
Set the Renderer module’s Trail Material to use the additive haze2 trail material from Ultimate VFX. This is the same one used on the large outer galaxy spiral from earlier.
![]()
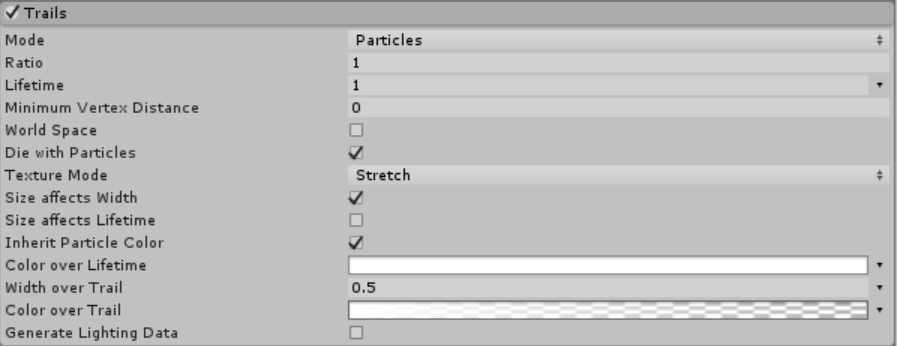
Now we just need our trail to begin rendering. Enable the Trail module. Set the Minimum Vertex Distance to 0, the Width over Trail to 0.5, and set the Color over Trail to a gradient that fades to complete transparency over the trail length.
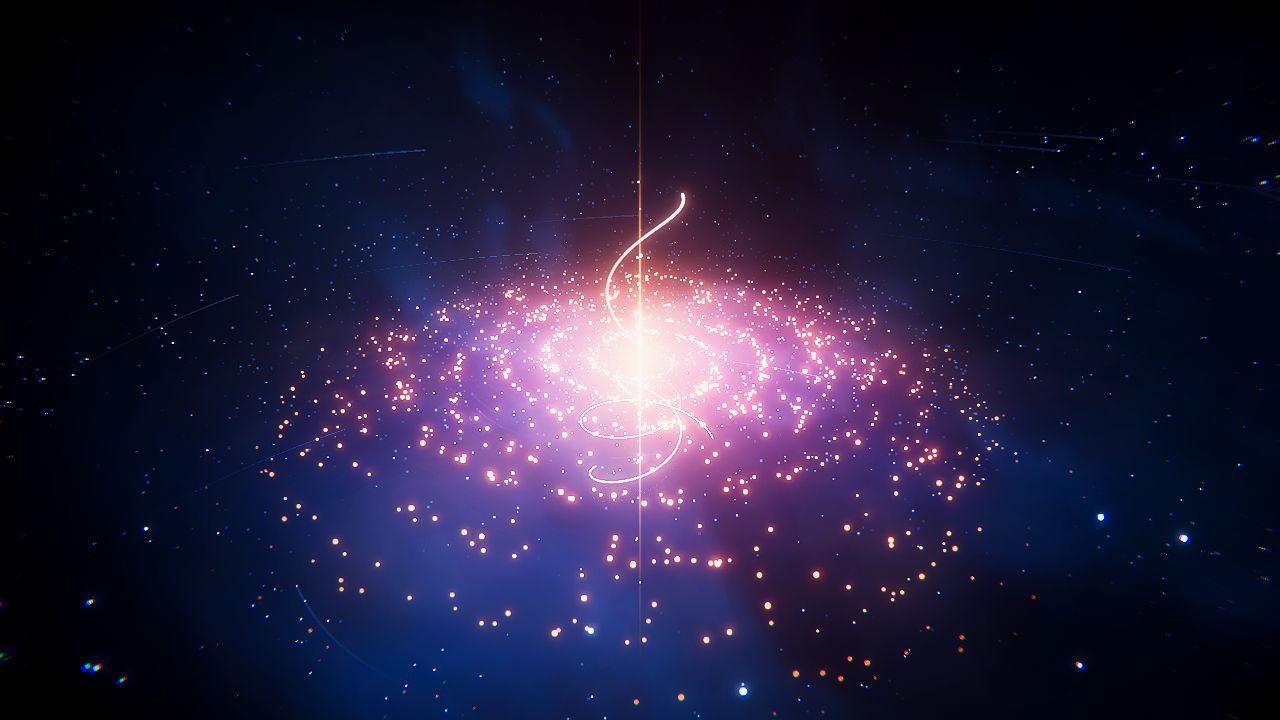
With the trails now added in, you should have something like this.
Part 14 – Sparkles
We’re getting close to the end now, and the galaxy itself is finished. We’ll just be adding in some extra ambient effects to crank up the “glam” to 11, starting with some sparkles. Create a new particle system.
[IMAGE REMOVED]
Note: In the preview above I’ve turned up the emission so it’s clear what the final effect looks like.
Set the Renderer module Material to the additive sparkle sprite from Ultimate VFX.
![]()
Here’s what these look like.
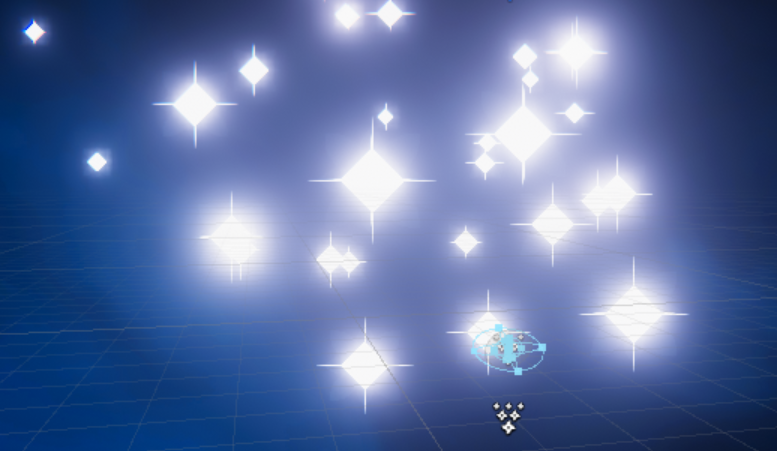
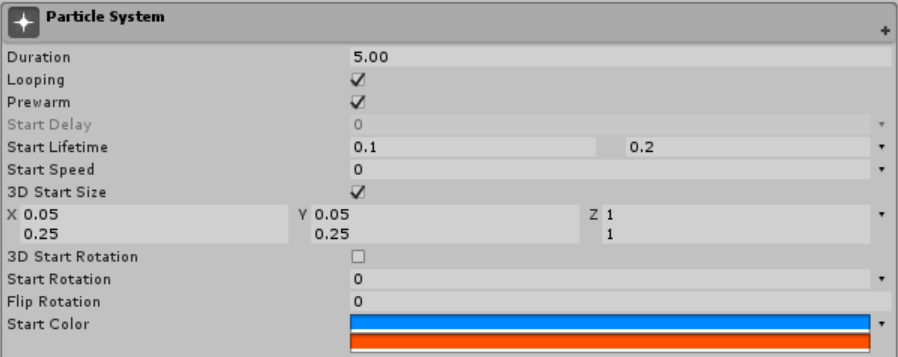
On the Main module, enable Prewarm. Randomize the Start Lifetime to between 0.1 and 0.2. Set the Start Speed to 0. Enable 3D Start Size and randomize the X and Y to 0.05 – 0.25. This will cause the particle to randomly squash and stretch, like some weird twinkling stars. Set the Start Color to randomize between blue and reddish orange.
Set the Emission module’s Rate over Time to 5.

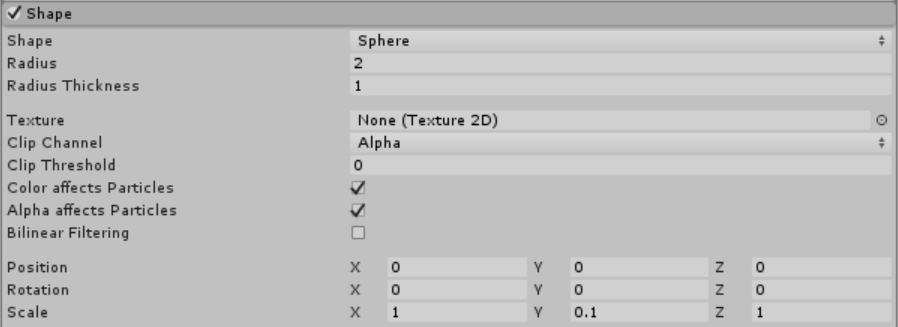
Let’s work on the Shape module. Set the Shape to Sphere with a radius of 2. We want the particle emitter shape to be a thin disk, but not entirely flat, so set the Scale Y to 0.1.
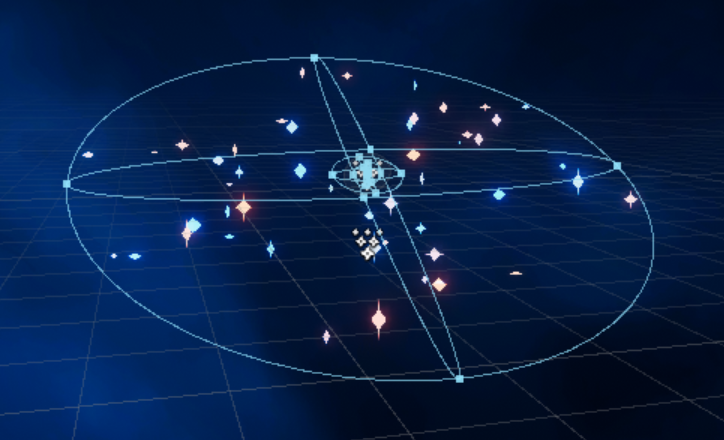
Here’s what the emitter look like. Ignore the number of particles, I only turned that up to demonstrate the spawn area.
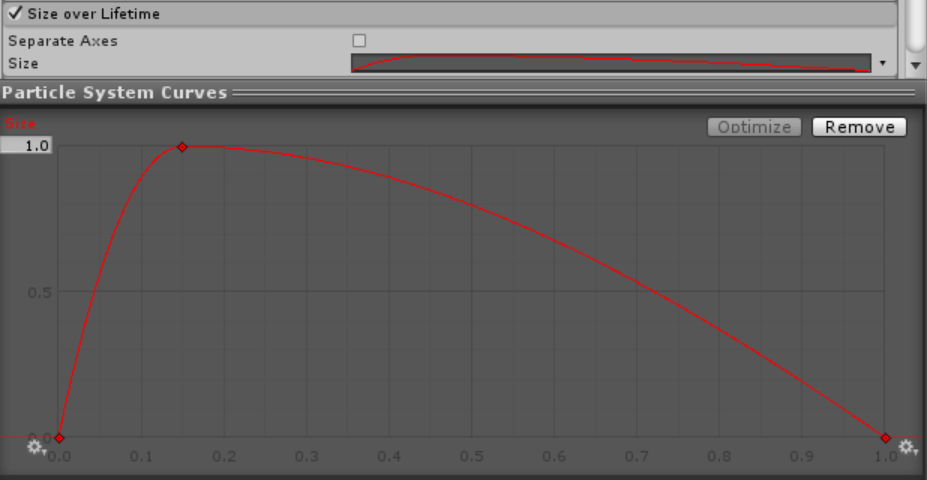
Enable the Size over Lifetime module and set the Size to animate like below. A quick scale in, and a slow scale out.
Part 15a – Electric Bursts
Why does a galaxy have random electric bursts? Who can say. But it looks cool, and it’s the last piece of the galaxy effect (although it does have an additional sub-system…). Create a new particle system.
[IMAGE REMOVED]
Note: In the preview above I’ve turned up the emission so it’s clear what the final effect looks like.
This is going to be an entirely trail-based effect. Set the Renderer module’s Render Mode to None. Assign the Trail Material to the additive solid glow trail material from Ultimate VFX.

We want to be able to preview this effect while we work on it, so let’s enable and configure the Trail module right away.
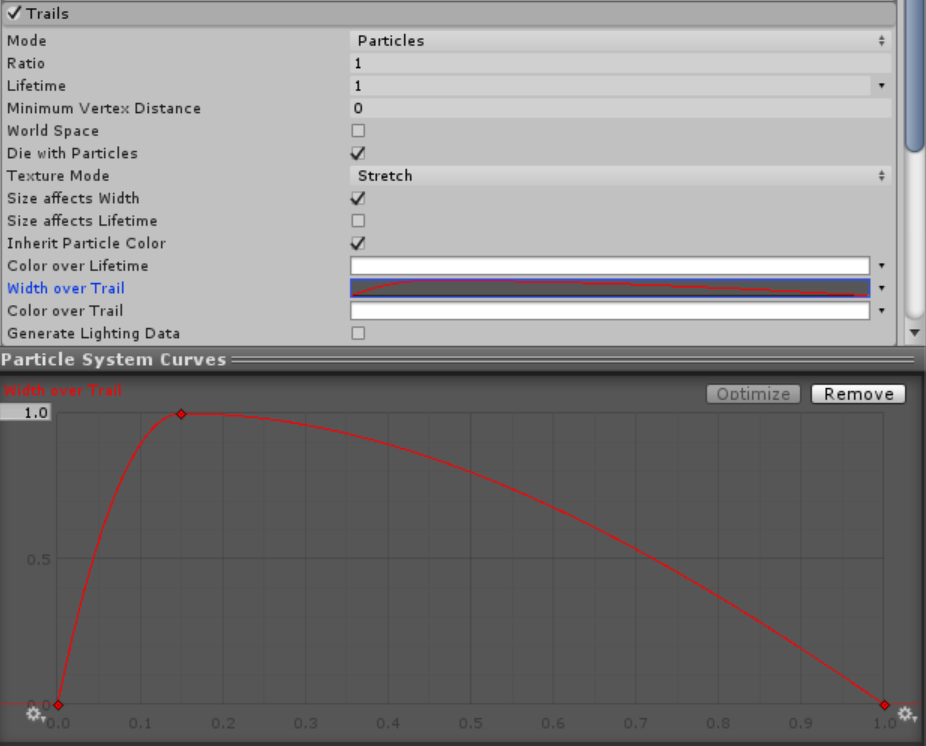
Set the Minimum Vertex Distance to 0 and the Width over Trail to the Curve type which scales in quickly and scales out slowly. This essentially creates a soft spear/droplet shape for the trail head.
Next, we’ll work on the Main module.
Enable Prewarm (as usual for all new systems…). Randomize the Start Lifetime to between 0.1 and 0.25. Randomize the Start Speed to between 2 and 5. Randomize the Start Size to between 0.01 and 0.05. Randomize the Start Color to between some weird blue and orange.
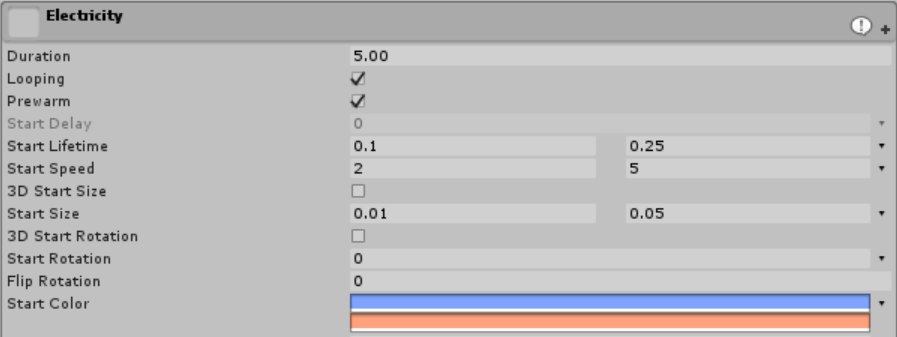
We want the occurence of these electric bursts to be rare and spontaneous. Set the Rate over Time to randomize between 0.4 and 0.8.

The shape should be pancake-like with the actual emission area hollowed out at the very center (so no particles spawn there). Set the Shape module’s Shape type to Sphere. Set the Radius to 2.5, and the Radius Thickness to 0.8.
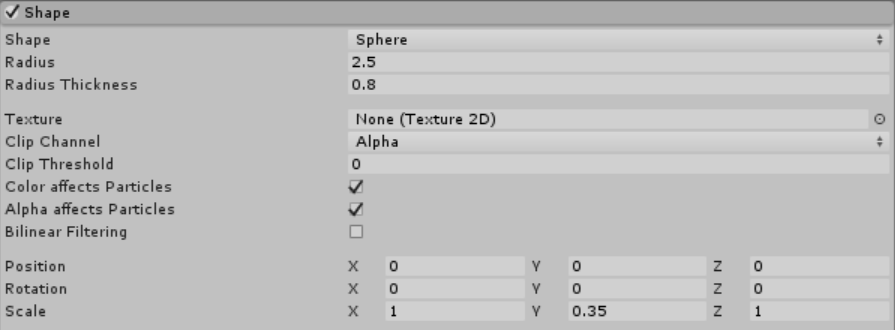
We can use the Noise module to create some chaotic movement which will cause the trails to render like electric bursts. Randomize the Strength between 5 and 15, set the Frequency to 2, and the Scroll Speed to 10.

At this point, the electric burst trails might be too long. We can use the Limit Velocity over Lifetime module to slow down the particles rendering the trails.
Set the Speed to randomize between 0.2 and 0.8 and the Dampen to 0.5.

Part 15b – Lens Flare (Electric Burst sub-system)
This is a continuation of the Electric Burst particle system.
[IMAGE REMOVED]
Note: In the preview above I’ve turned up the emission so it’s clear what the final effect looks like.
We want a small flare particle accompanying the electric burst, and we can use the Sub Emitters module to do that. Click on the little plus sign that you’ll see next to the circle on the particle system slot and a new particle system will be created as a child of the current one which you can rename. In the image below, I’ve called it “Lens Flare”. Then set the Inherit mode to Color. This will set the base tint of all sub-system particles to the color of the parent particle that spawned it.


On the new sub-emitter particle system, set the Renderer module’s Material property to a softer additive point sprite.
![]()
We can work on the Main module next.
For once, we don’t need to touch Prewarm on a new system. We can leave Looping enabled since particle emission is controlled by the parent (disabling it won’t have any effect either).
Set the Start Lifetime to randomize between 0.05 and 0.1. Set the Start Size to randomizr between 5 and 15. Set the Start Color to randomize between different transparent whites.
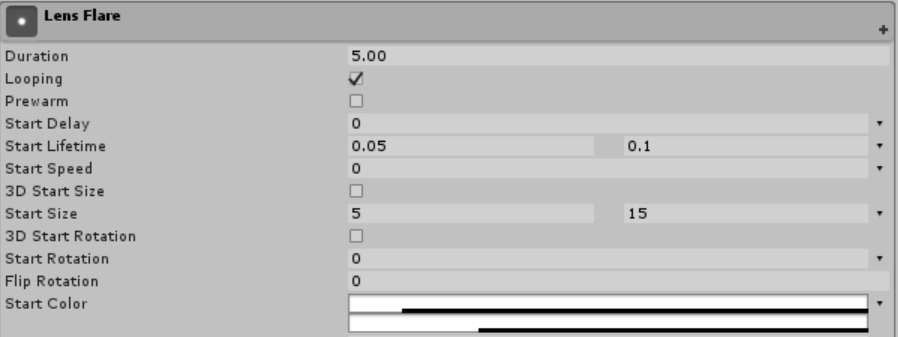
We only want a single “flare” particle emitted per electric burst. Set the Emission module’s Rate over Time to 0 and add in a new burst (click the plus icon). Set the count to 1.

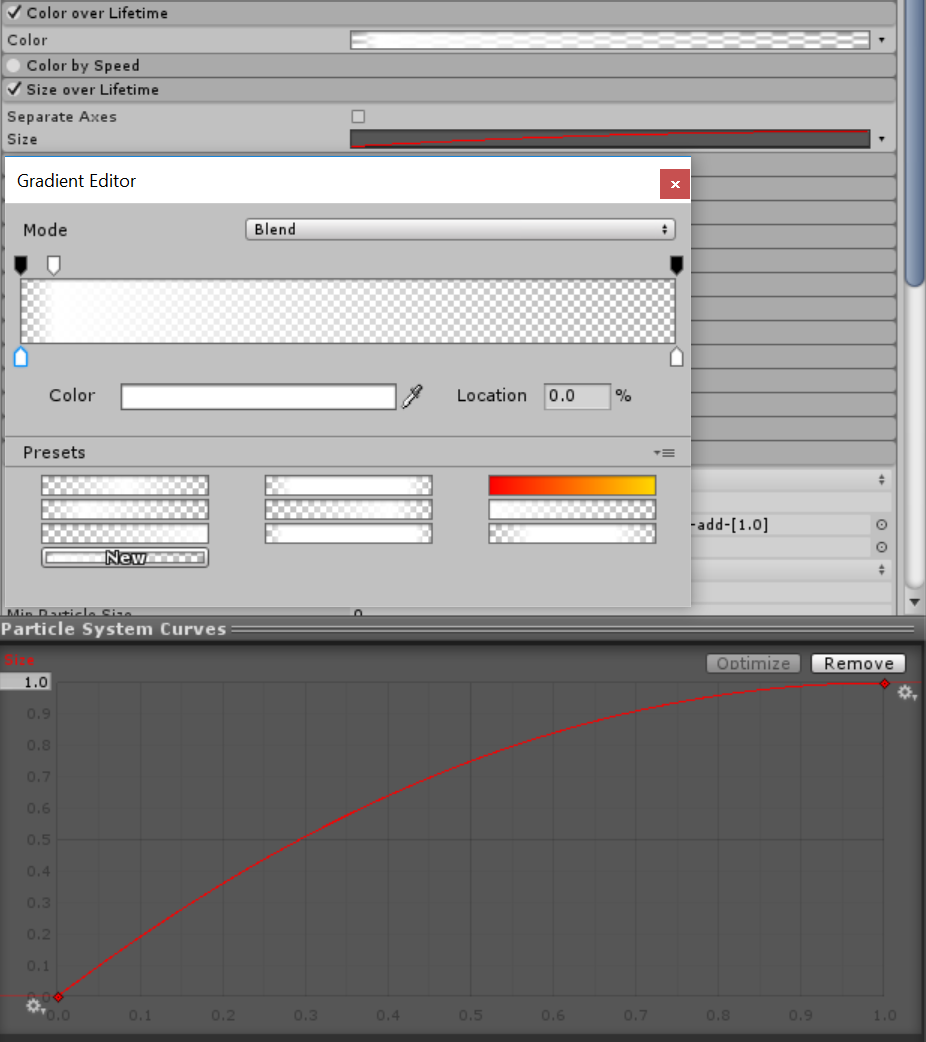
Finally, set the Color over Lifetime to fade in very quickly and then slowly animate out the transparency. For Size over Lifetime, set the curve so that particles will scale in quickly over their lifetime.
Part 16 – Putting It All Together
We’re done with the actual effect. We can now assemble every piece into a new “folder” particle system which has all modules disabled. You can use this to play the entire effect and scale it together.
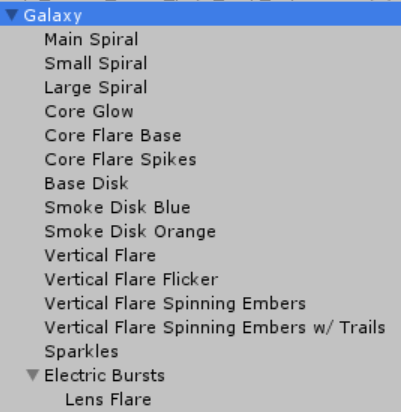
If you want to scale the entire effect using the root particle system object, simply select all the particle systems and set the Scaling Mode under the Main module to Hierarchy.

And that’s it! Hope you enjoyed the tutorial and learned a bunch of new things about Shuriken – Unity’s particle system.
[IMAGE REMOVED]
Thanks so much for all the amazing tutorials!